
Snowflake is a powerful cloud data platform, and effectively monitoring audit events and query history is crucial for security and compliance. While Snowflake offers various methods for accessing this data, leveraging Cribl Stream's REST Collector with the Snowflake SQL API provides a flexible and efficient way to ingest, standardize, and route this valuable information to your preferred systems of record.
This blog will guide you through the process of configuring Cribl Stream to pull Snowflake audit events and query history, transforming them into a clean, key-value pair format suitable for any SIEM or log analytics platform.
Why use Cribl Stream for Snowflake Audit Data?
Cribl Stream acts as a powerful pipeline for your data, offering several advantages when collecting Snowflake audit data:
Flexibility: Use the REST Collector to interact directly with the Snowflake SQL API, giving you granular control over your queries.
Normalization: Easily transform complex JSON outputs from Snowflake into a standardized key-value format.
Routing: Send processed data to multiple destinations, including SIEMs, data lakes, or other analytics platforms.
Filtering & Sampling: Reduce noise and optimize storage by filtering out irrelevant events or sampling high-volume data.
Prerequisites
Before you begin, ensure you have the following:
Cribl Stream Instance: A running Cribl Stream instance with appropriate licensing.
Snowflake Account: Access to your Snowflake account with sufficient permissions to query
SNOWFLAKE.ACCOUNT_USAGE.QUERY_HISTORYandSNOWFLAKE.ACCOUNT_USAGE.LOGIN_HISTORY(or other relevant audit tables).Snowflake API Integration: A configured Snowflake API integration for secure access to the Snowflake SQL API. This involves creating an API integration object, a security integration object, and a user and role for API access. Refer to Snowflake's documentation for detailed setup instructions.
JSON Web Token (JWT) Generation: A mechanism to generate a JWT for authentication with the Snowflake SQL API. This can be done programmatically or using a dedicated service.
Configuring Snowflake
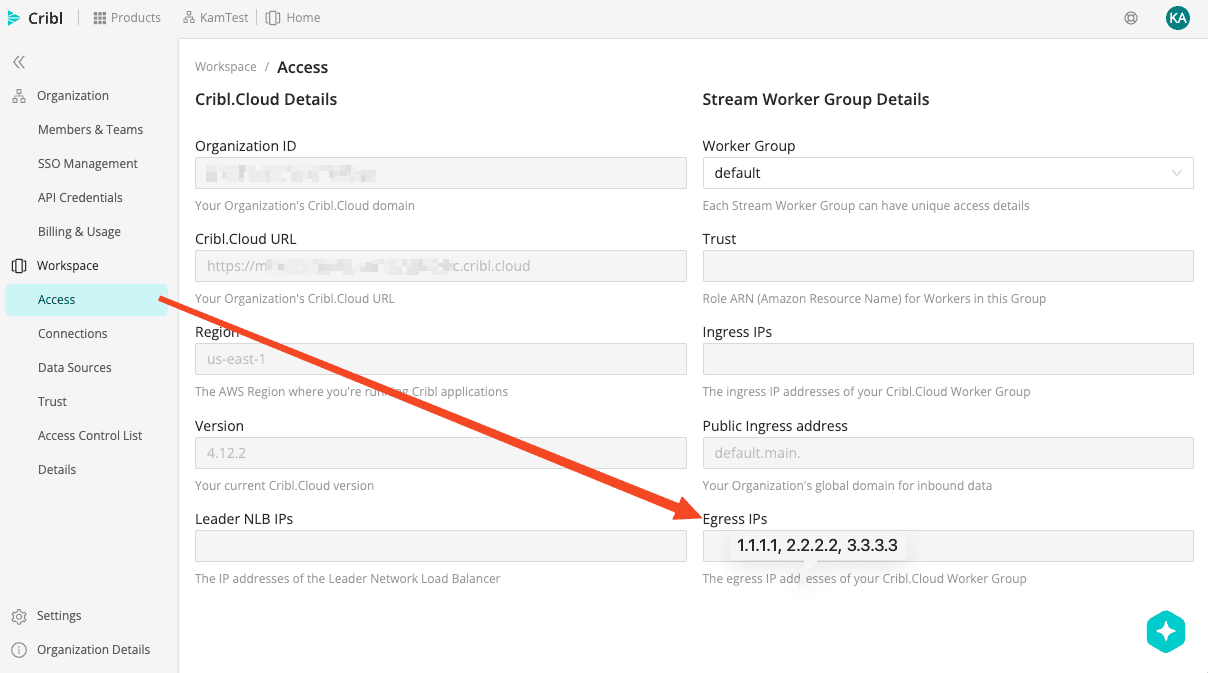
Before you can access the tables with Cribl Stream, you will need to update the network access for Snowflake. This is done by allowing the IP addresses for Cribl.Cloud or your self-hosted Cribl deployment to access the Snowflake environment.
Log into your Snowflake environment and open a workspace to run a SQL command.
From your Cribl Cloud portal, you can find the IP addresses under Workspace -> Access -> Egress IPs
Run the following SQL statement with your Egress IP addresses. You can add individual IP Addresses or ranges of IP’s:
CREATE NETWORK POLICY cribl_policy
ALLOWED_IP_LIST = ('1.1.1.1', '2.2.2.2', '3.3.3.0/24');
Run this SQL statement to validate the changes have been enabled:
DESCRIBE NETWORK POLICY CRIBL_POLICY;
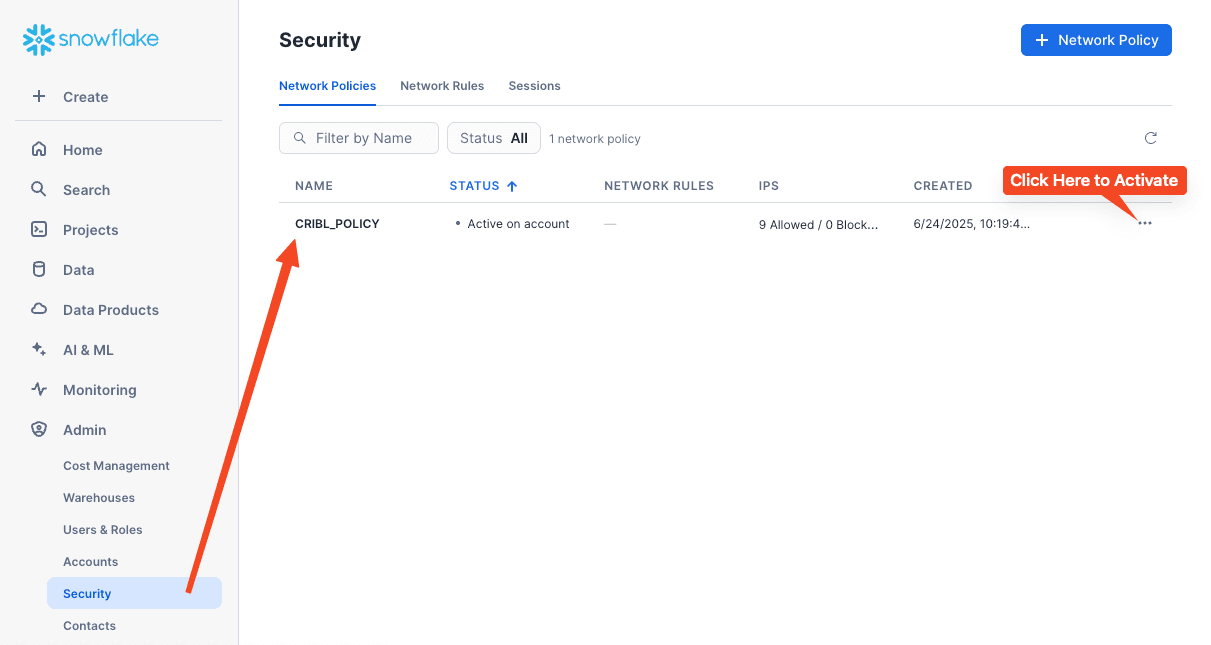
In your Snowflake console, go to Admin -> Security -> Network Policies and enable the CRIBL_POLICY. OR you can also use the SQL statement below to enable the policy at an account or user level :
ALTER ACCOUNT SET NETWORK_POLICY = CRIBL_POLICY;
This would be for a User-Level activation:
ALTER USER <username> SET NETWORK_POLICY = CRIBL_POLICY;
Create the Programmatic Access Token (PAT) by signing into Snowsight, and navigate to Admin -> Users & Roles. Select the user for whom you want to generate the PAT and click “Generate new token.” Enter a name, set the expiration and (optionally) restrict the token to a specific role.
Optional : If you want to create a method to refresh your OAUTH token, you can follow these steps to setup the framework for enabling a token refresh. Follow the documentation for a custom oauth setting to refresh the token. Create the Custom Cribl Integration to create the OAUTH token and client secret. In the Snowflake console, run the following SQL statement :
CREATE SECURITY INTEGRATION cribl_oauth_integration
  TYPE = OAUTH
  ENABLED = TRUE
  OAUTH_CLIENT = CUSTOM
  OAUTH_CLIENT_TYPE = 'CONFIDENTIAL'
  OAUTH_REDIRECT_URI = '<your-cribl-redirect-uri>'
  OAUTH_ISSUE_REFRESH_TOKENS = TRUE
  OAUTH_REFRESH_TOKEN_VALIDITY = 86400
  BLOCKED_ROLES_LIST = ('SYSADMIN');
Once complete, run the following SQL statement to reveal the OAUTH Client Secret :
SELECT system$show_oauth_client_secrets('CRIBL_OAUTH_INTEGRATION');
This SQL statement can be used to reveal the additional information for the Cribl integration:
DESC INTEGRATION CRIBL_OAUTH_INTEGRATION;
Configuring Cribl Stream
Create a REST Collector Source
Navigate to Sources in Cribl Stream and add a new REST Collector source.
Example Request Body for Query History:
{
  "statement": "SELECT * FROM SNOWFLAKE.ACCOUNT_USAGE.QUERY_HISTORY WHERE START_TIME >= DATEADD(hour, -1, CURRENT_TIMESTAMP())",
  "warehouse": "your_warehouse_name"
}
Example Request Body for Login History:
{
  "statement": "SELECT * FROM SNOWFLAKE.ACCOUNT_USAGE.QUERY_HISTORY WHERE START_TIME >= DATEADD(hour, -1, CURRENT_TIMESTAMP())",
  "warehouse": "your_warehouse_name"
}
You might want to create separate REST Collector sources for QUERY_HISTORY and LOGIN_HISTORY or combine them with a more complex SQL query if needed. Ensure the warehouse parameter points to a warehouse with sufficient privileges to execute the query.
Adding the Collect Section Screenshots. Your URL can be found in the Snowflake UI under Admin->Accounts->Active Accounts and click under your Account :

Take that URL and make sure to add /api/v2/statements to the end.

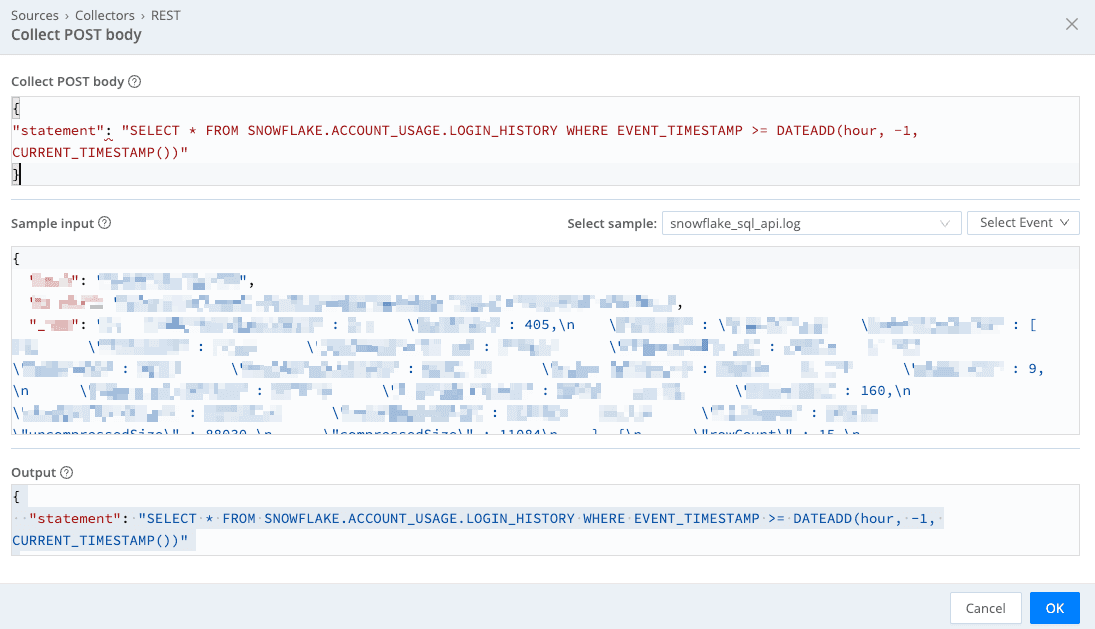
For the Collect POST body section, click on the Advanced Mode Button

This will expand the UI and you can then paste your statement from above. Click OK.
Now add the Collect headers from above. Make sure to surround the Authorization value with the single tic (`) character otherwise it will give you an error. You can leverage the actual bearer token instead of the variable ${token} or you can put in a secrets variable and store the token in the Cribl Secrets. Click Save and then you can run a preview to grab a sample event.
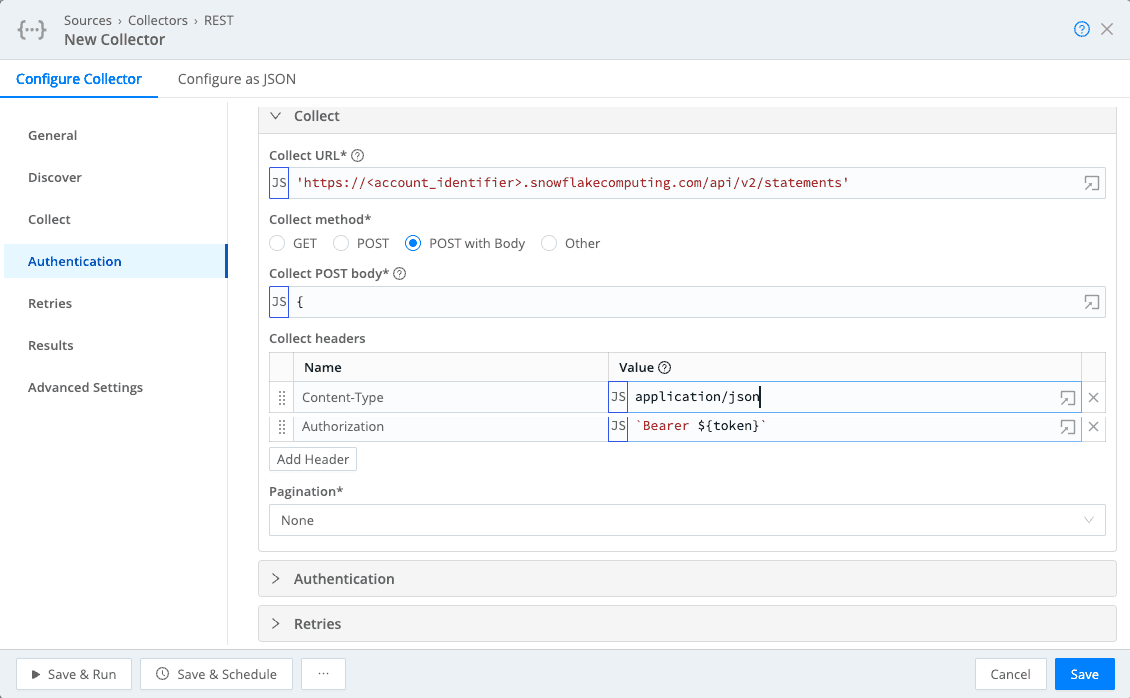
Repeat the steps above if you want to add additional tables to collect, such as the Query History table or other relevant tables. Just clone your Rest Collector and modify the SQL statement in the Collect POST body.
Leverage Cribl Pack for Snowflake
Download and install the Cribl Pack for Snowflake. Here is the link (https://packs.cribl.io/packs/cribl-snowflake) or you can download and install the pack within the Cribl Stream UI. This will normalize the output and make it into Key Value pairs from the JSON output.
Filter Function: Use a filter to only process events from your Snowflake source.
Eval Function: This is where the magic happens for standardization. The Snowflake SQL API response for queries will typically be a JSON object containing
dataandresultSetMetaDatafields. You'll need to extract the relevant data and transform it.
Example Eval Function for QUERY_HISTORY:
// Assuming your query results are in `_raw.data`
const results = JSON.parse(_raw).data;
const fields = JSON.parse(_raw).resultSetMetaData.rowType.map(f => f.name.toLowerCase());
let newEvents = [];
for (let row of results) {
  let newEvent = {};
  for (let i = 0; i < fields.length; i++) {
    newEvent[fields[i]] = row[i];
  }
  newEvents.push(newEvent);
}
// Return an array of new events
_raw = JSON.stringify(newEvents);
This Eval function will:
Parse the
_rawevent to access thedataandresultSetMetaData.Extract the column names from
resultSetMetaData.rowType.Iterate through each row in
dataand create a new event object with key-value pairs, where the key is the column name and the value is the corresponding data point.Replace the original
_rawevent with a JSON string representation of the array of new, normalized events.
You might need to adjust the Eval function based on the exact structure of the Snowflake SQL API response and the specific audit tables you are querying.
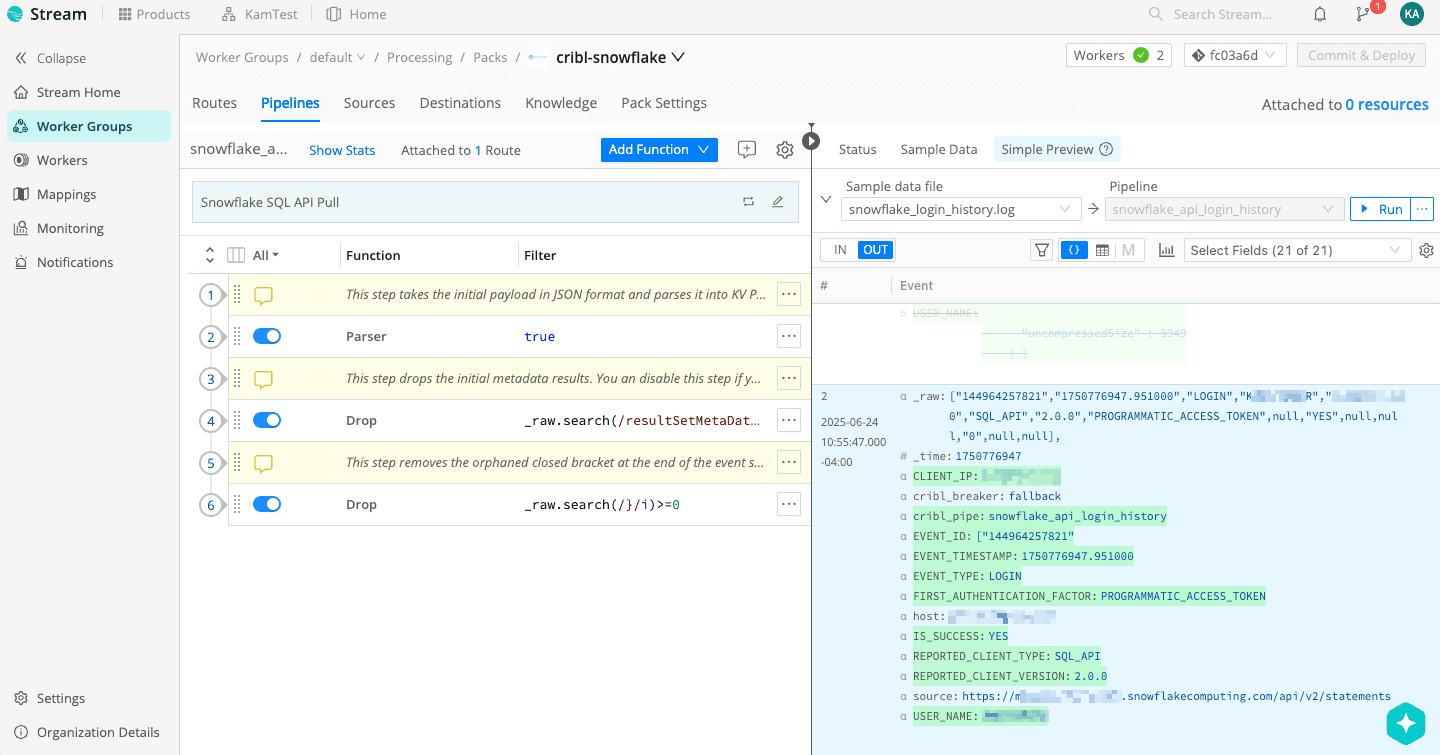
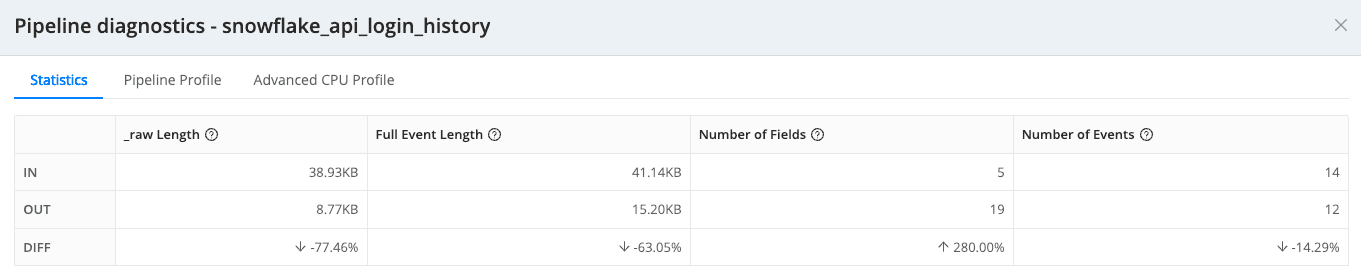
This pack will help clean out some null values along with dropping unnecessary events.
Add a Destination
Finally, configure a destination to send your normalized Snowflake audit data. Common destinations include:
Splunk HEC: For sending data to Splunk.
Elasticsearch: For sending data to an Elasticsearch cluster.
S3 Compatible Storage: For archiving data in a data lake.
Kafka: For streaming data to other systems.
Configure the destination with the appropriate connection details and ensure the data format is compatible with your chosen system of record.
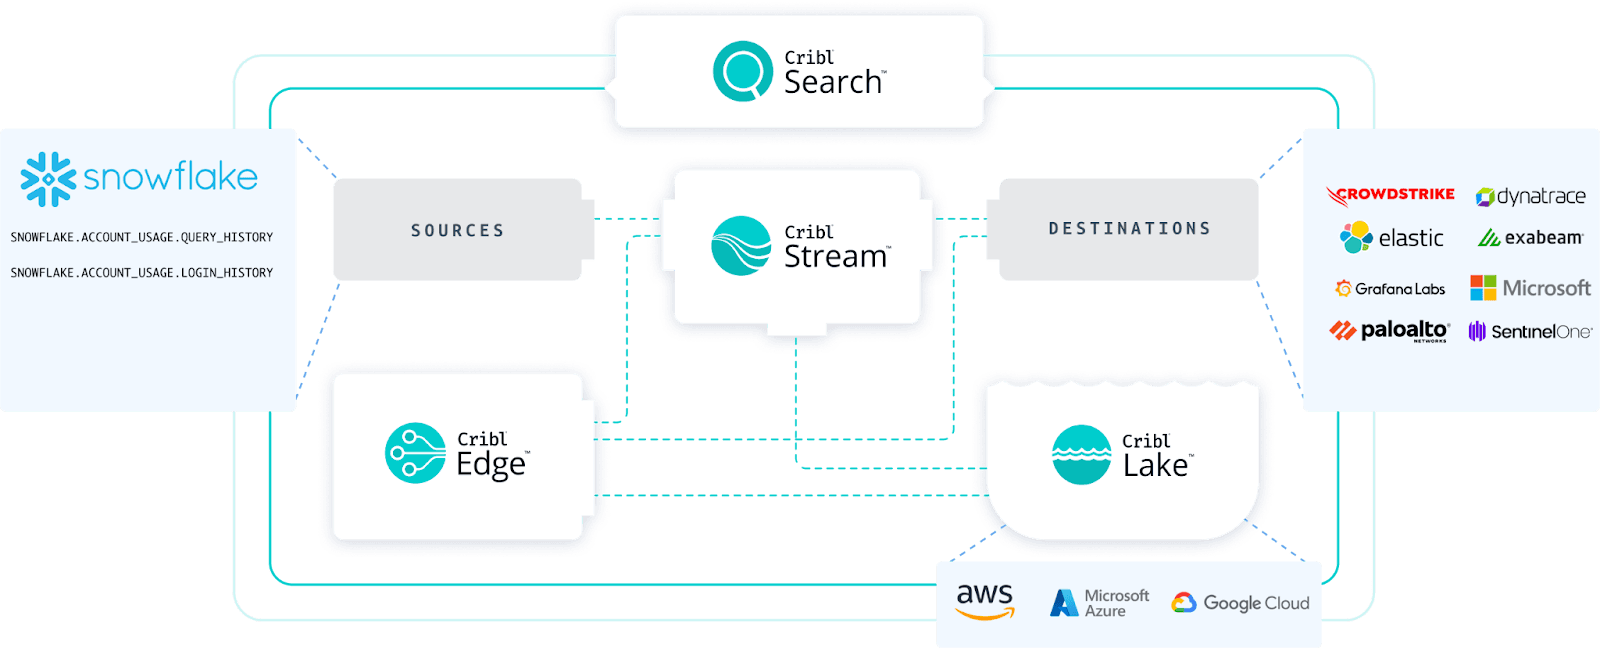
Data Flow
Wrap Up
By leveraging Cribl Stream's REST Collector and its powerful processing capabilities, you can efficiently collect, normalize, and route your Snowflake audit events and query history to any system of record. This approach provides flexibility, control, and the ability to enhance your security monitoring and compliance efforts within your organization. Start streaming your Snowflake insights with Cribl Stream today!
Stay tuned to future posts that cover the key-pair approach for authentication described in the Snowflake documentation and new features in Cribl Cloud.
If you want to get started and test this out, good news, both Cribl and Snowflake offer free solutions to test out these enterprise features. Sign up for a free Cribl.Cloud instance to get started. You can obtain a free Snowflake tenant with up to $400 in credits for 30 days.