
Preventing data loss for data in motion is a challenge that Cribl Stream Persistent Queues (PQ) can help prevent when the downstream Destination is unreachable. In this blog post, we’ll talk about how to configure and calculate PQ sizing to avoid disruption while the Destination is unreachable for a few minutes or a few hours.
The example follows a real-world architecture, in which we have:
Processing: 25 Cribl Stream Worker Nodes, each with 36 vCPU each to process the data.
Storage: 25 Cribl Stream Worker Nodes, each with 900 GB SSD local storage available for Persistent Queuing.
Output: Cribl Stream does data reduction, and the output is 35TB that we send to 120 Splunk Indexers. In addition, all metrics data is sent to a different Destination.

Destination Persistent Queues Under the Hood
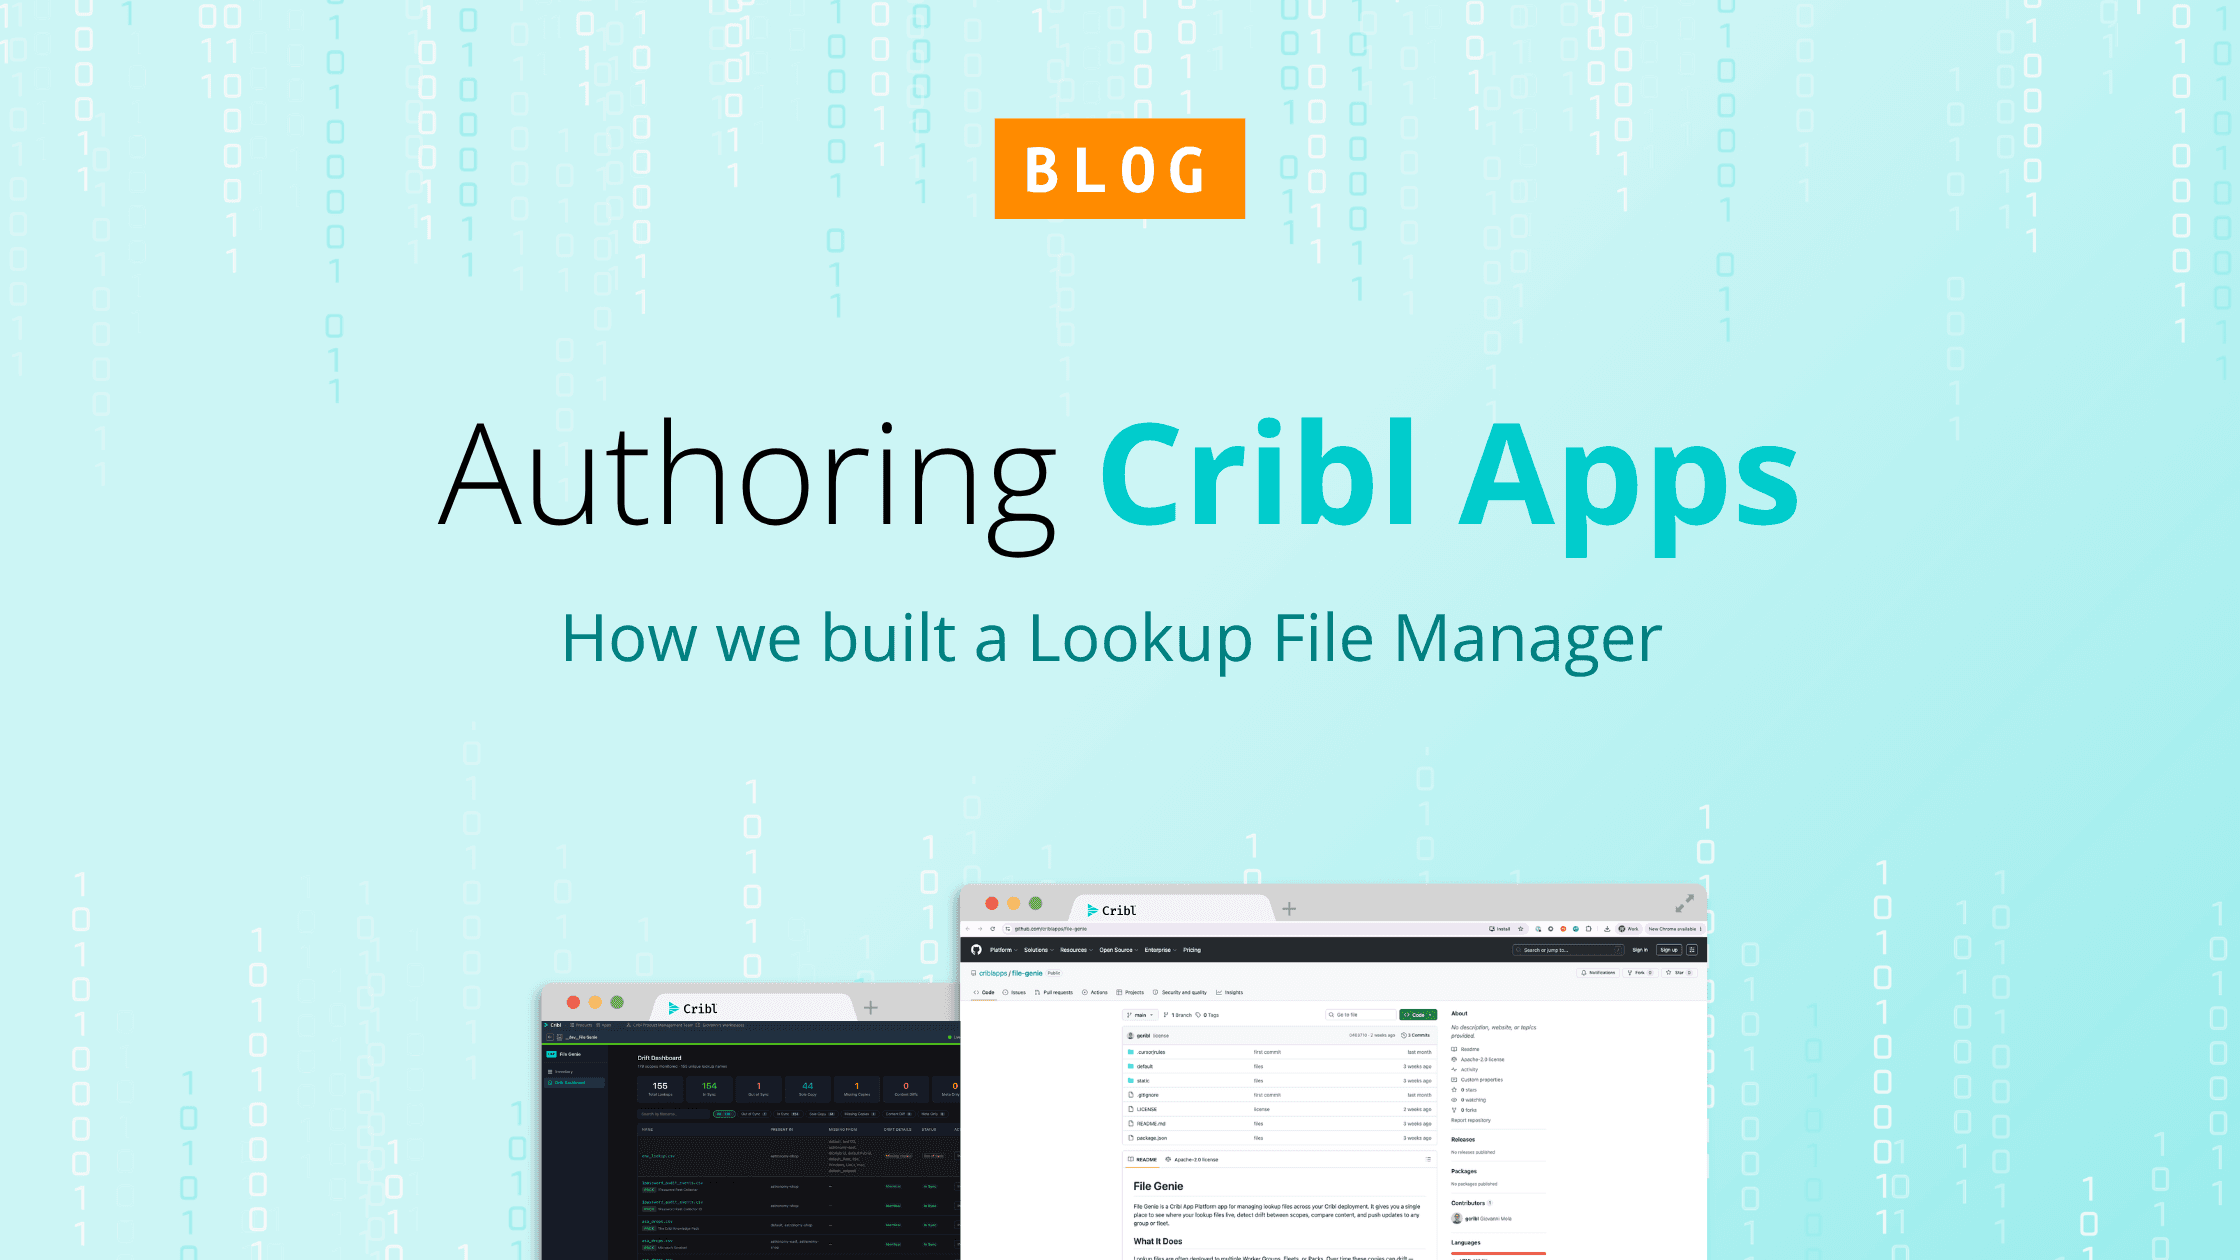
Under the hood, Cribl Stream Persistent Queuing is implemented at the Worker Process level. The Worker Processes each knows their own failed connections and persistent queue sizes independent of each other.
Worker Processes attempt In-memory queuing first. Each Worker Process output has an in-memory queue that helps it absorb temporary imbalances between inbound and outbound data rates. For example, if there is an inbound burst of data, the output will store events in the queue, and will then output them at the rate to which the receiver can sync.
The filesystem queue is attempted only when Cribl Stream receives an error from the downstream Destination and starts storing the data on disk.
In our case, we have 34 Worker Processes in each of our 25 Worker Nodes. For example, Worker Process (WP) 18 cannot send data to the Destination, so it sends the events to the filesystem PQ location. In the meantime, all the other WPs keep on working as normal.
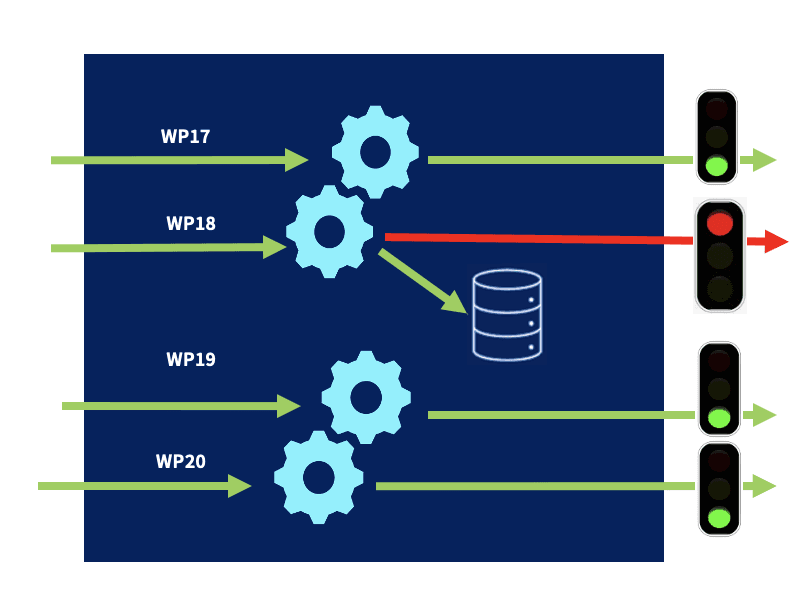
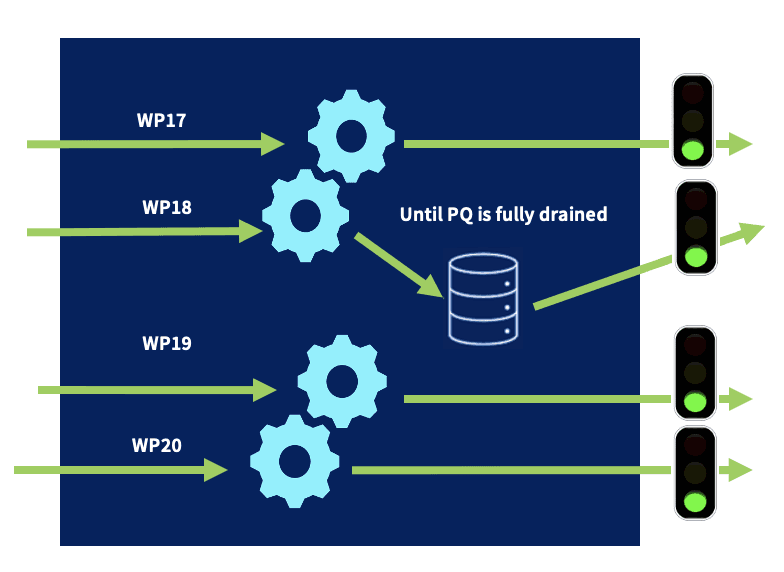
When the receiver is ready, the output will start draining the queues in FIFO (First In, First Out) fashion.
During the draining process, new events will continue to be written to the queue until Cribl Stream has successfully shrunk the queue, and the final file on disk can be flushed and removed. At that point, Cribl Stream goes back to fully in-memory processing.
Another option during the draining process, if Strict ordering is disabled, Cribl Stream will prioritize new events over draining the queue. This is like LIFO (Last In, First Out) fashion.
Throttling the queue’s drain rate can boost the throughput of new/active connections, by reserving more resources for them.

Source Always-On Persistent Queues Under the Hood
With Always-On mode, PQ will always write events directly to the queue before forwarding them to the processing engine
All events are written to disk as they’re received by the Cribl Stream Source
Since every event must be written to the disk, and then read from the disk, this option adds load and delay to the system.
Cribl recommends using this option for Sources like Syslog UDP. However, due to the overhead of always going to disk this option might not be optimal for most sources.
Source Smart-mode Persistent Queues Under the Hood
With Smart mode, PQ will write events to the filesystem only when it detects backpressure from the processing engine.
Few conditions that will cause PQ in Smart mode to engage:
When the Worker Process is experiencing delays due to heavy processing.
When the Destination is causing delays and backpressure.

When the receiver is ready, the output will start draining the queues in FIFO (First In, First Out) fashion.
During the draining process, new events will continue to be written to the queue until Cribl Stream has successfully shrunk the queue, and the final file on disk can be flushed and removed. At that point, Cribl Stream goes back to fully in-memory processing.

What Did the Configuration From Cribl Stream to Splunk Look Like?
To enable persistent queueing, go to the Destination’s configuration page and set the Backpressure behavior control to Persistent Queue. This exposes the following additional controls, which we set with these values:
Max file size: 1 MB
Max queue size: 25 GB
Queue file path:
$CRIBL_HOME/state/queuesCompression: None
Queue-full behavior: Drop new data
Why Have We Decided to Use These Settings?
Using 25 Cribl Stream Worker Nodes, 36 vCPU each, and 900 GB SSD local storage for Persistent Queues as the available hardware, we made the following choices:
Max file size: 1 MB
1 MB is the default maximum file size, and we did not see a good reason to change it.
Max queue size: 25 GB
This flag should be translated as “Maximum queue size per Worker Process.”
Since we have 36 vCPUs per Worker Node, we used 34 Worker Processes on each, reserving 2 vCPUs for Cribl Stream itself.
The hardware we used included 900 GB SSD local storage. We calculated 900 (Disk) / 34 (WP) = 26 GB. To make sure we do not consume all the disk space, we chose a Max queue size of 25 GB.
25 GB per Worker Process means we will use, at most, 850 GB of disk space per Worker Node.
Queue file path: $CRIBL_HOME/state/queues
This is the default queue file path, and we did not see a good reason to change it.
Compression: None
Gzip would enable us to consume more data, but it would also take longer to compress the data set to disk and decompress it. So, we decided to not use compression.
SSD gives us the option to read and write the event to disk very quickly.
Queue-full behavior: Drop new data
Using 25 Cribl Stream Worker Nodes x 850 GB of disk storage, we get 21 TB of total disk space for Persistent Queuing.
The daily output to Splunk is 35TB.
That means that in this case, Cribl can handle about 14 hours of Splunk downtime.
Once the queue is full, we decided to drop new incoming data. For our use case, we had one additional Destination. Using the Queue-full behavior: Drop new data option means that the other Destination will keep on getting data. Had we instead used the Block option, all data into Cribl Stream would stop once the queue filled up.
What Is an Appropriate Value for the Drain Rate Limit (EPS)?
We recommend that you start with roughly 5% of the Events Per Second (EPS) throughput rate. And if that value is too low and the Persistent Queue is not draining fast enough, increase it.
Steps to find the Events In EPS throughput rate:
On the Cribl Stream Monitor page -> Overview page, you will see the Events In and Events Out display.
Change the Monitor page to a single Worker, and change the display’s granularity from the default last 5 min to 24 hours.
In the Events In and Out display, find the Thruput In (AVG) number. For example, 175k EPS.
An approximate number for the Drain rate limit should be 8,000.

Persistent Queues on the Filesystem, Monitoring, and Notification
What is the structure of Filesystem-backed PQ?
Files are stored in the directory the user specifies (in our case, /cribl/state/queues), and files are written out using worker ID, Destination output ID, and a strictly increasing unique identifier
For example:
cribl/state/queues/0/splunklocal
1049897 Nov 11 00:56 queue.0.ndjson
1048600 Nov 11 00:57 queue.1049897.ndjson
887534 Nov 11 00:59 queue.2098497.ndjson.tmp
This naming scheme ensures that multiple instances on the same machine do not stomp on queue files stored in the same directory.
In the above example, we can see that once the file reached 1MB file size, it changed from a tmp file to an ndjson file.
How Do We Make Sure That the Persistent Queues Get Engaged, Store Our Events, and Flush the Stored Data to the Destination?
Cribl Stream allows us to see Persistent Queuing in action using the Monitoring page, as well as the internal logs.
Navigating to Monitoring -> System -> Queues, we can see when the Destination engaged with Persistent Queues and flushed the data, <something happened>.

In addition, looking at the Destination’s Logs tab, we can see all the messages:
connection error -> begin … end backpressure -> complete flushing persistent queue.

Can We Be Notified When Persistent Queuing Is Engaged?
Cribl Stream enables you to set Notifications when Persistent Queueing engages or exceeds a configurable threshold. These Notifications can be sent to external systems (for example, if we want to send an email alert), or we can choose to display Notifications only within Cribl Stream’s Messages pane and internal logs.
To enable Notifications when Persistent Queues engage, go to the Destination’s modal page and select Notifications -> Add New. In the Condition drop-down, pick the Destination Backpressure Activated option. Note that the Default target: System Messages is always enabled. If desired, select Add target -> Create to configure sending Notifications to external systems as well.

Once the Persistent Queues have engaged, we can see these Notifications in Cribl Stream’s Messages pane:

Persistent Queuing to the Rescue
Cribl Stream’s persistent queuing (PQ) feature helps minimize data loss if a downstream receiver is unreachable. PQ provides durability by writing data to disk for the duration of the outage and forwarding it upon recovery. We have a wealth of more detailed documentation over on the Cribl Docs site as well that is completely ungated and free to access.