Sending events into a data lake can make it challenging to find and organize them. Using tagging with Cribl Lake in conjunction with Cribl Search across a primary data source will increase speed of analysis and reduce costs, as well as help keep your data organized. This scenario involves us performing an investigation for an incident that occurred where our systems indicated unusual activity from an IP address of aaa.bbb.ccc.ddd.
We’re going to use Search to ingest logs containing that address from multiple sources, filter to only those logs, parse data fields, and send the results to our Cribl Lake Dataset. Then we can further investigate that data using multiple searches in Cribl Lake at high speed, without needing to worry about data consistency or transport issues. Finally, our results can be sent from Lake to another system of analysis for a final readout of our investigation.
Basic Steps
Create Lake, add tag as accelerated field
Search Primary Datasource, count events
Search Primary Datasource -> Export to Lake
Search Lake with Tag, Iterate
Send results back into System of Analysis (or Lake!)
Profit!
Step 1: Create Cribl Lake Dataset
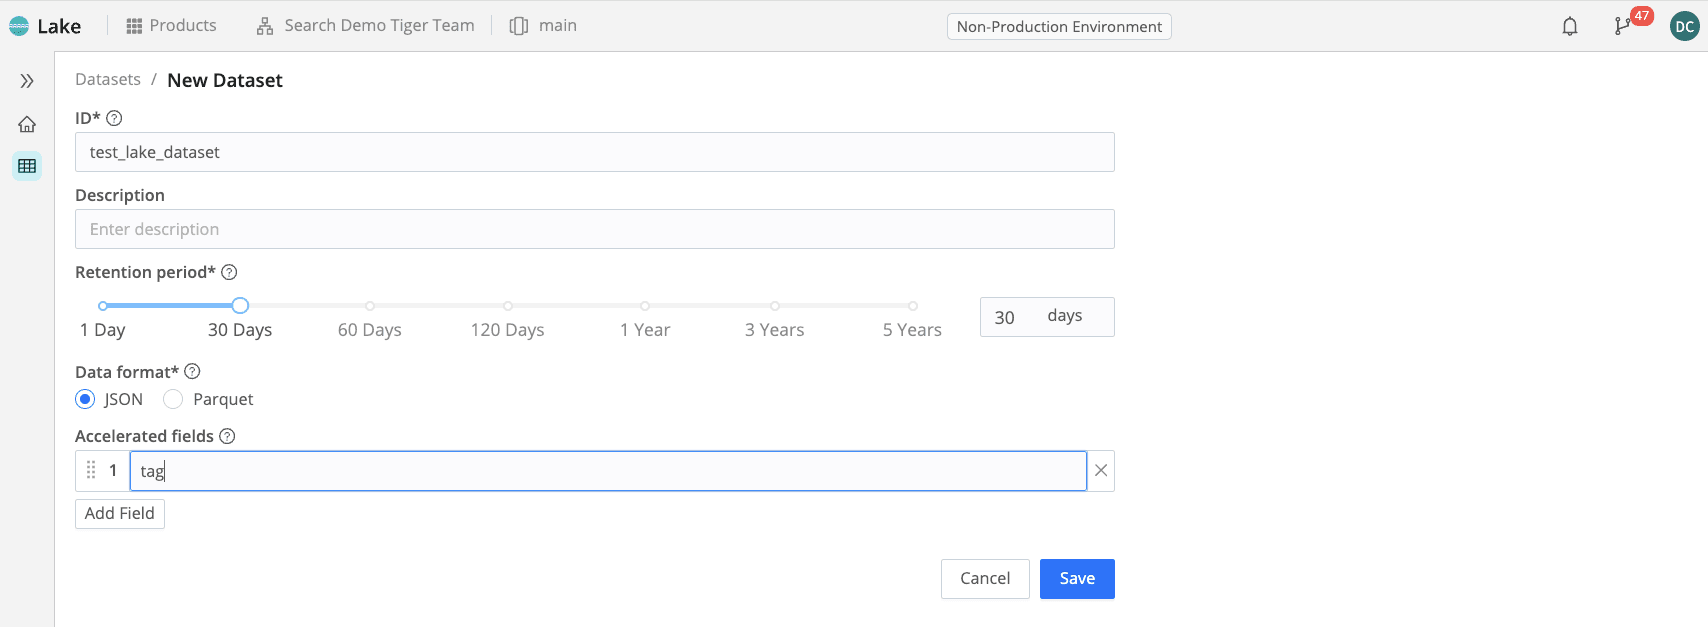
The first thing you need to do is create a Cribl Lake Dataset. To do that, go into Products → Lake and click on Add Dataset. Give the Dataset a name. Here, we will use test_lake_dataset as our Lake Dataset name.

Next, we want to add an accelerated field. When we accelerate a Lake dataset field, what we’re doing is actually partitioning the object store bucket that represents the storage system for the data in the Dataset using one or more fields. That will enable faster access to the Dataset when we specify the accelerated field (or fields) in a search. Here, we will call our accelerated field “tag.” You can call it anything you like, as long as you are consistent in following through this example using the name you chose.
Step 2: Search Primary Datasource, Then Count Events
When I don’t know what I’m looking for, I like to use some guardrails (or training wheels), to protect myself and the system from being overly used in a manner that was not anticipated. The simplest way to do this is to reduce our time range, even if we know we’re interested in a larger data sample. Using a smaller time range ensures that we know what data we’re looking for and we know what data we’re expecting it to return.
Another guardrail is to add the limit command to your search. This allows us to return only a finite set of events, regardless of how many data events may actually be in the Dataset we’re looking at. This helps cut down on surprises and ensures that answers will come back in the shortest amount of time.
(Incidentally, there are system-wide guardrails to control and limit Search usage on a user-by-user level. These are called “Usage Groups” and can be found under Search Settings. Docs for Usage Groups can be found here.)
Next, we can pipe our pipeline to the count operator, which will simply return a count of the events found. This is often more efficient, because it does not require all of the data in your Dataset to be returned to the Coordinator and then to the user. Counting the data will accurately reflect the number of events in the desired results that, if you were to fetch it in its entirety. (Or send it somewhere else like… to your Lake Dataset.)

dataset="cribl_search_sample" dataSource=*vpc* srcaddr=="172.16.2.105"
| count
Finally, we can take a look at the top IP addresses, by count of events. We could use a combination of summarize, sort, and limit to give us the top-N IP addresses, but there’s a built-in operator in Kusto to do just that: top-hitters.

dataset="cribl_search_sample" dataSource=*vpc* srcaddr=="172.16.2.105"
| top-hitters 10 of srcaddr
Step 3: Search Primary Datasource, export to Lake
Now that we found the data we’re looking for, and have a good idea of its size, we want to send it to our Lake. However, before we do, we need to remember to tag that data so we can find it again more easily. As you recall, we created an accelerated field when we created this Lake Dataset. In our case, we called it “tag.”
In order to create a field in our data, we have to use the Kusto operator extend. In this case, we will extend the field tag and then give it a descriptive string. We’ll call it investigation and append today’s date. When we do that, we can see that the field called tag is added to our results set with the value we configured. That will not only enrich every single event in this Dataset, but allow the Lake Dataset to be appropriately accelerated (in this case, partitioned by that field). So when searching through this Lake Dataset, we will more quickly and more easily be able to find this specific results set if other data is also sent to the same Dataset.
dataset="cribl_search_sample" dataSource=*vpc* srcaddr=="172.16.2.105"
| extend tag="investigation_oct_2024"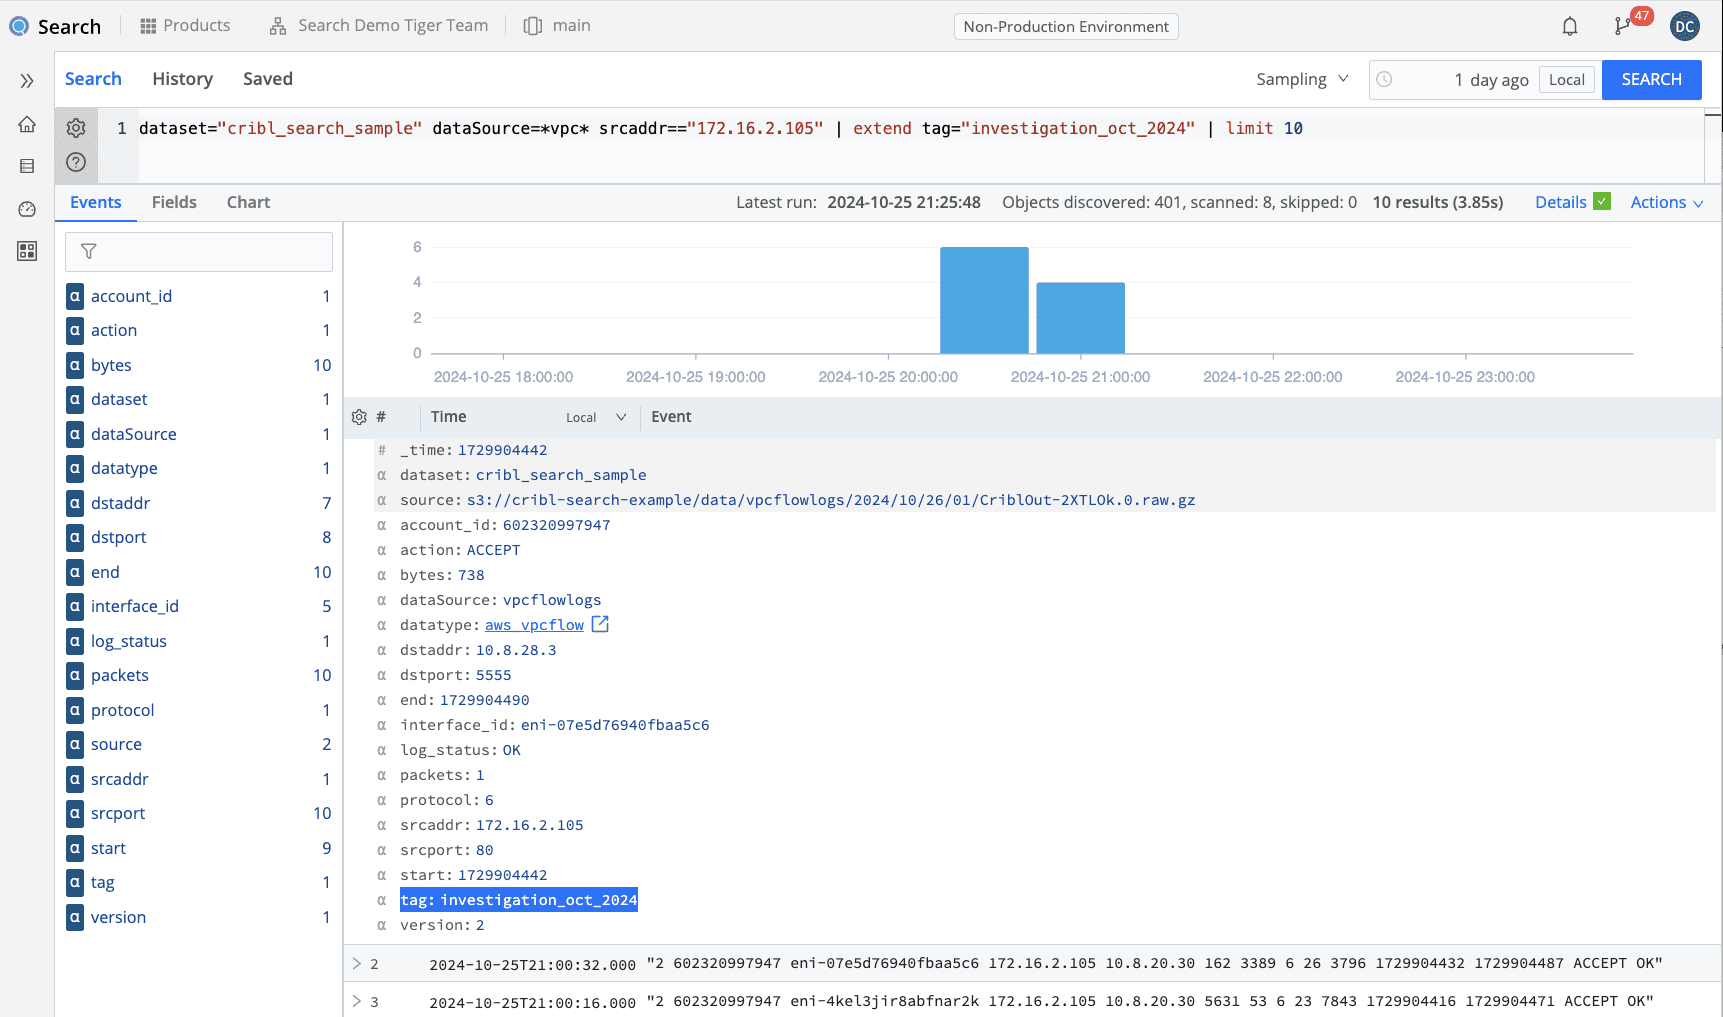
Of course, if we want to append to the Dataset, we can simply run more searches and add that exact same extend operator to additional searches. The Lake Dataset will be tagged with the specific tags that you ask for, rather than any other tags, in the future.
Notes about time: unless overridden, the events in the Lake that you have sent will retain their initial timestamps. So when you search for those events, you will have to know roughly the time that those events covered, or you’ll have to search through all time. Since you have created a tag, the time itself may not be relevant to your investigation, However, there is the other option of changing your time field in each event to reflect current time, or even copying the existing time to an additional field to reflect the original event’s time. Either way, taking into account the time of the event versus the time of the extraction into Lake may be relevant to your future searches.
After visually verifying that the events all contain the tag field as desired, and that the _time field is set appropriately, we export the data from Cribl Search to Cribl Lake by appending the export to <lake_dataset> operator. Note that ordinary limits on result sets being fetched to the Search UX (usually 50,000 events) do not apply to data sent to Lake.The export operator will send the full amount of data found in your searched time range.
Once you execute the export search, you should see two or more status updates instead of results: one indicating that the export has begun, and one every few seconds that the export continues until it completes.
N.B.: Do NOT run this search more than once, otherwise your resulting Lake Dataset will have multiple copies of every event sent to it. If you do want multiple runs to be sent to the Lake Dataset, you should ensure that each execution runs with a different Time range specified in the Date picker.
dataset="cribl_search_sample" dataSource=*vpc* srcaddr=="172.16.2.105"
| extend tag="investigation_2024_oct"
| export to test_lake_dataset
Step 4: Search Lake with Tag, Iterate
Once we have the Dataset sent to Lake, we can now explore the data that we have exported. Simply execute a search containing the Lake Dataset name and the tag you specified earlier. You may or may not need to specify the time range more explicitly, or even possibly choose all time as your time range. (This depends a lot on how you specified your time field in the previous step.)
Once you have done that, you should be able to very quickly return results from the Lake. Again, you may not be interested in a full set of those results onscreen but merely a sampled set or a small preview of those examples of those events, using the limit command. After confirming that your data was successfully exported to Lake, you can interact with this Dataset quickly.
dataset="test_lake_dataset" tag=="investigation_oct_2024"
| limit 100
You can perform many types of analyses, including hunting, statistical analysis, anomaly detection, or allow/deny list detection on these data. Having this data close and fast greatly improves the turnaround time on any analytics, improving your ability to perform many what-if analyses.
Here we create a count of connections based on the destination port.
dataset="test_lake_dataset" tag=="investigation_oct_2024"
| summarize count() by dstport
Step 5: Profit, er, Derive Insights, and Preserve Data!
Now that you have found the resulting data that you’re looking for, one final step may be to preserve those events in a system of analysis for future examination. You can use Cribl Lake as that storage system as well, or you can use any third-party storage system to which Cribl Stream can connect.
To do this, create a route in Stream from Search to the desired destination system. or have your administrator do that. Once that is set up, you may simply append the send operator to your final search and re-execute that search. That will allow your results to be sent from Cribl Lake through Search into Stream, which will then forward those results to your final system for further analysis. You may additionally add other fields – like other tags or labels, or possibly specific destination locations to which those data may be sent – depending on your goal. (Insert link referencing how to set up Search + Send)
At this point, you’re at the final stage of your analysis, where you’ve drawn a conclusion and have results to justify that conclusion. One recommendation we have is to create a second Cribl Lake Dataset, specifically to save your findings from analytic investigation for posterity. If you’ve done this, then you can substitute the export operator rather than the send operator, and use the same tagging system and methodology we talked about earlier to label the results of this final conclusion in your new Dataset.
dataset="test_lake_dataset" tag=="investigation_oct_2024"
| summarize count() by dstport
| send
Wrap Up
And that’s really it. Quick recap of what we did in this article:
You created a Lake Dataset,
You performed an initial extraction to send your primary data source data to Lake.
You have then searched your Lake data repeatedly, to derive insights from it using mathematics and/or statistical transformations.
You have found events of Interest, and formed conclusions based on those events.
Finally, you sent them on to a system of analysis for further storage or processing.
I hope that this process was clear and helpful to you, and serves as a model for one of the best ways to perform analytics on very large sets of data from your primary data sources, without having to transfer that data into a single proprietary data storage system. This results in a cost-effective but highly performant methodology of analysis for sizable Datasets for the years to come.


