Imagine a workflow where you change and test all of your configuration in the “development” environment, committing those changes along the way, and then when you’re happy with the changes, you bundle them together in a single “pull request”, and the changes, after being reviewed by your peer(s), get pushed into production.
Or maybe you want to have “departmental” worker groups, allowing each department to manage their own configurations – assigning each department a “development” branch to work in, but still giving you the ability to review and approve changes (to ensure that no changes break someone else’s work, etc.).
These are just a couple of workflow options when you embrace the use of GitOps. “Oh, great”, you say, “yet another IT management fad; cue the hype and eventual disillusionment when it doesn’t work as advertised.” I get it – I’ve been on the IT side of the house most of my career, and I’ve seen the fads come and go. But GitOps is not a fancy product (or a product at all), it’s a way of managing your deployments at scale with a flexible workflow that can be adapted to your compliance regimen.
What is GitOps? I like to think of it as using a git repository as the source of truth for your configurations, and automation (usually in the form of a CI/CD tool like Github Actions or Jenkins) that manages the deployment of those configurations. The scenarios mentioned above are just a couple of examples that you can implement using Cribl Stream’s GitOps functionality, which is available with an enterprise license.
Let’s walk through the first scenario. Figure 1 shows that we have a single git repository, with a branch dedicated to the dev environment and another branch dedicated to the production environment. The names are abbreviated here, but they can be whatever you’d like.
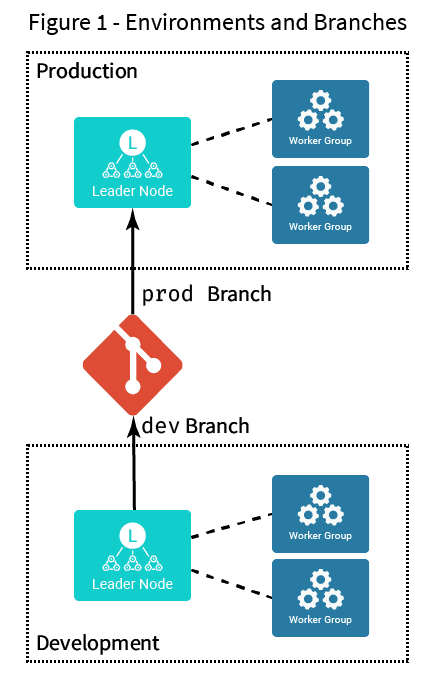
The idea is that the development environment will commit all its changes to the development branch, and then, when appropriate, that branch will be merged to the “prod” branch, applying all changes to the production environment.
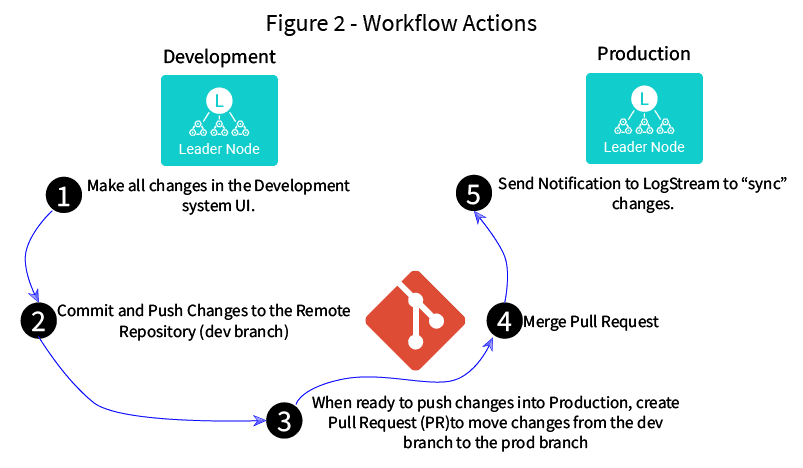
The actual workflow itself looks more like figure 2 – steps 3 and 4 happen completely outside of Stream, in your git system. Step 5 is also external to Stream, being triggered either by a script or by your CI/CD system. Step 5 is an example of a “push” workflow – when a change occurs to the prod branch, we need to “push” a notification to Stream to tell it to go get the changes. Initially, Stream supports only push workflows like this, but that will change over time.
What about Stream Sources and Destinations? Most people aren’t going to be able to have the same Sources and Destinations in their development versus production environment, so we’ve made Sources and Destinations “environment aware.” This means that you can assign each Source and Destination an “environment” value that’s specific to the git branch on which you’re configuring it.
Assume that I have a datagen in my development environment that I use to create and model my pipelines, but on production, I have a syslog Source that sends the same type of data. I can set the environment value to “dev” for the datagen, and “prod” for the syslog Source. The datagen will be enabled on the development environment, but disabled on production, and the syslog Source will be enabled on production, but disabled on development. Routes can pull the correct Source by referring to the C.LogStreamEnv global variable, which you set separately on each branch’s environment. This enables you to use the same Route for both systems, while still getting the data from and to the correct services.
Enough theory, I wanna try it!
At Cribl, we believe that doing is the best way to learn, so we’ve created a GitOps sandbox that will allow you to set up and try out this scenario. Go try it out!
The fastest way to get started with Cribl Stream is to sign-up at Cribl.Cloud. You can process up to 1 TB of throughput per day at no cost. Sign-up and start using Stream within a few minutes.
