
Mobile devices have changed our world. They come with us everywhere and provide invaluable services. One nagging problem is how to get data out of your mobile device. Specifically, logging metrics and events can be a trial. Opening up a public-facing port, managing the log receivers, coding… Wouldn’t it be nice if this was simplified? This article will demonstrate how easy delivering logs can be using Cribl.Cloud and simple HTTP POSTs – for free.
Get An Account
Cribl.Cloud is free for up to 1 terabyte per day. 1000 tasty tasty gigs. Yeaahh, there are no qualifiers here. Use that 1 TB as you see fit. You’ll be able to transform, aggregate, enrich, and route your data in whatever way your requirements dictate. A Leader node, or management interface, will be provided along with a Worker node, which actually receives and processes the data. Key for this exercise: The Worker node is in the Cloud with public facing ports (using TLS of course) ready to receive data from anywhere.
If you haven’t already, get signed up and log in.
Get the Configs
On the account landing page, you’ll see a link for “Network Settings” along the top of the page:

Click that, and you’ll be presented with the list of default inputs, ready to be used. One of them is ‘http’. (TLS is enabled, so while it says http, it will actually use https. Score.) Note the link provided. I’d recommend copying it for later referral:

Now click that ‘http’ link on the left, and it will take you into the Stream management interface, directly to the source definition. The default HTTP source includes a token that allows access to the endpoint. If you click the eye icon on the right side of the field, it will toggle hiding/showing the value. Show it, then copy it. We’ll need that (along with the address from above).
While in the Source config screen, click the “Connected Destinations” link on the left, and change it to QuickConnect. Save.
Set-up a Destination … Eventually
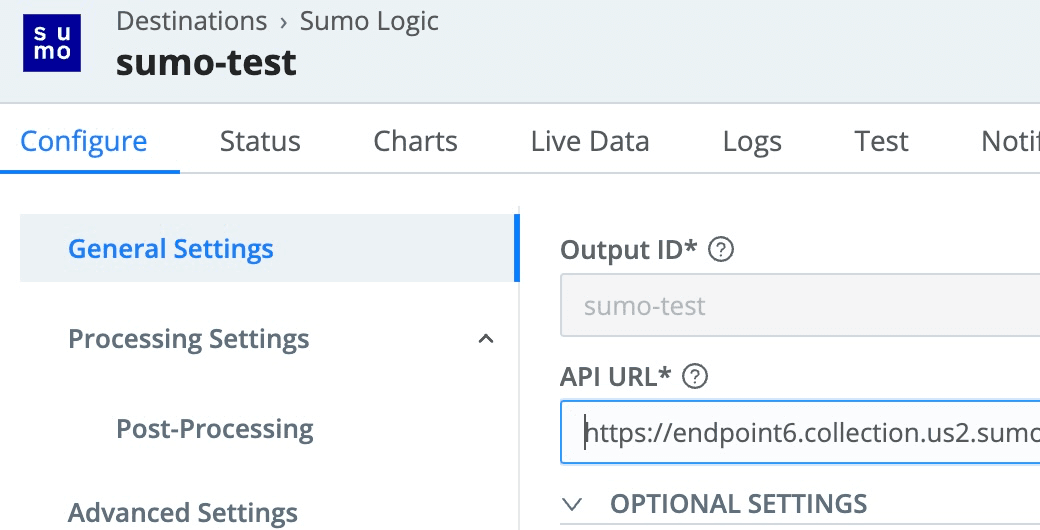
The default configuration will be sending any data received to our old friend Davie Null. This is fine for testing, but you’ll eventually want to set-up one or more actual destinations. Cribl has a diverse selection available, including object stores, SIEMs, and open protocols. For a simple verification during this exercise, I used Sumo Logic. They have a free trial, sign-up was easy, and as with most configs in Cribl, the destination set-up is dead simple:
That said, a detailed destination discussion is outside the scope of this article. The Cribl’s docs are fantastic though.
Set-up a Route
Under Routing, go to QuickConnect (see the docs).

You should see your http input there on the left, and your destinations on the right. Connect them with a simple drag-n-drop. When the Pipeline option pops up, select Passthru.

Click Save, then the Commit button in the upper right. Give your commit a message like “set-up route and destination for HTTP-based log delivery”. Click Commit, then Click the Deploy button.
Checkpoint: What We’ve Accomplished So Far
Cribl.Cloud provided an endpoint (source) to send data to. We created a route that connects that source to a named destination. We could define that destination to send to an analysis service, but for this demo we’re dumping the data to devnull. We could also get trickier with the Data Routes instead of QuickConnect, and/or a Pipeline to enrich, filter, and transform the data, but we’ll leave those for a future how to blog.
Now that the plumbing is in place, let’s get some data flowing.
Demonstrating With curl
Using the token and the URL you grabbed in the first steps above, we can construct a simple curl command to send data.
Before we run it, start a Live Data capture in the Cribl interface. Go back to the Data -> Sources -> HTTP source, open up the config, and then click on the Live Data tab.

⚠️This is one of the handiest features of Cribl. We can see what is being delivered to us right off the wire! We can also capture and save this sample so as we build out rulesets we have real data to reference and verify impact. Getting Data In has never been easy. Cool!
Now pop into a terminal window with curl available. Most Linux distros have it by default. macOS also ships with it by default. Windows will need to have it installed. Run this command:
curl -H "Authorization: Bearer <token>" \
-X POST -d '{"event": "test", "field1":"value1"}' \<url>/services/collector
Substitute the values of the token and the URL from above into the correct slots. A successful post will result in: {“text”:”Success”,”code”:0}
Immediately, you should see data show on the Live Data capture you have running in the browser. Congratulations, you just created your first logging event in Cribl.Cloud. You’ll notice the contents of event are placed in _raw. Any other fields are added to the event metadata. Think of an event as an envelope. Inside the envelope is _raw, the message you’re sending. Written on the outside of the envelope is metadata. The message might be something like “failed to login, bad password”. Maybe the account id and version are in the metadata. A slightly more practical example might look something like this:
curl -H "Authorization: Bearer <token>" \
-X POST -d '{"event": "failed to login, bad password",\"userid":"thedude", "version":"1.42"}' \<url>/services/collectorResulting in an event like so:

What’s Next?
We set-up the plumbing ✅We tested ingest with sample data ✅
To bake this into your app, IOT device, or utility, you’ve got the key required bits:
The URL you send the data to
The authentication token
The data payload
For a truly robust and production-ready system you’d want to embellish this set-up with some sort of failsafe in case the logging endpoint isn’t available or the network is down.
Below I’ve included some real samples of the basic set-up using Apple iOS devices.
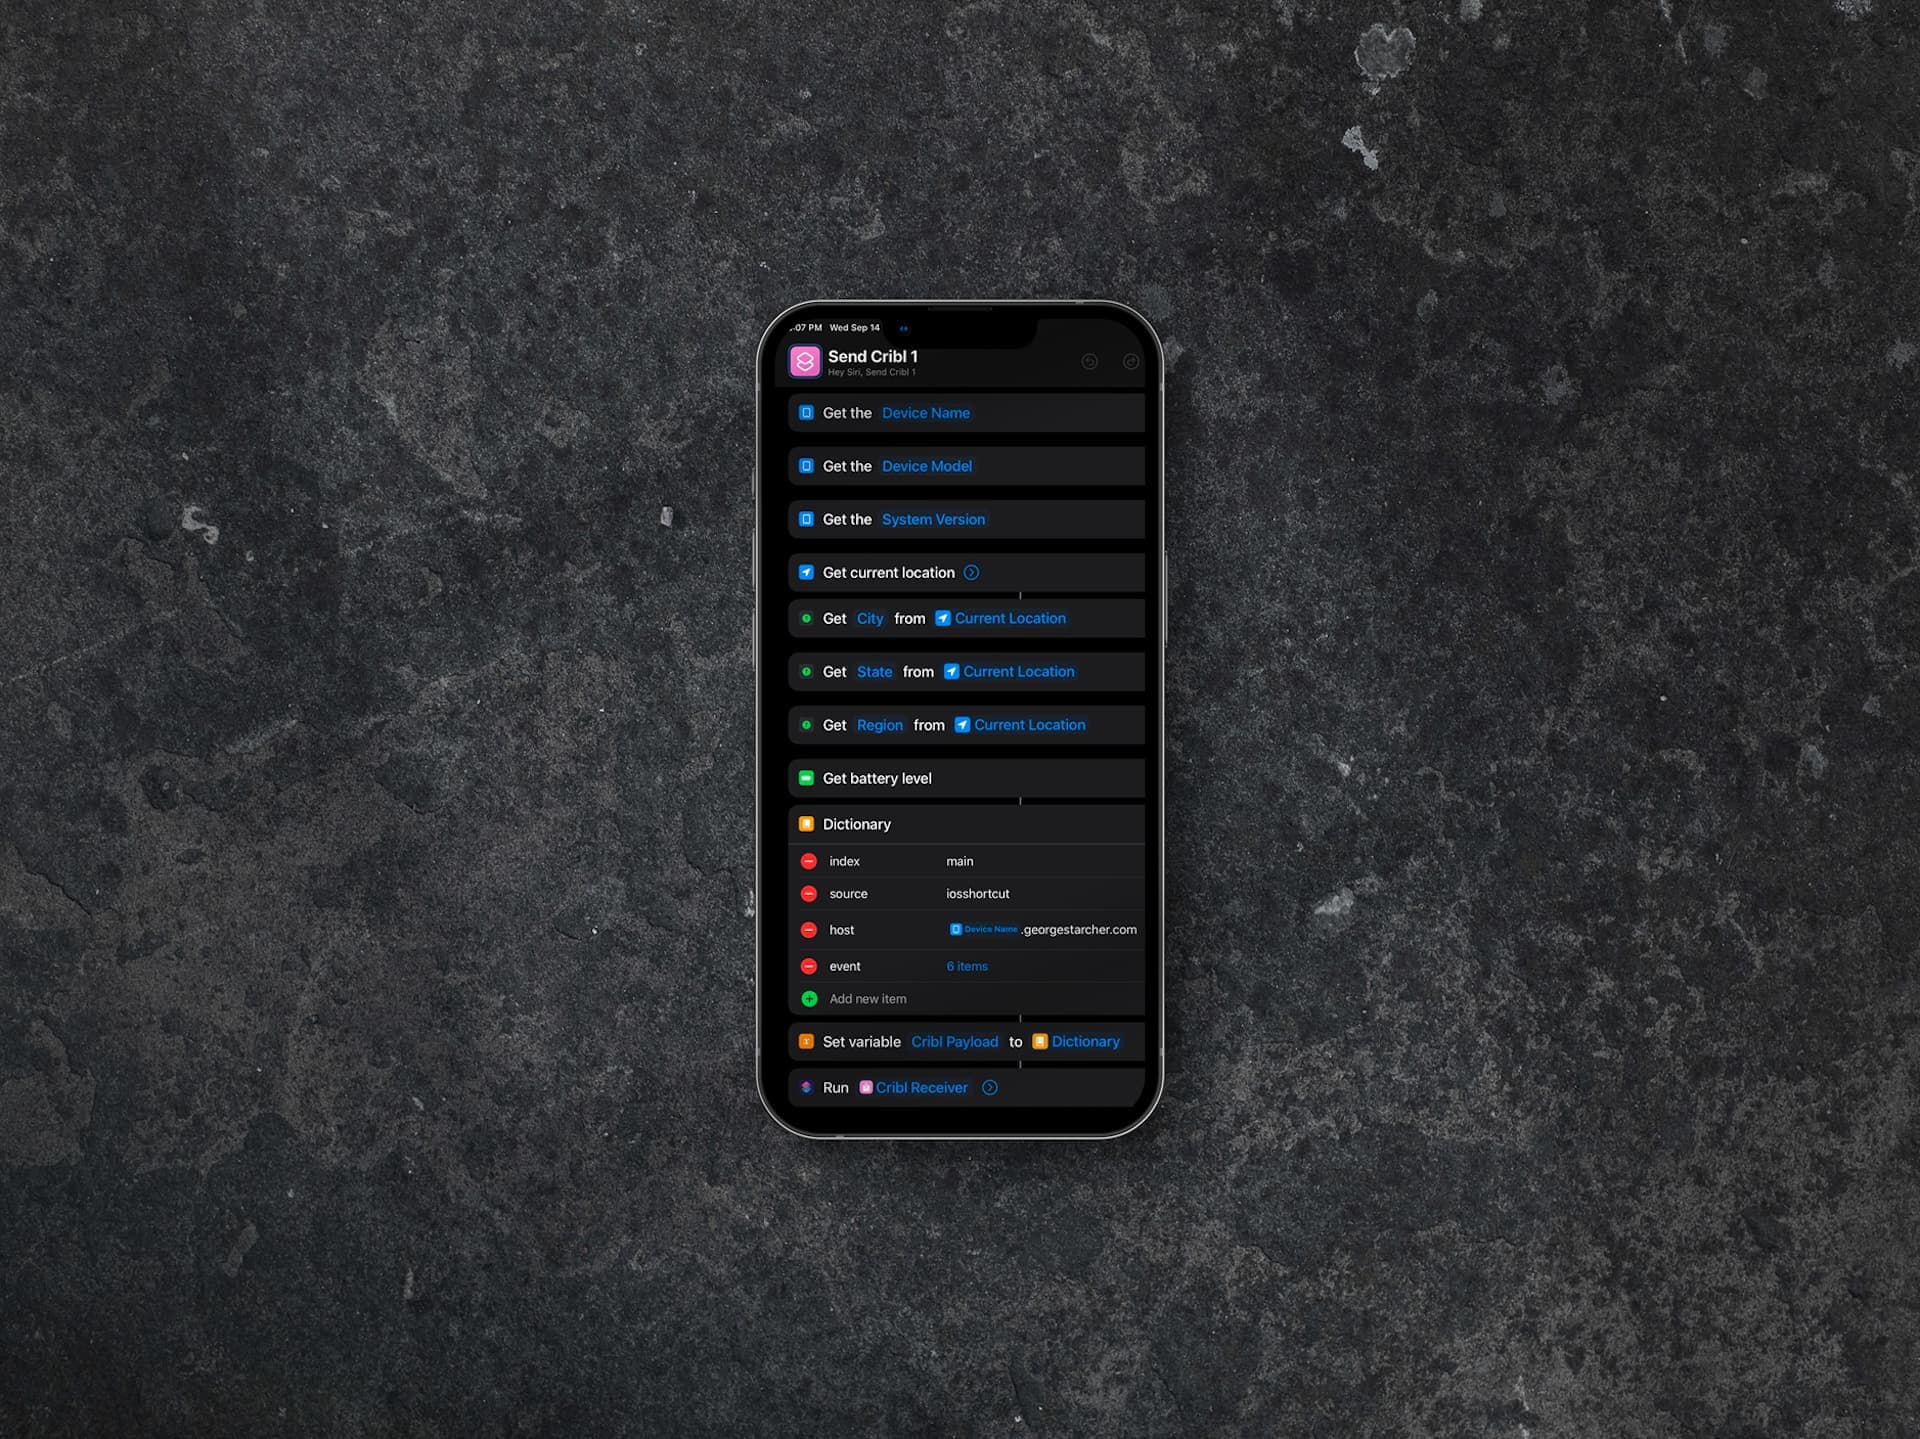
Apple iOS Shortcuts
This is a pretty cool demo put together by Cribl Community user @starcher. It automatically logs data (location, battery level, etc) to Cribl.Cloud when you fire off a Shortcut. Originally, he had used it to send to Splunk HEC directly, but converting it to work with Cribl took minimal effort, and Cribl allows so much more flexibility with his data.
The set-up is shown below in screencaps because Shortcuts is very visual/GUI driven. There’s not much text-based code.
First, he collects up the bits of info he wants to send and builds the dictionary which will be the payload. Within this main dictionary, he also created an event dictionary (next pic) which will be the event (ie, envelope content). At the end of this screencap, he runs Cribl Receiver.

The event dict:

And the definition for Cribl Receiver:

Apple iOS with Swift
With these few lines of code, you could enable logging directly from deployed mobile apps. Refer to Apple’s Swift docs for more detailed info.
Create the log struct
Here we create the chunk of data to post. We create the struct spec, a new object based on it, and then we convert that to JSON, as required by the endpoint.
struct MyLogEvent: Codable {
let userid: Stringlet version: Stringlet msg: String}let eventdata = MyLogEvent(userid: "thedude",version:"1.42",msg: "failed to login, bad password")guard let uploadData = try? JSONEncoder().encode(order) else {return}
Configure the upload request
Now we are preparing the request. You’ll need the URL and token for this block of code.
let url = URL(string: "<enter your url here>/services/collector")!
var request = URLRequest(url: url)
request.httpMethod = "POST"
request.setValue("application/json", forHTTPHeaderField: "Content-Type")
request.setValue("<enter your token here>", forHTTPHeaderField: "Authorization")
Perform the upload
Finally, using the previous code, we make a POST request.
let task = URLSession.shared.uploadTask(with: request, from: uploadData) { data, response, error in
if let error = error {
print ("error: \(error)")
return
}
guard let response = response as? HTTPURLResponse,
(200...299).contains(response.statusCode) else {
print ("server error")
return
}
if let mimeType = response.mimeType,
mimeType == "application/json",
let data = data,
let dataString = String(data: data, encoding: .utf8) {
print ("got data: \(dataString)")
}
}
task.resume()
Conclusion
Using Cribl unshackles you from your analysis tool. With a few clicks, you can change how your data is routed, filtered, transformed and archived. Using Azure object storage (blob)? Sure, send it there. Using Event Hub? New Relic? QRadar? Splunk? Absolutely. Want to use multiple destinations, sending a copy to each place? YES! Easy to do.
With Cribl the fasten seatbelt sign is off! Your data is free to move about the cabin.

Sign-up for your free Cribl.Cloud Suite now to get 1 TB/day of ingest for free.
The fastest way to get started with Cribl Stream and Cribl Edge is to try the Free Cloud Sandboxes.