
The way we handle massive volumes of data from multiple sources is about to change fundamentally. The traditional data processing systems don’t always fit into our budget (unless you have some pretty deep pockets). Our wallets constantly need to expand to keep up with the changing data veracity and volume, which isn’t always feasible. Yet we keep doing it because data is a commodity.
To complement our traditional processing systems, data lakes are becoming more popular. With data lakes, we can store any amount of data in real-time as it flows. More importantly, data lakes allow us to tier our data, essentially sending our high-value data to our analytics system and our low-value data to our retention system. Ultimately, this makes all our data accessible.
A data lake also allows us to store data in multiple cloud environments without incurring high egress costs. Moving data is expensive! But you might be asking, “ok, so cool, I have all this data in my data lake but I’m going to have to move it eventually!” Well, not necessarily. Investigative and search workflows are changing. What if you could search your data without moving it out of your data lake? And what if you didn’t have to index it in your analysis system, reducing licensing costs? How about running a unifying search across multiple data lakes and datasets at once? Well, YOU CAN!
Cribl Search combines federated, centralized search with decentralized data storage to offer a search-in-place solution. You are free to use ALL the cloud data lakes your business requires or your heart desires!
This blog will take a quick look at how to federate a search across all three major Cloud data lakes (AWS S3, Azure Blob, and Google GCS). Why, you might ask? Here are some reasons why federated cloud searches are important:
Investigate the same data across multiple cloud providers more quickly (e.g., flow logs across all three main cloud providers).
Ensure conformance across all data lakes – Eventually, you’re going to have to search data across multiple data lakes, but how can you make sure they all follow the same standard? Use Cribl Search to run conformance-based searches.
Give users access to the data – analytics systems can be expensive. What if those infrequent or ad hoc users could access that data through Cribl Search without incurring additional licensing costs downstream or cloud egress costs.
Analyze historical data before replaying to your analysis system – We often need to review historical data for investigations, capacity exercises, or other reasons. Instead of replaying or rehydrating all the data for a given time, Cribl Search allows you to find the relevant data PRIOR to rehydrating.
And more…!
So now that you know federated cloud searches can be useful, let’s connect your data lakes and start searching.
Connect Amazon S3 to Cribl Search
First, we’ll tackle Amazon S3. There are two ways to authenticate:
Use an access key/secret key combination
Assume a role within your organization’s account.
In this blog, we are going to be covering the second option with AssumeRole.
In the diagram below, we show how Cribl Search is hosted in Cribl.Cloud works with your AWS AssumeRole permissions to access your S3 resources.
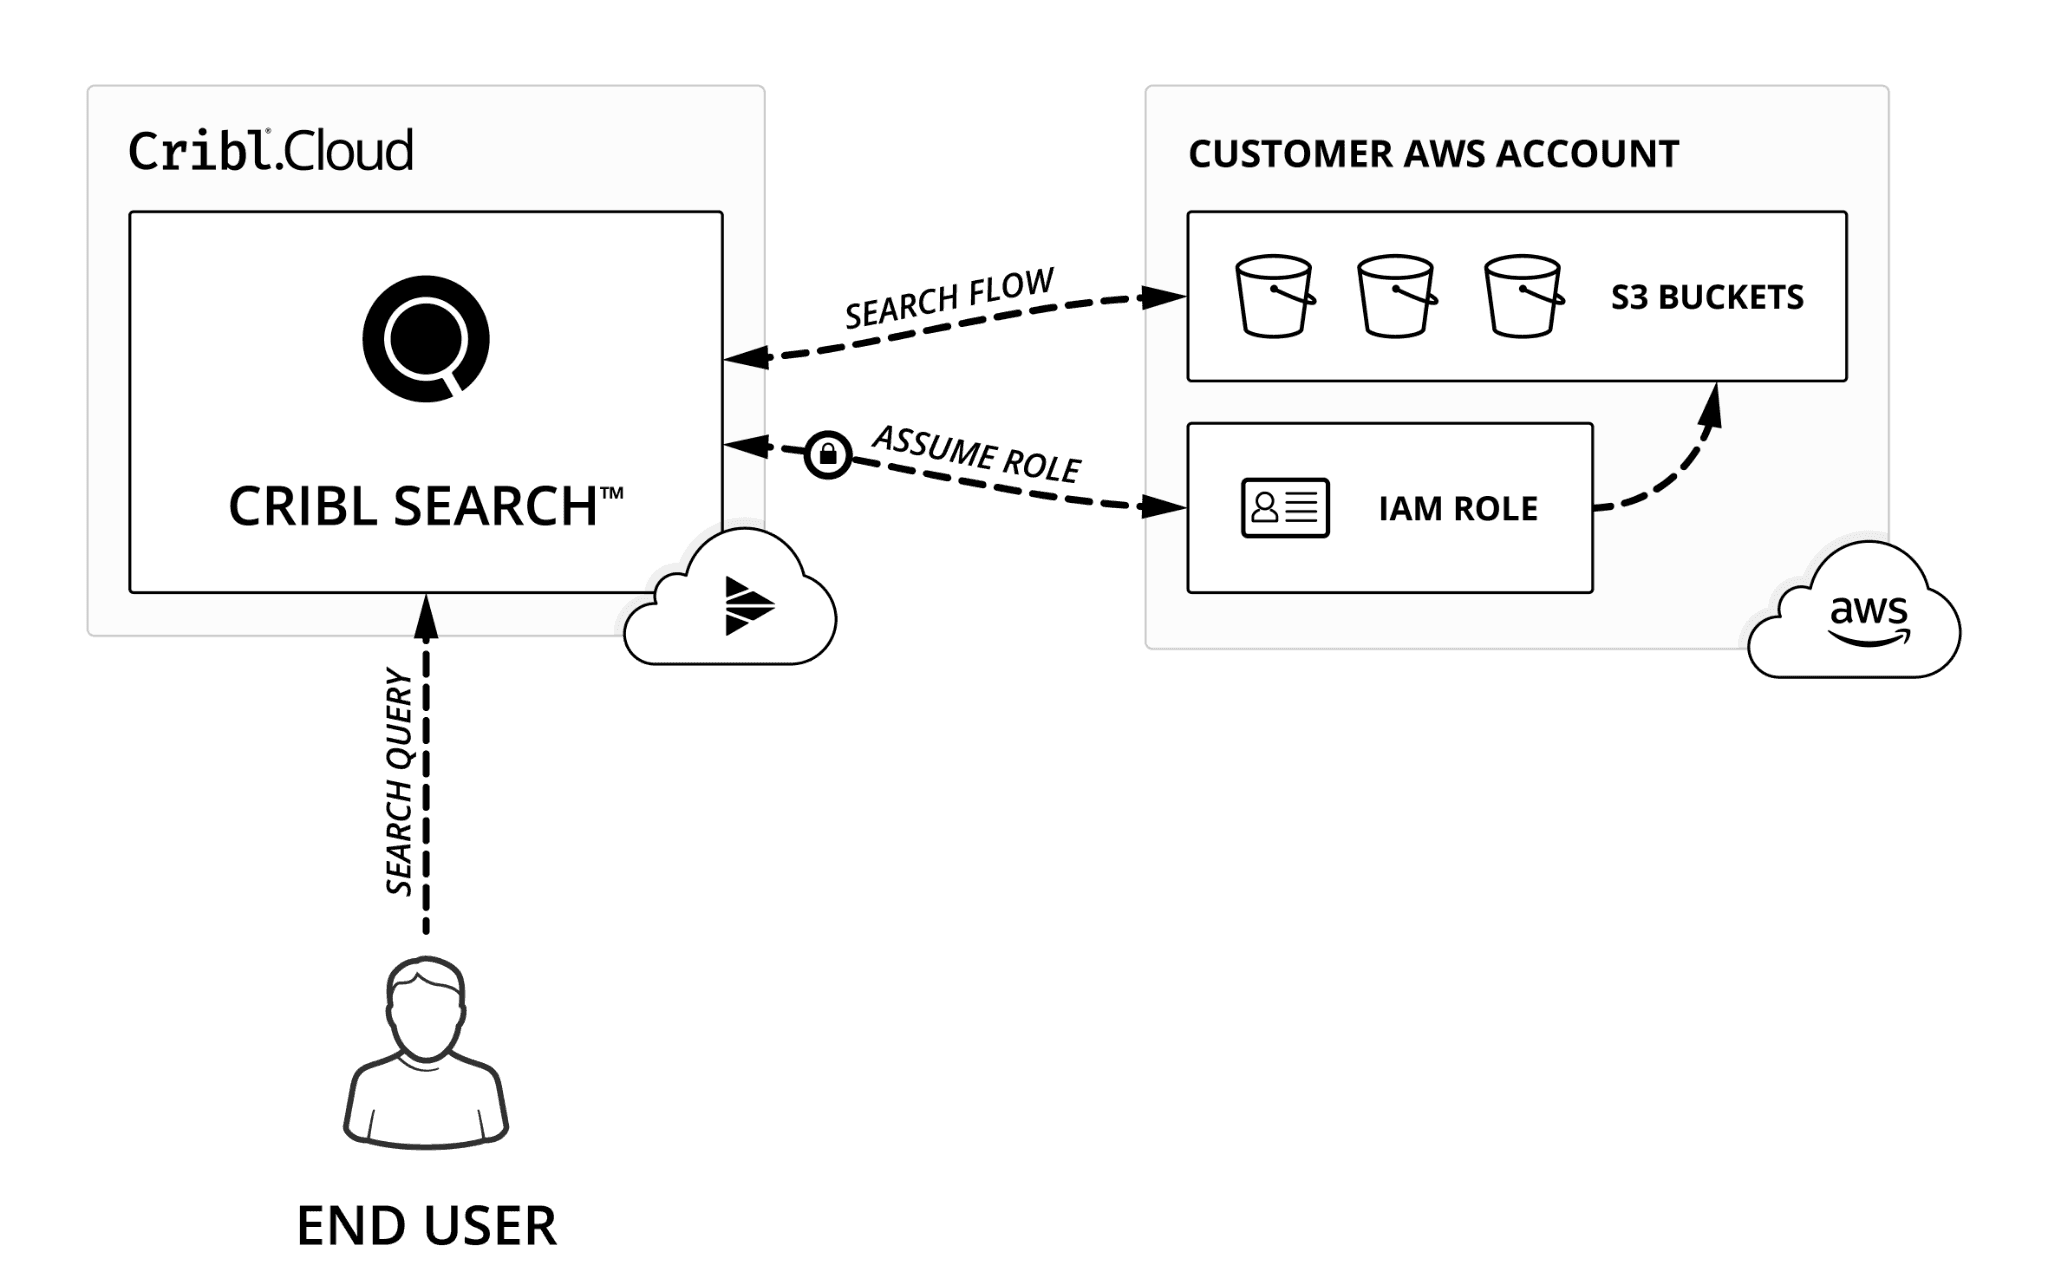
Here’s how it works:
The Cribl Search Compute assumes a role in your AWS Account. Your account’s Trust Policy allows this role to assume another role.
By using these credentials, Cribl Search Compute can access resources in your AWS Account that are limited by the resource/permission policies.
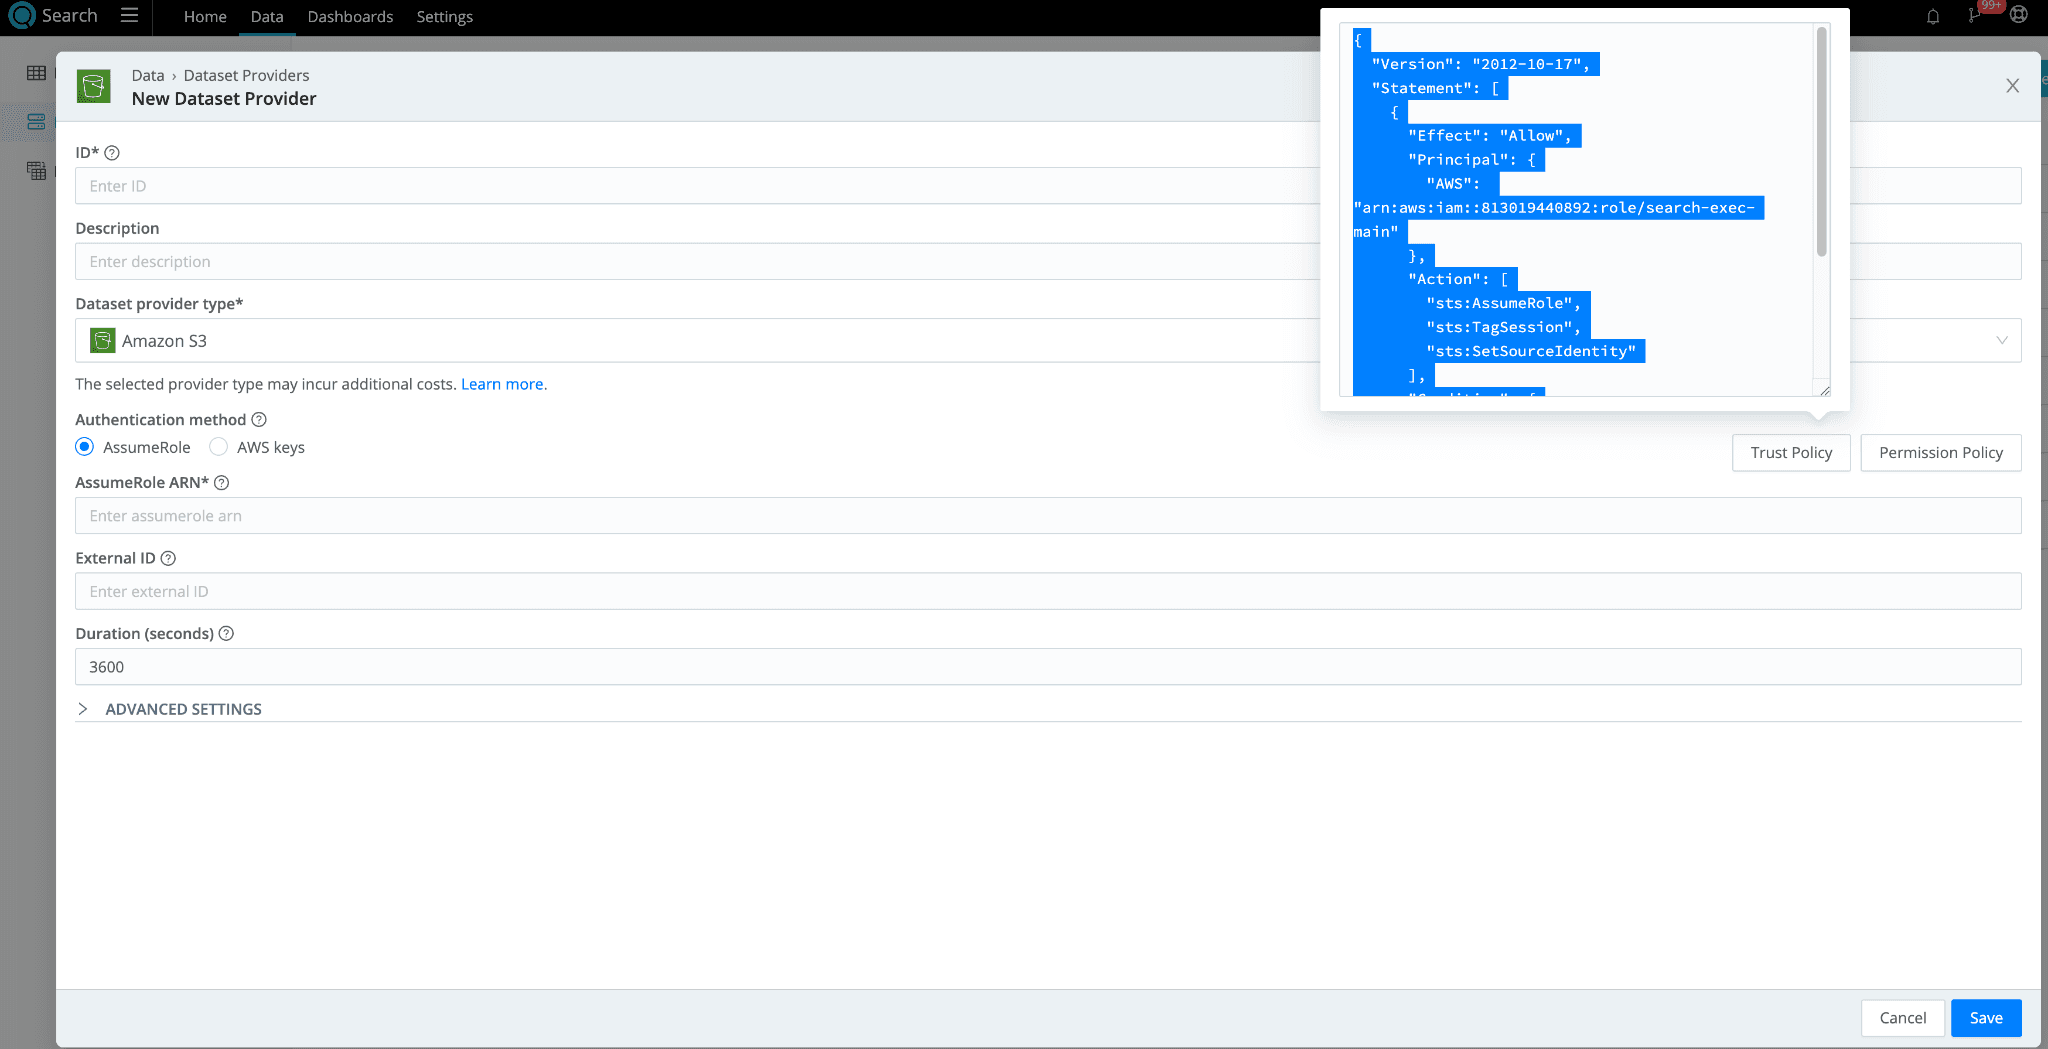
Let’s get started by setting up two items within your AWS Account. In Cribl Search, you’ll find both the Trust and Permission policies under Dataset Providers. Let’s get started by navigating there.
In Cribl Search, navigate to Data > Dataset Providers > Create Provider
Set Dataset Provider Type to Amazon S3.
Copy the Trust Policy and Permission Policy and paste them into a temporary notepad. We will need these once we get to the AWS Console.
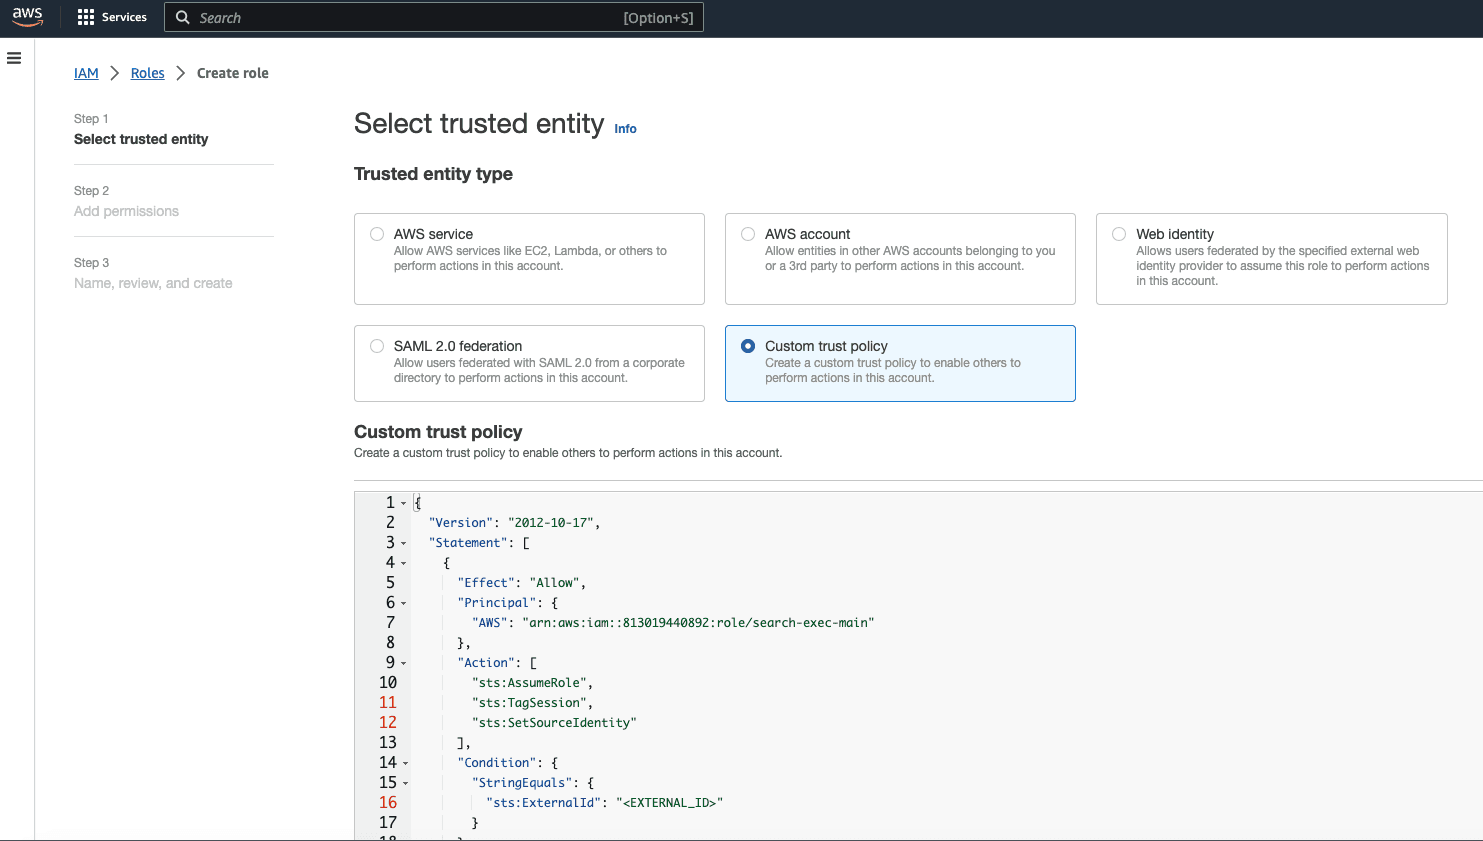
In the AWS Console, navigate to AWS Console > IAM. Create a Role with a custom Trust Policy.
Paste in the Trust Policy you copied in Step #3 from Cribl Search Dataset provider. You will need to update the ExternalId field in your Trust Policy if you are using one.
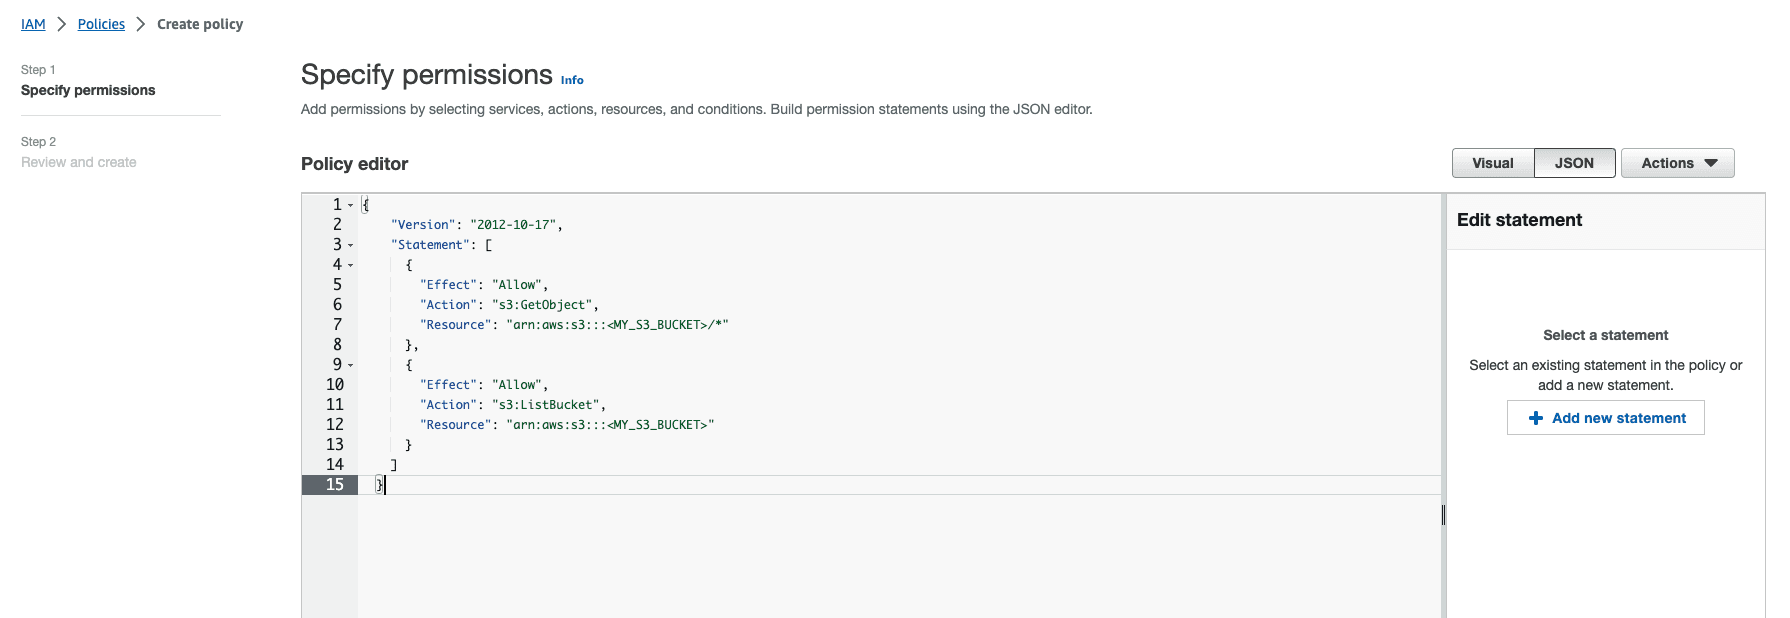
In the AWS console, under Step 2 of the Role Creation wizard, you can add the Permissions policy copied from Step #3 here to allow access to the S3 bucket you plan to search in the AWS console. You will need to update the “Resource” in the policy itself to reflect the name of your bucket.
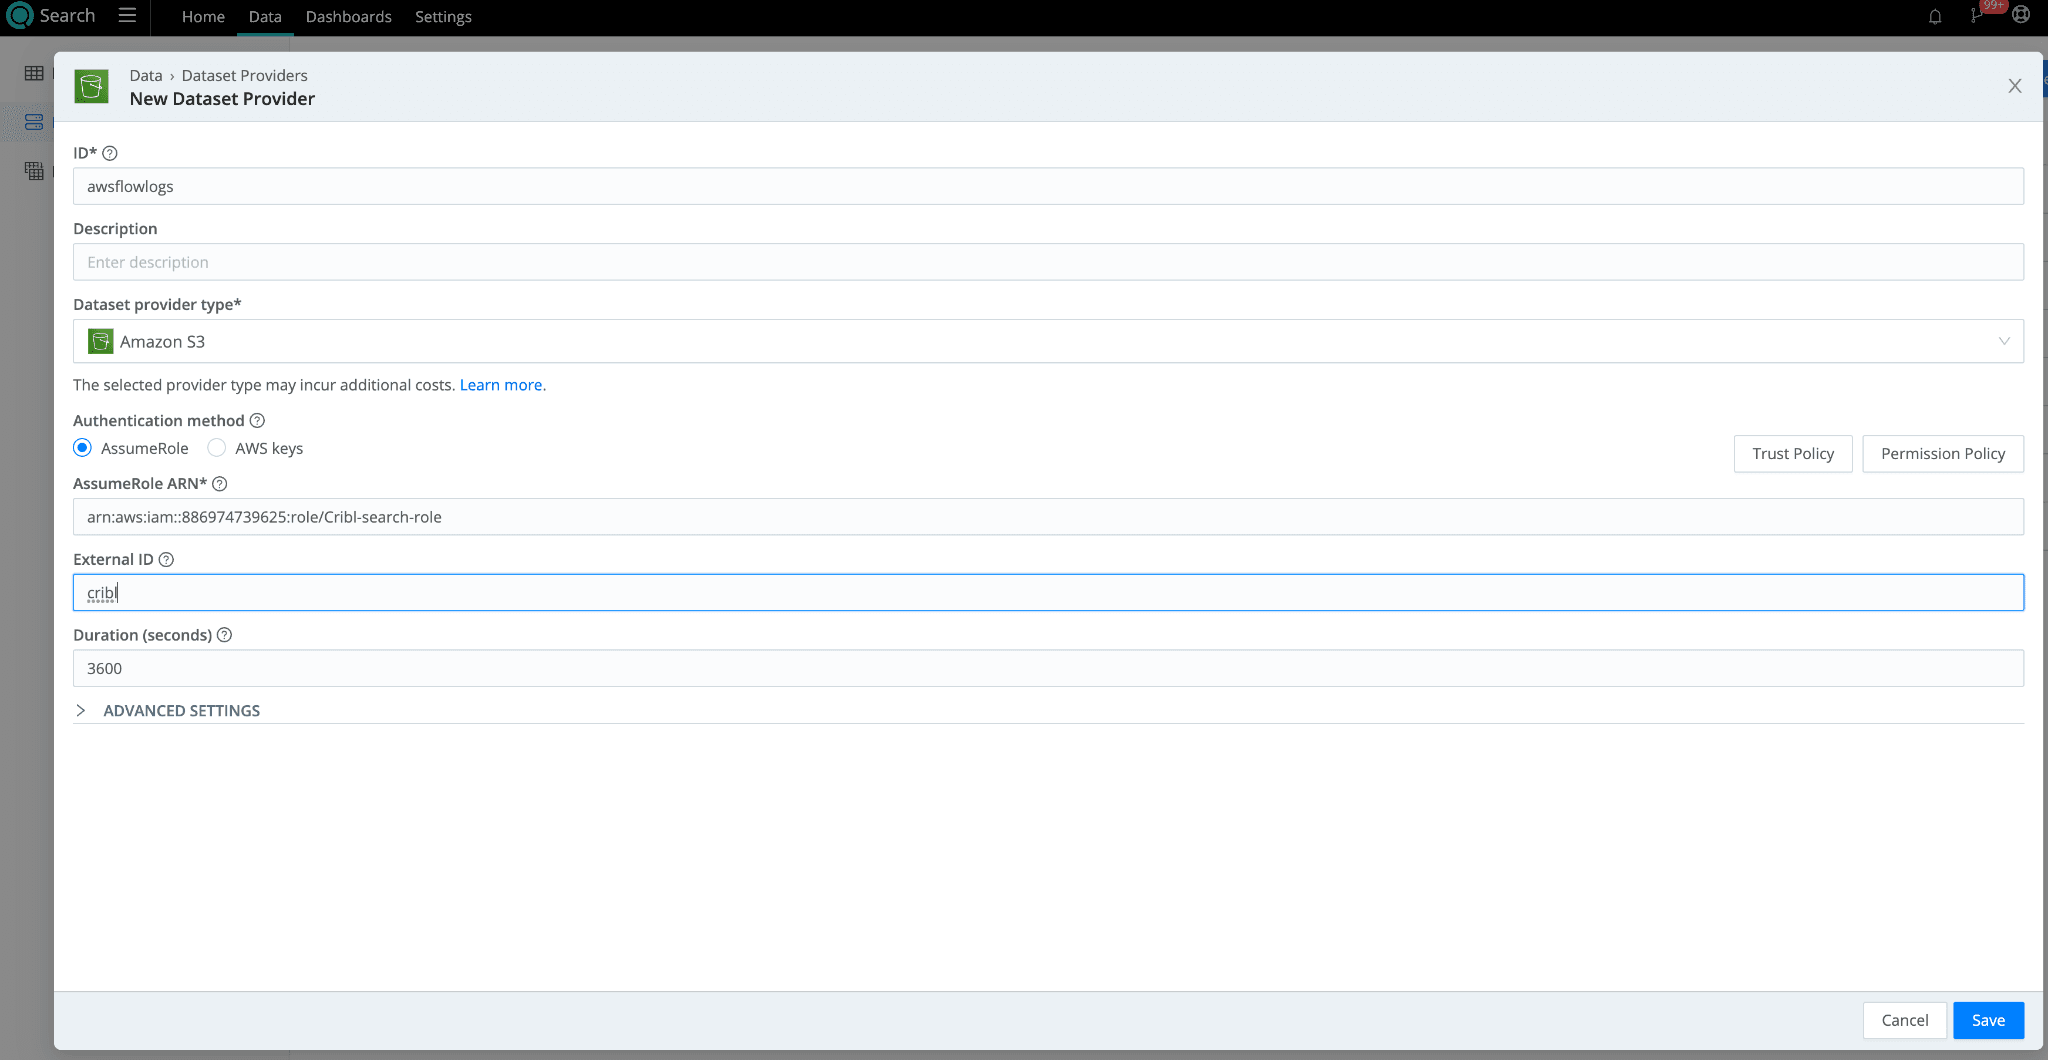
When the role is created in the AWS console, copy the ARN and use it in the Cribl Search Dataset provider set up page for S3. Include any ExternalId you used in your Trust Policy. Click Save.
In Cribl Search, navigate to Data > Datasets > Add Dataset. Set the Dataset Provider to the Amazon S3 dataset provider (its ID) you created in the earlier step. Specify the bucket prefixes to populate the Bucket path. If you want to tokenize parts of that prefix, you can use the following syntax:
"mybucket/${fieldA}/${fieldB}"
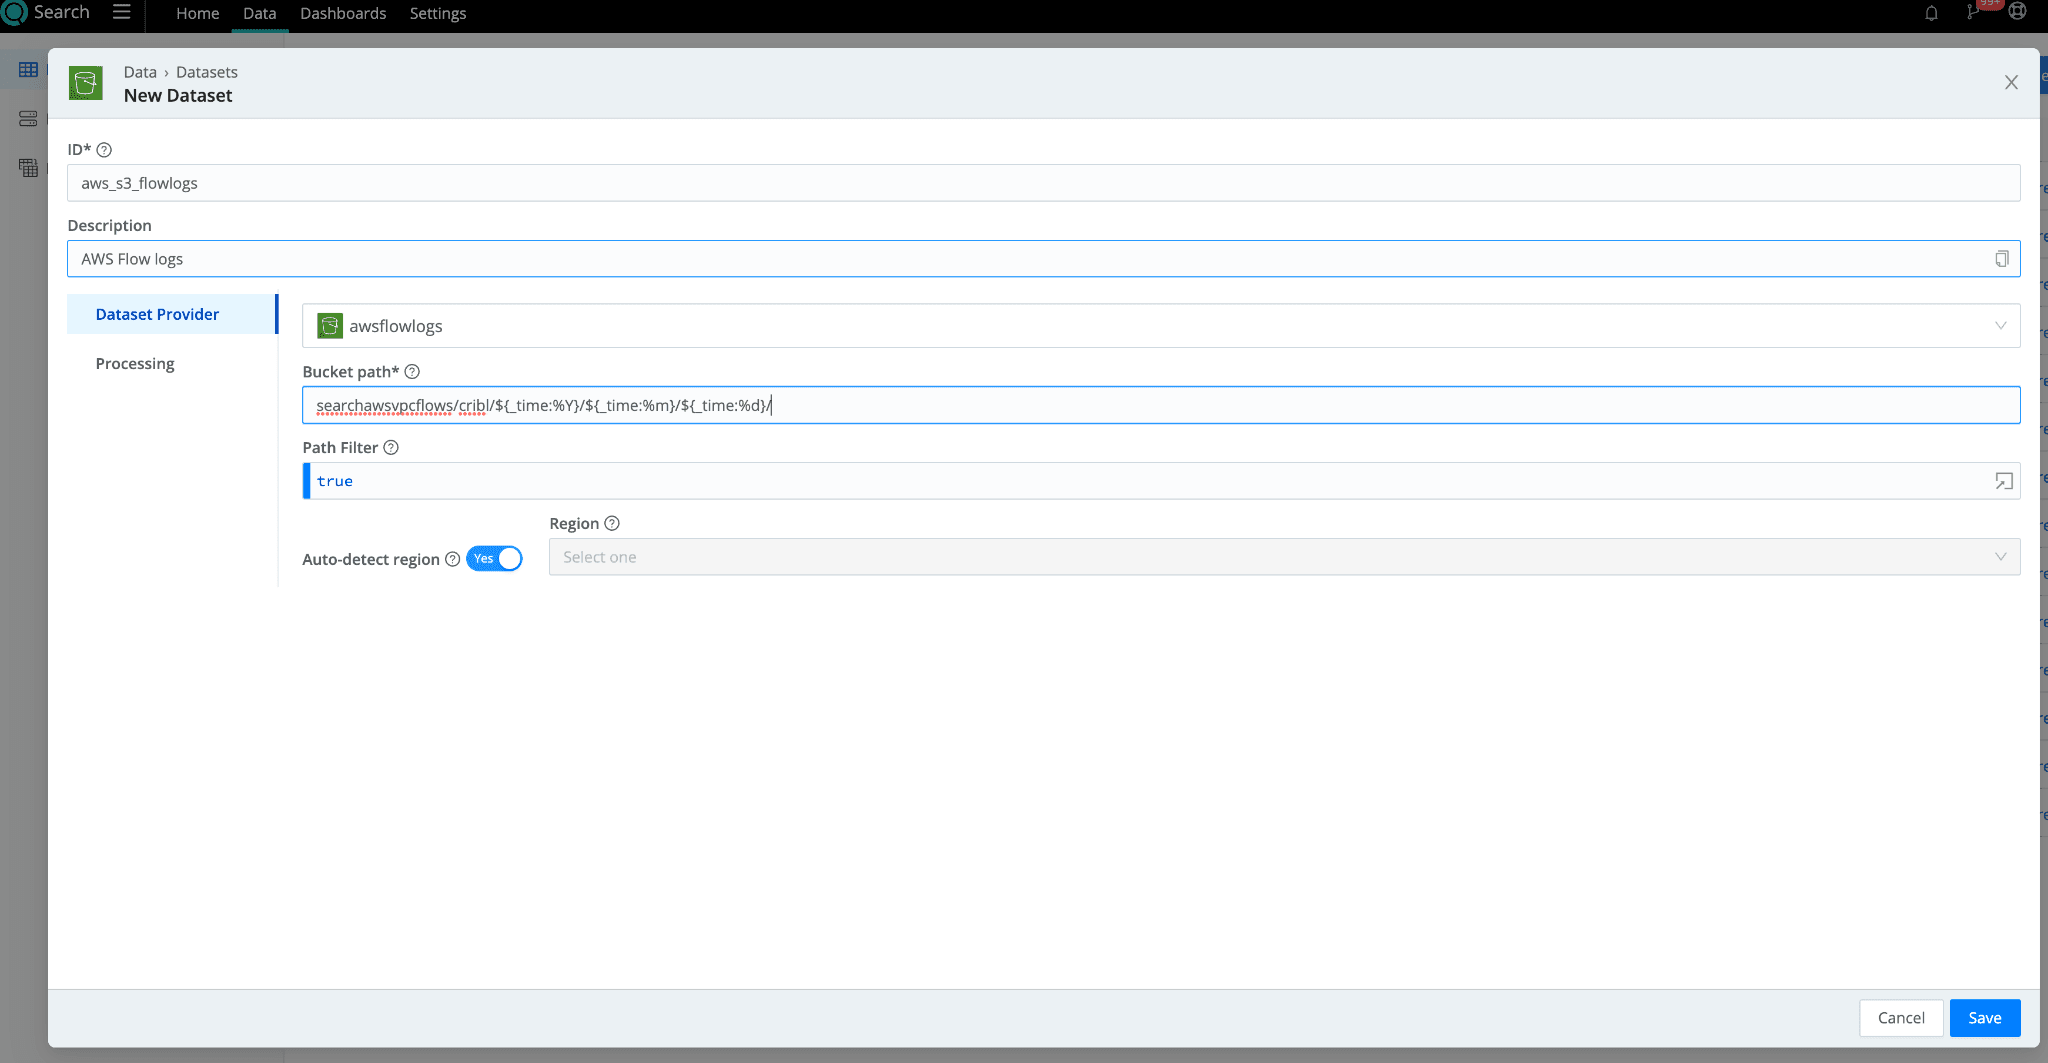
Under “Processing”, add any Datatype Rulesets to make searching your data easier and fields referenceable in your search queries.
Connect Google Cloud Storage (GCS) to Cribl Search
On to Google Cloud Storage (GCS) hosted within GCP. To access resources in your GCP account, Cribl Search uses a service account on the GCP side with service account credentials. Let’s go over your storage bucket access controls and get your service account up and running.
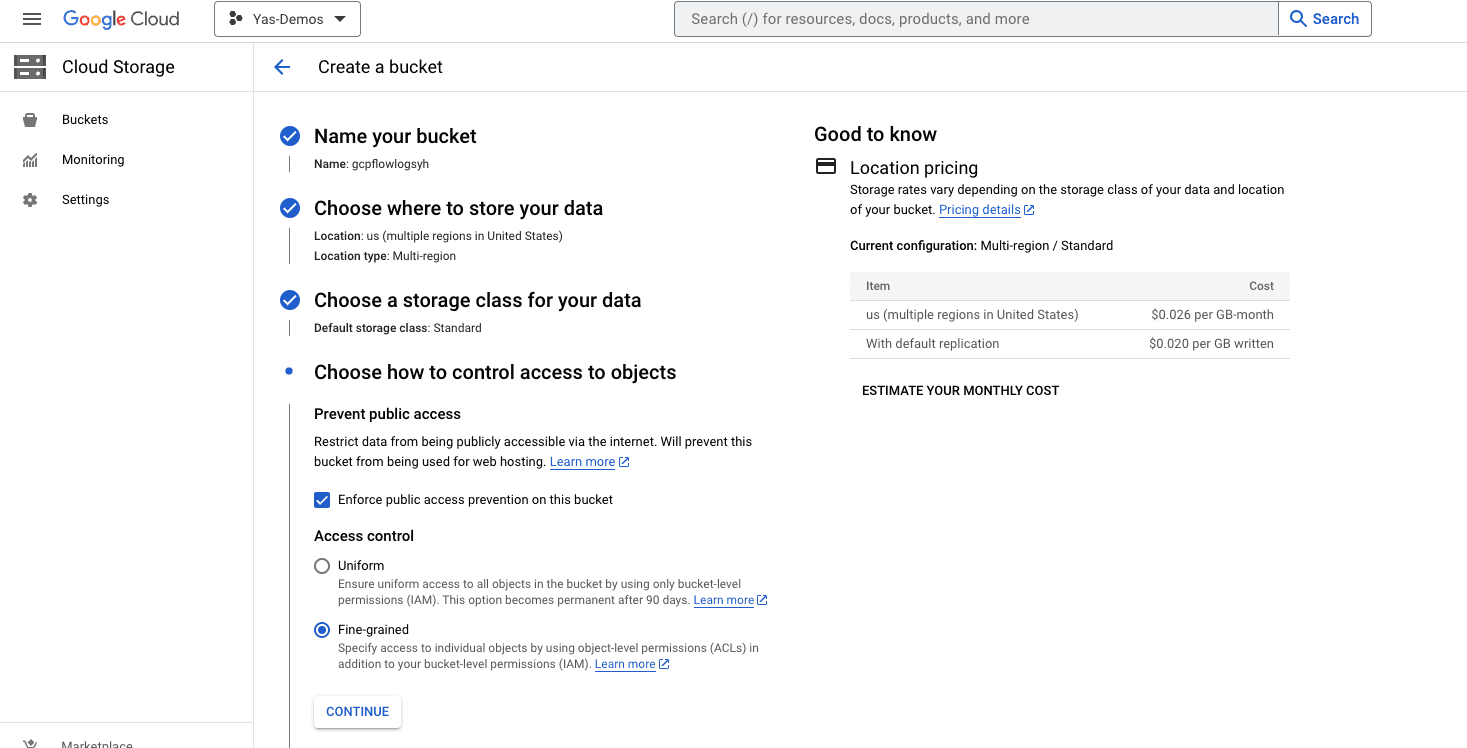
In the GCP Console, if you haven’t already created your storage bucket, go ahead and do so. When you get to “Access Controls”, make sure to select “Fine Grained” Access control. If your bucket already exists, make these modifications “Bucket Details” > “Permissions” section.
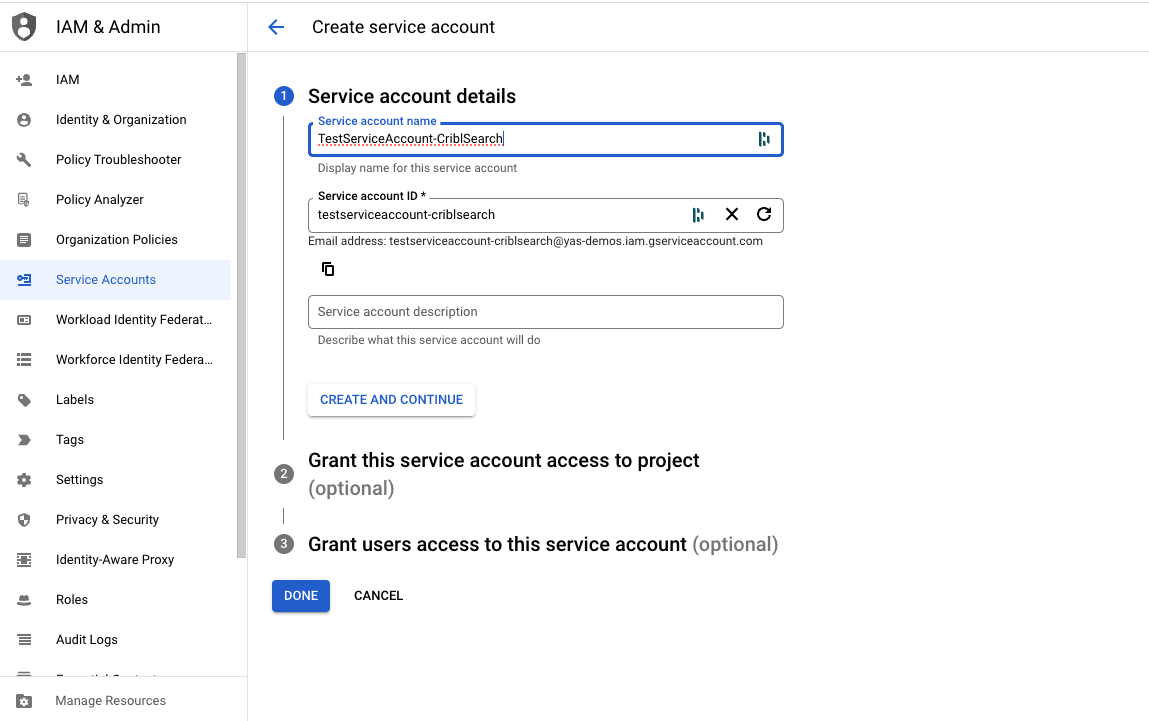
Navigate to IAM & Admin > Service Accounts > Create Service Account in the GCP Console to create a new service account for Cribl Search access. Give the account an ID.
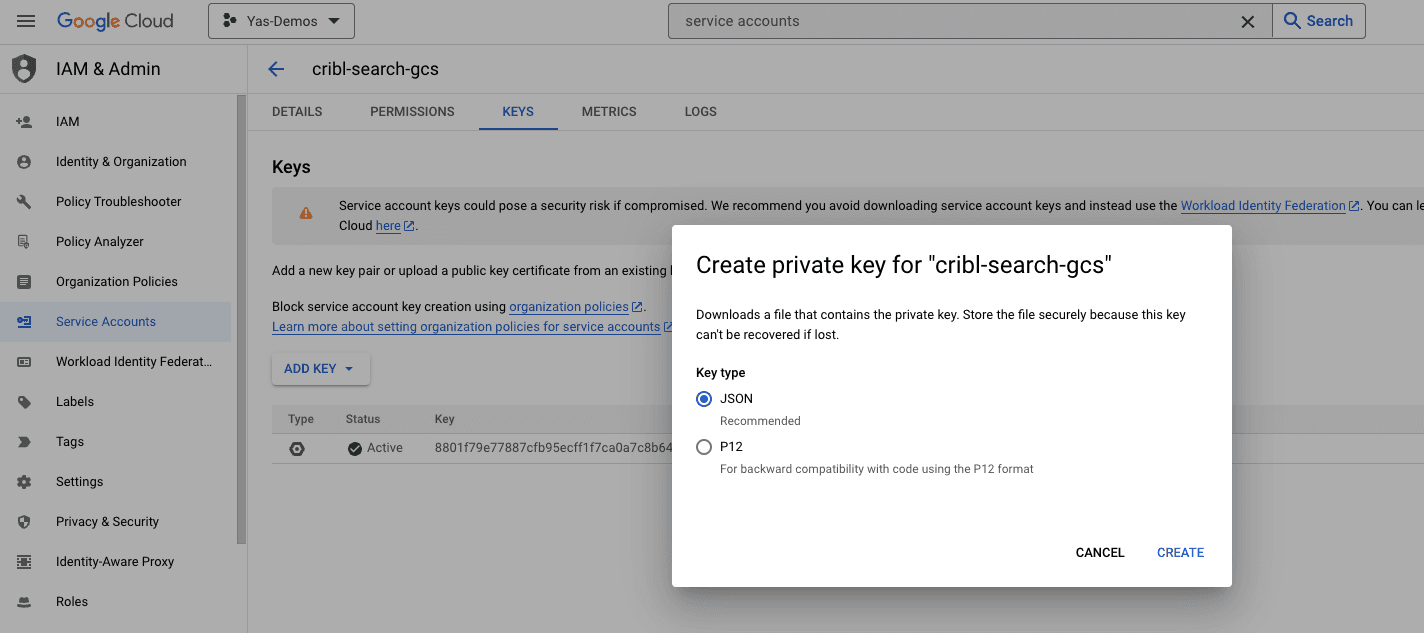
Once the service account is created, copy the address of the service account. You’ll need it in Step 4. Then navigate to the Keys tab and click Add Key > JSON to generate Service Account credentials for Cribl Search.
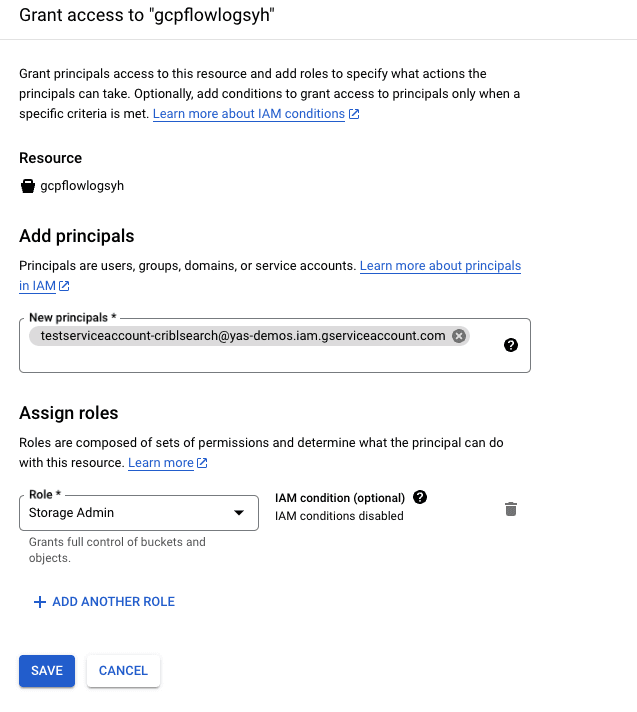
Navigate back to the bucket, on the Permissions tab, click Grant Access under the Principals section. Add the Service Account address you copied from before to the Principals field and assign it the role of Storage Admin for your bucket. Click Save.
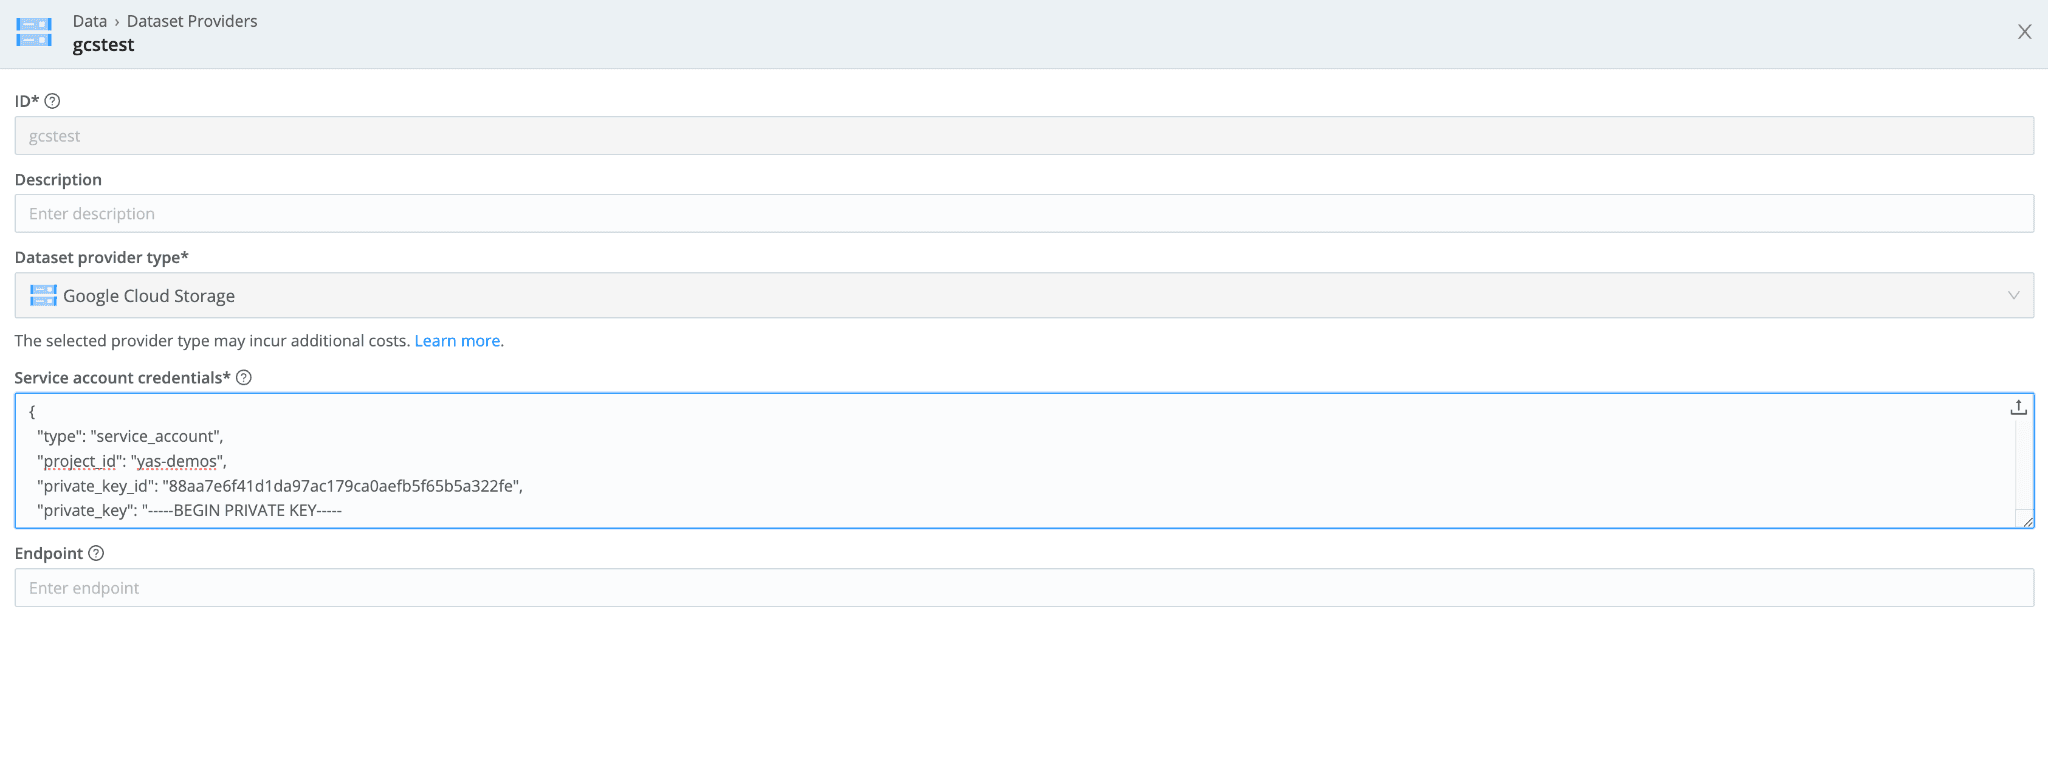
In Cribl Search, navigate to Data> Dataset Providers > Create Provider. Select Google Cloud Storage. Add the Service Account credentials you created in Step #3.
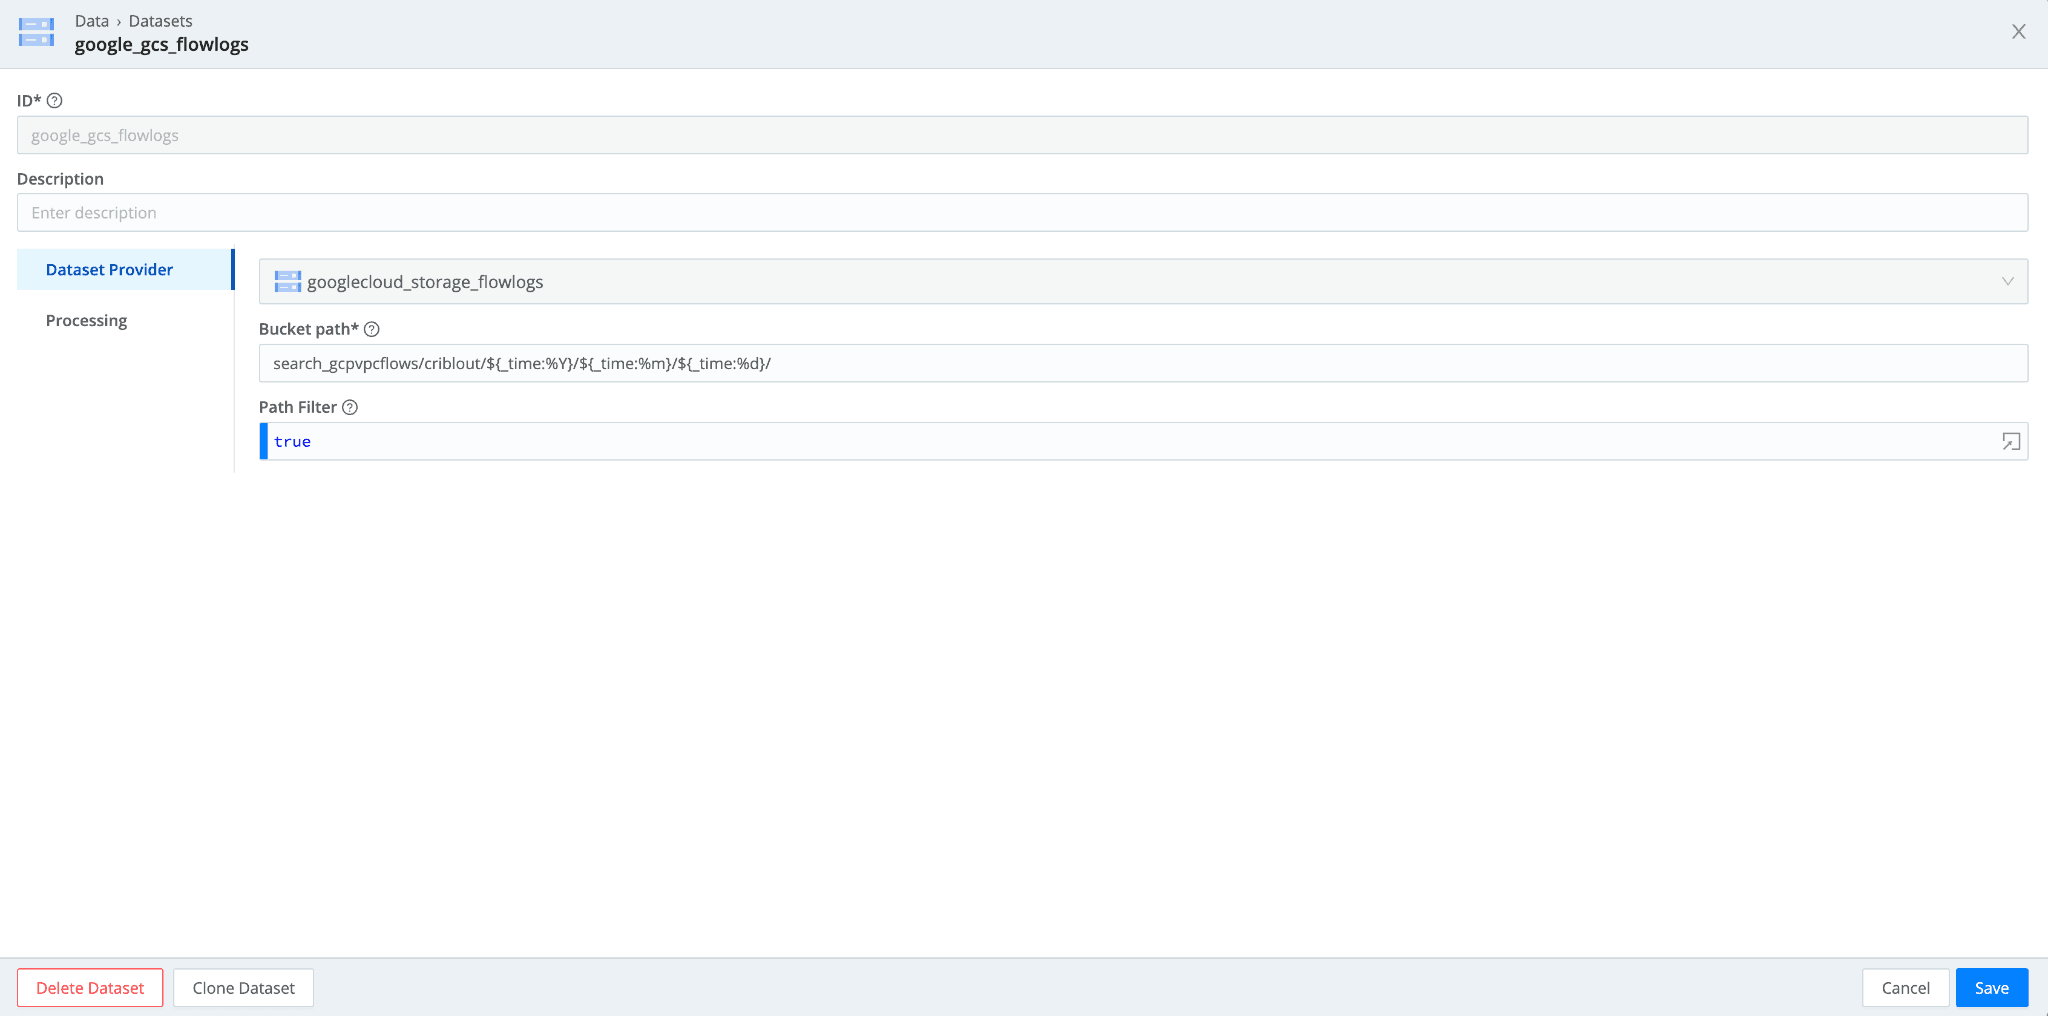
Navigate to Data > Datasets > Add Dataset. Set the Dataset Provider to the Google Cloud Storage dataset provider (its ID) you created in the earlier step. Specify the bucket prefixes to populate the path. . If you want to tokenize parts of that prefix, you can use the following syntax:
"mybucket/${fieldA}/${fieldB}"
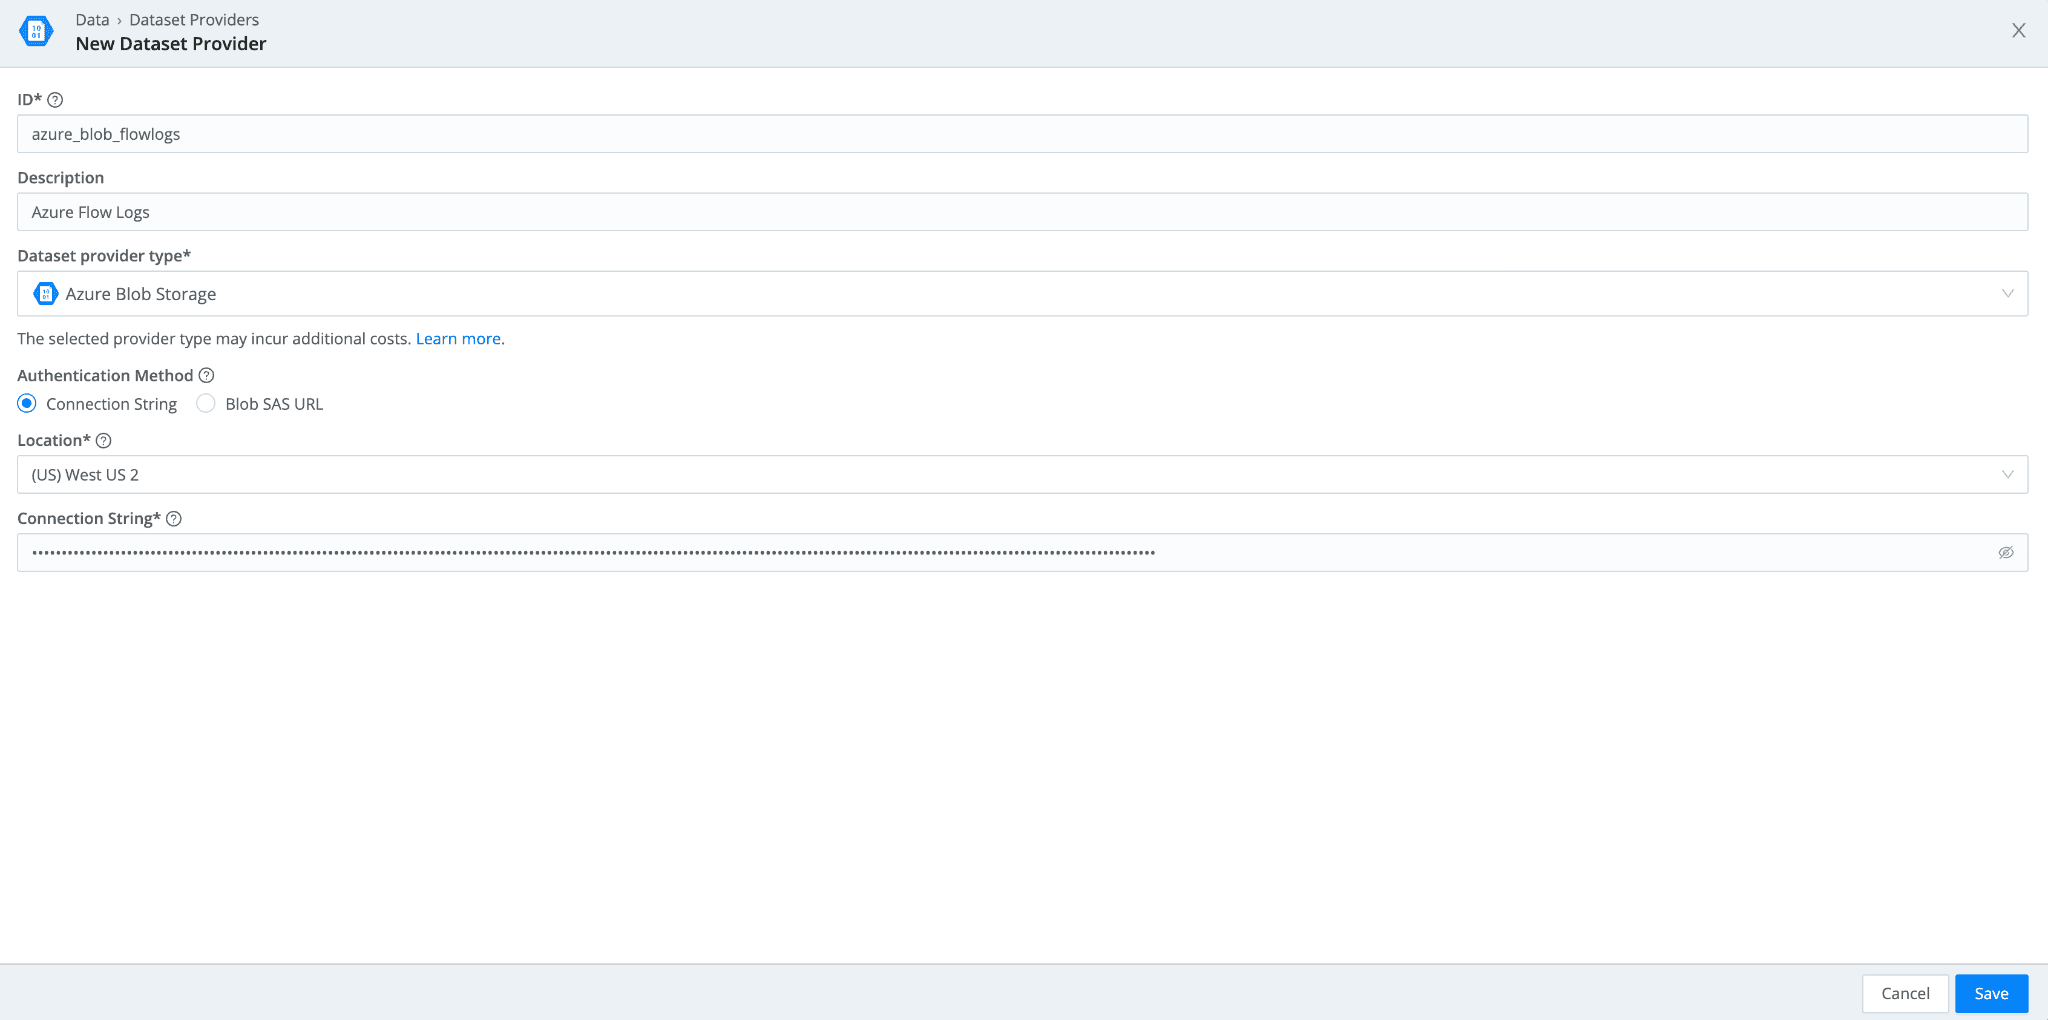
Connect Azure Blob to Cribl Search
Finally, let’s connect Azure Blob to Cribl Search. For authentication, Azure Blob offers two options:
Shared Access Signatures (SAS)
Connection Strings.
This blog covers the second method, Connection Strings.
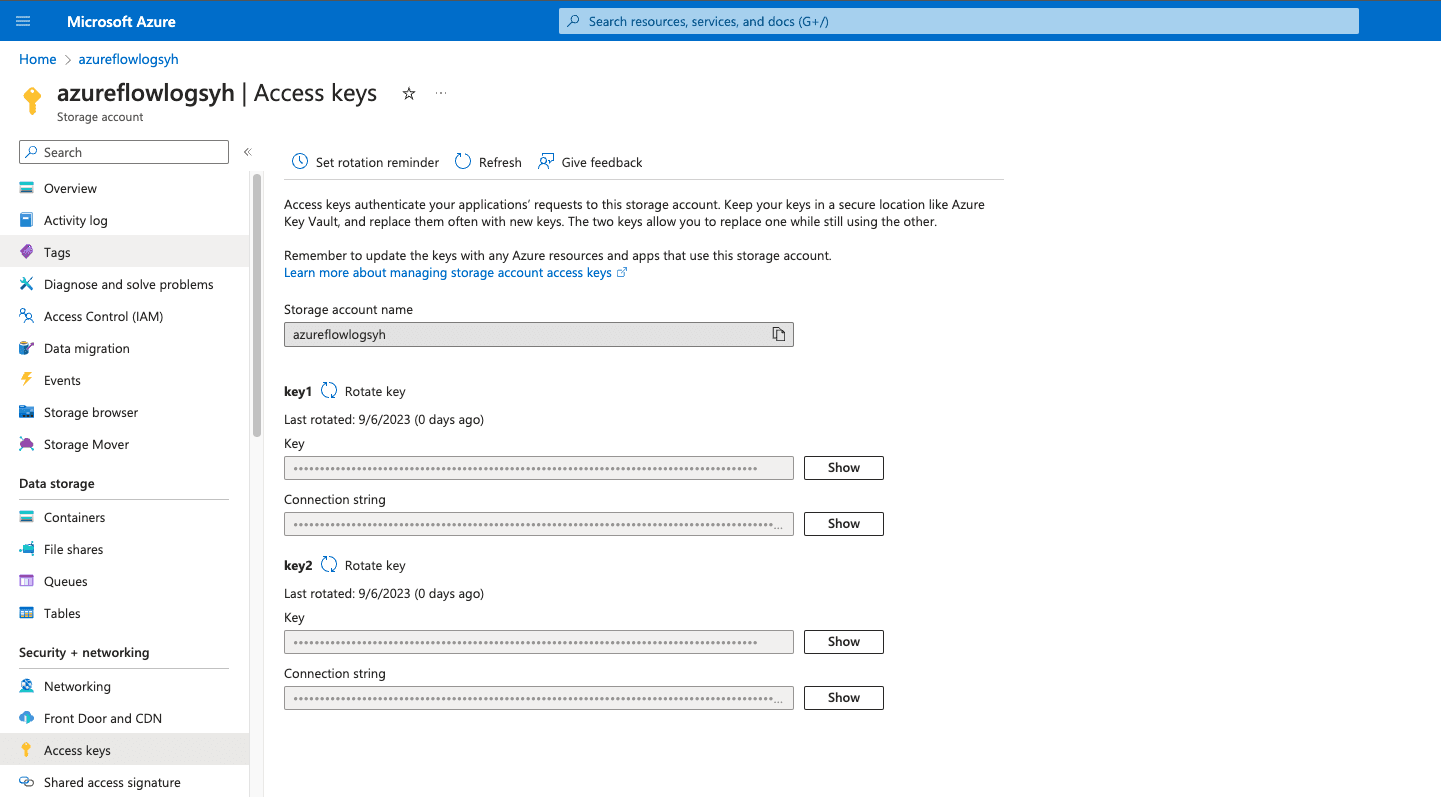
In your Azure Portal, navigate to Storage Account > and select the Storage Account you want Cribl Search to access, then go to the Access Keys. You will see a handful of keys already configured for the storage account. You can Rotate key if necessary. Copy the Connection String of the key you’d like to use.
In Cribl Search, navigate to Data> Dataset Providers > Create Provider. Select Azure Blob Storage. Add the Connection String you copied from Step #1 along with the location of your Storage Account.
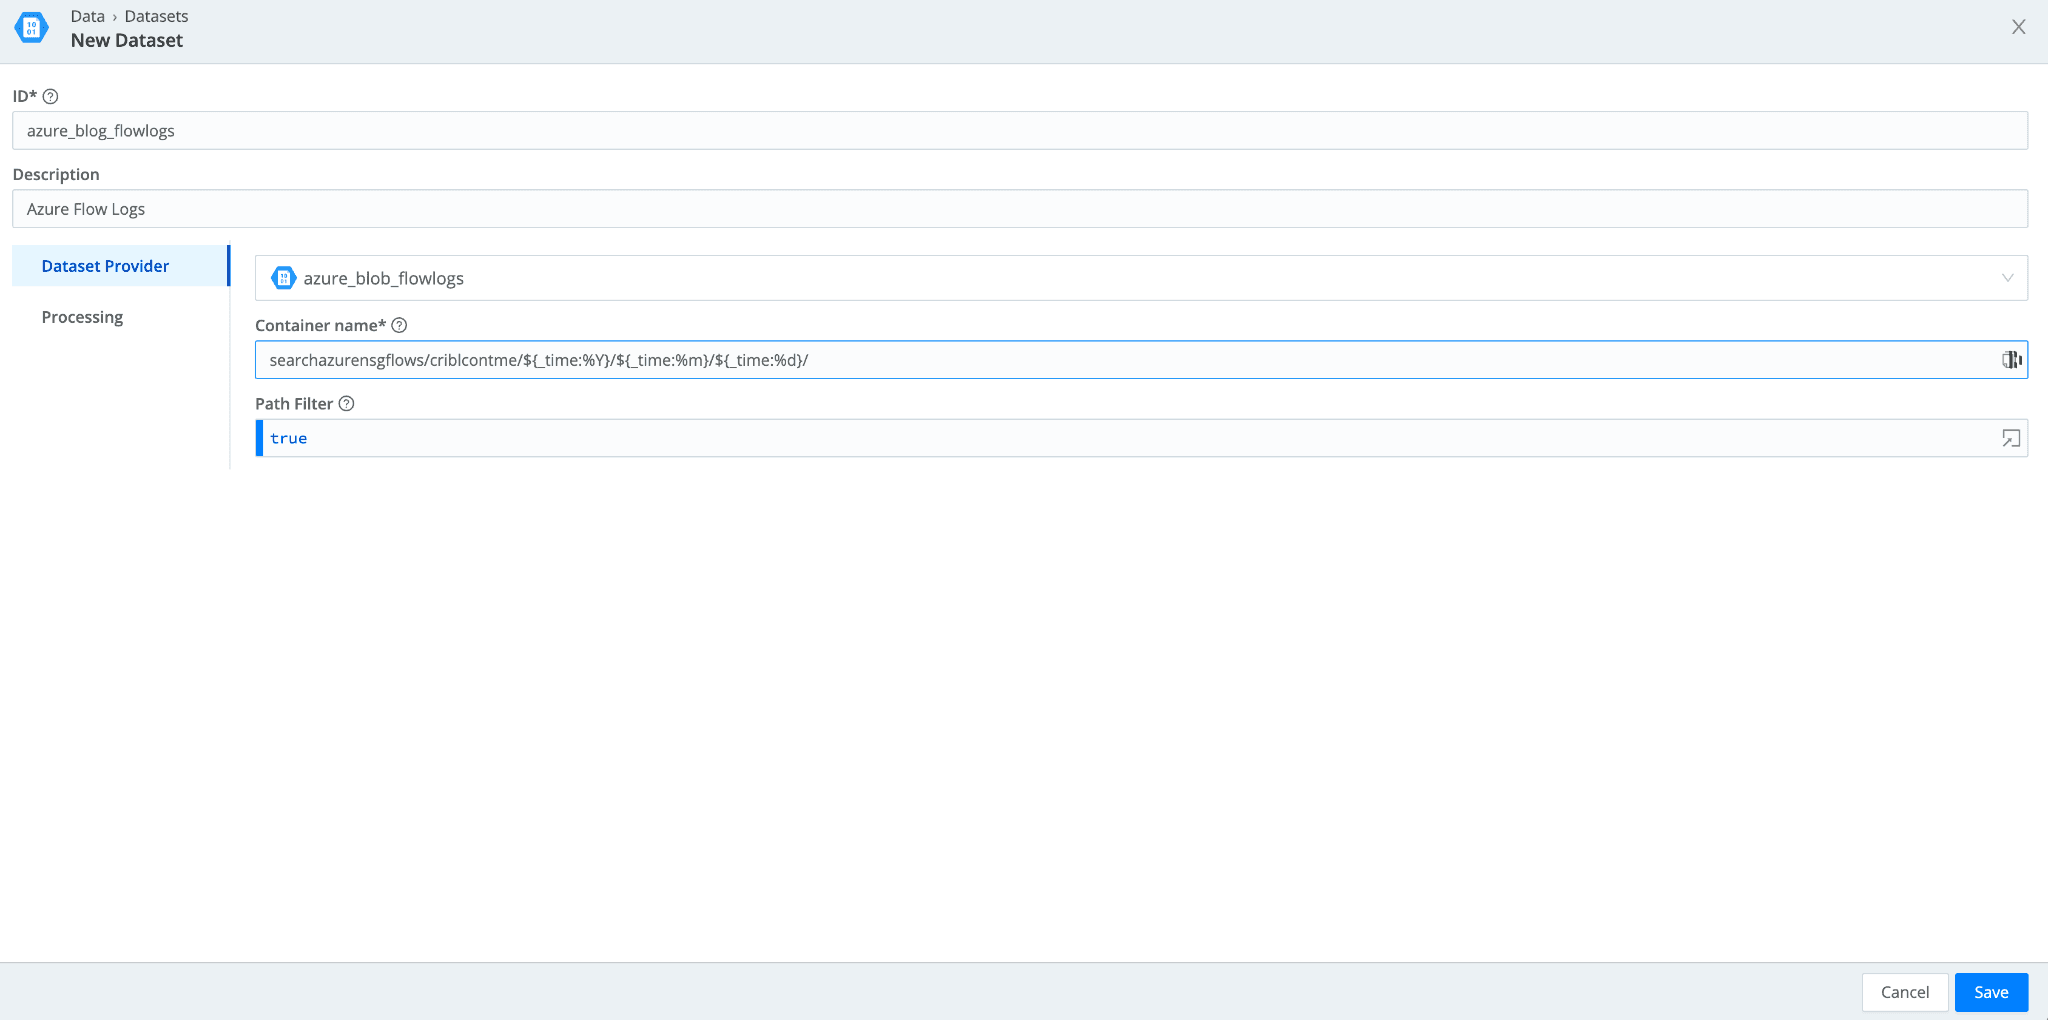
Navigate to Data > Datasets > Add Dataset. Set the Dataset Provider to the Azure Blob dataset provider (its ID) you created in the earlier step. Populate the Container name with the storage container and prefixes you have in your Azure Storage Account. If you want to tokenize parts of that prefix, you can use the following syntax:
"mybucket/${fieldA}/${fieldB}"
Running a Federated Search Across All 3 Cloud Providers
We now have all three cloud providers configured within Cribl Search. It’s time to federate some searches.
In this example, each of the three cloud providers has flow logs in their object storage that we have configured Dataset Providers and Datasets to access. To give all three datasets a uniform naming convention, each dataset is appended with “_flowlogs”. This naming convention allows us to run the first search to combine data from all three datasets:
dataset="*_flowlogs" | limit 1000
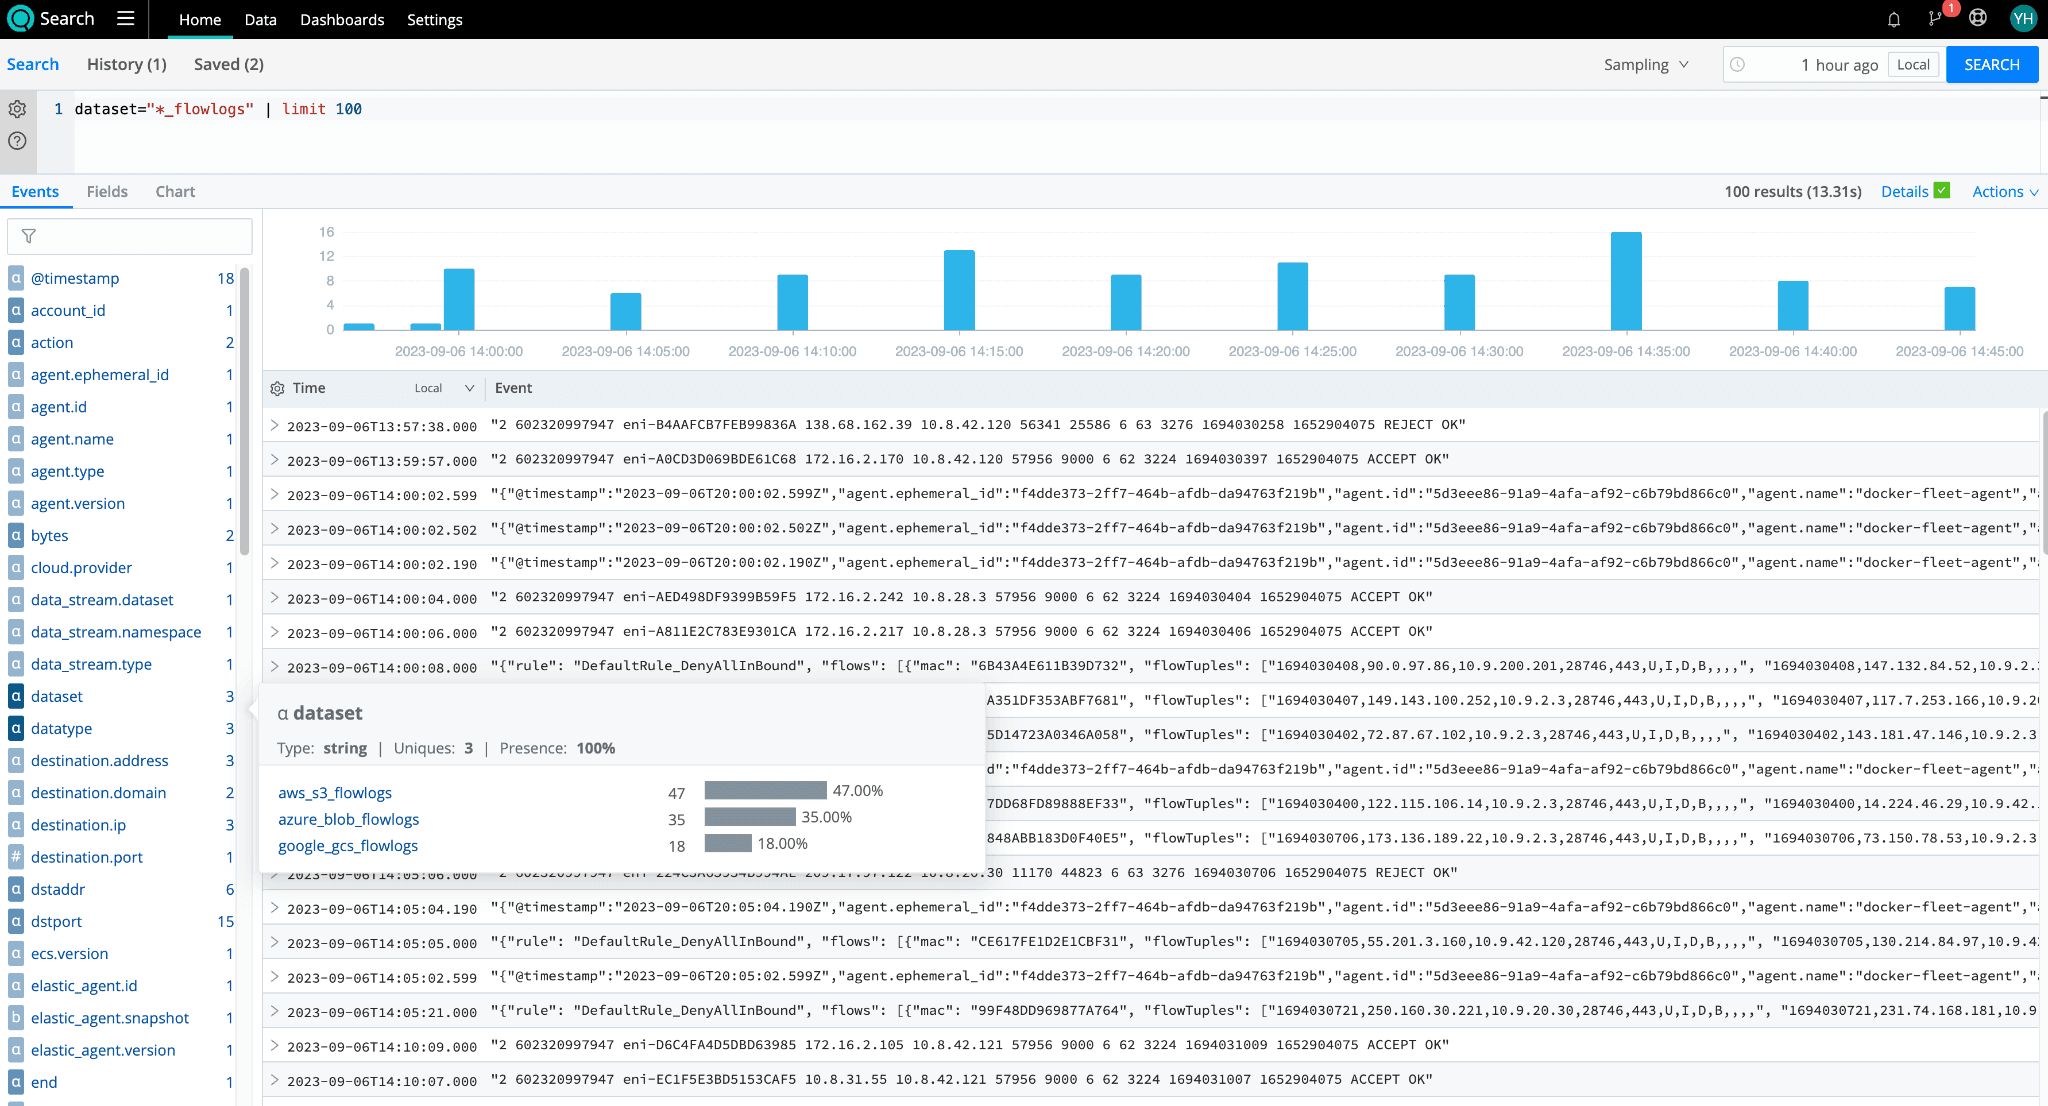
We can see all three datasets from GCS, Azure Blob, and Amazon S3 returning results here. With Cribl Search, you can easily gather all your flowlogs from your multi-cloud management environments for analysis.
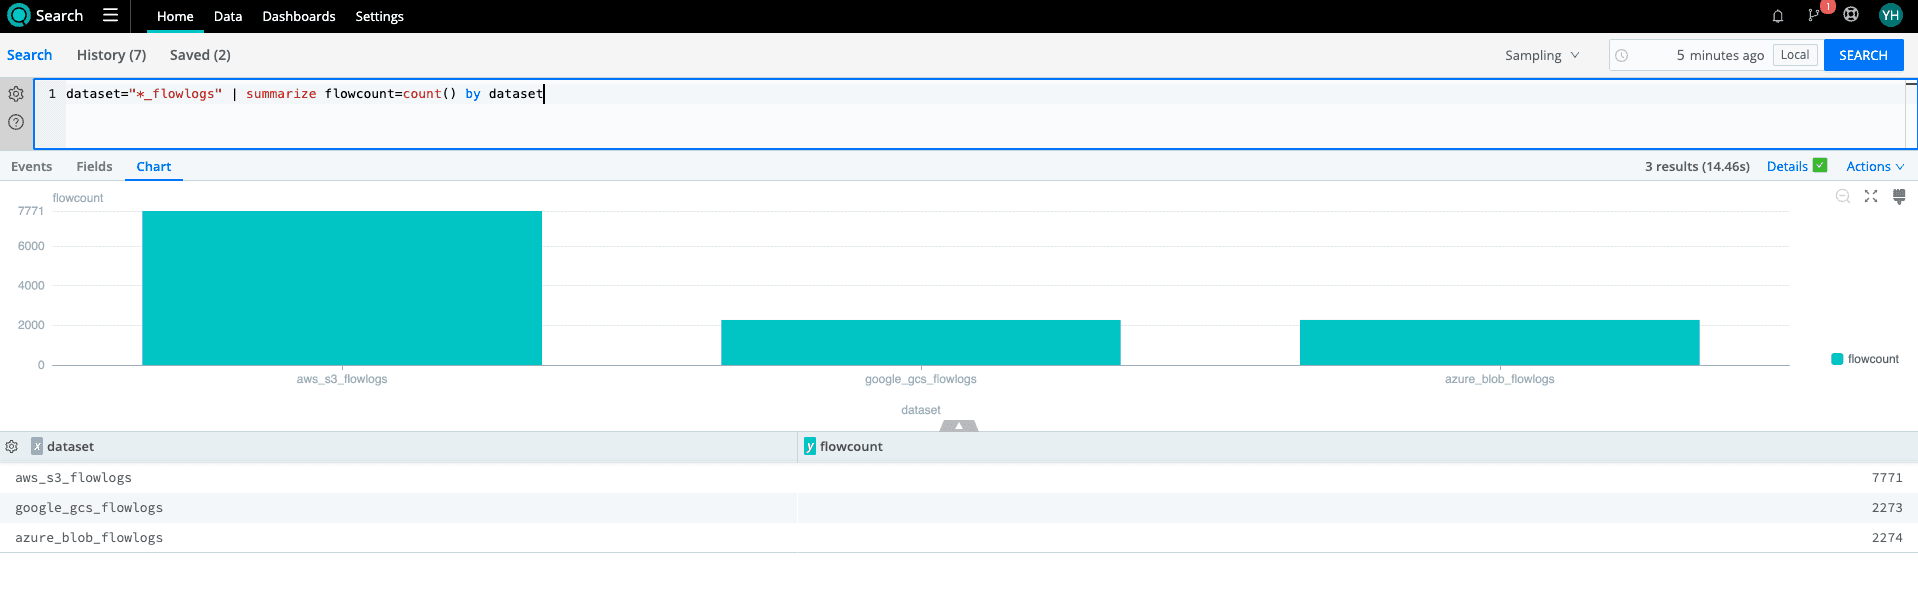
Let’s take that search and turn it into a bar chart with counts of each dataset’s flowlog. By visualizing each provider’s flowlog volume, I can see if there are any anomalies in terms of the volume I expect from each and add this visualization to my dashboard.
dataset="*_flowlogs" | summarize flowcount=count() by dataset
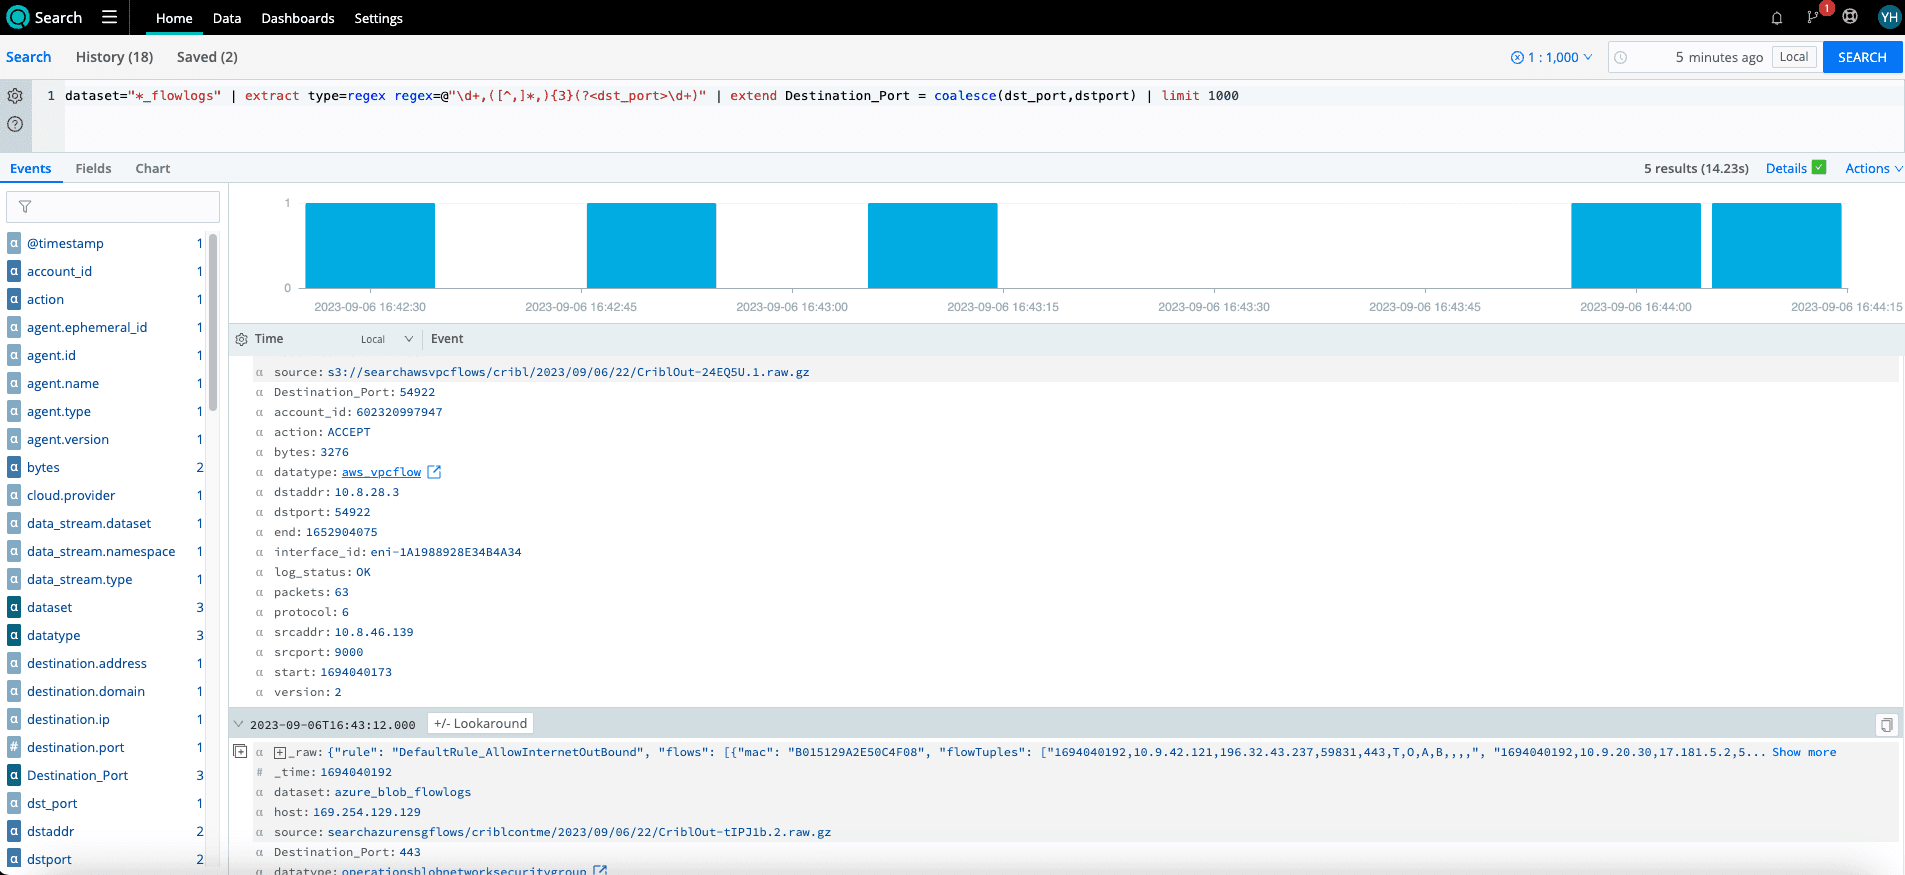
It is likely that the three providers will also share fields. However, they can’t make it THAT easy! For our AWS flowlogs, we already have a “dstport”; however, Azure organizes flowlogs into tuples from which we must extract the destination port.
As part of the next search, we try to accomplish just that and then go one step further by using the coalesce operator to create a normalized field, “Destination_Port”, across my Azure and AWS flows. It is also possible to create datatypes with normalized fields for each dataset as well. (More details here: https://docs.cribl.io/search/datatypes/). Now that I have normalized fields, I can analyze data across all three cloud providers agnostically.
dataset="*_flowlogs" | limit 1000 | extract type=regex regex=@"\d+,([^,]*,){3}(?<dst_port>\d+)" | extend Destination_Port= coalesce(dst_port, dstport)
Wrap up
The popularity of multi-cloud environments and data lakes is growing. Cribl Search allows you to bring all of those datasets together, normalize them, and gain insights across all platforms at once rather than keeping them all separate during analysis. Federated searches here we come! No more need for a swivel chair I mean, swivel cloud analysis! Visit us over at Cribl Community Slack to share any cool multi-cloud searches you’re running today!