

There are several reasons you may want to route to Amazon S3 destinations, including routing to object storage for archival, routing to S3 buckets to utilize Cribl.Cloud’s Search feature, and archiving data that can be replayed later. When setting up Amazon S3 destinations in Cribl, there are three authentication methods: Auto, Manual, and Secret. Using the Auto authentication method paired with Assume Role is the most secure way to connect Amazon S3 to Cribl. However, we often run into permission errors when using these methods. If you have ever poked around Amazon S3 and IAM services, you will notice there are several different places to add policies and attach roles. I, personally, have needed to walk away from my computer before I flip my desk when I have gotten my hundredth error message and was on my Nth hour of troubleshooting AWS permissions.
So, to save you from doing the same, in this blog post, we will focus on Auto authentication using either environment variables (if our Worker Node is in the same account as our Amazon S3 bucket, i.e. a Hybrid Worker) or an attached IAM role (if our Worker Node is in a different account than our Amazon S3 bucket, i.e., Cribl.Cloud Worker). This requires the majority of setup in the AWS Management Console followed by some quick configurations in the Cribl UI. I love screenshots and have included them throughout the steps in this blog as a follow-along how-to guide.
We will cover the following:
Create a bucket in the S3 Service
Create a Policy in IAM Service for your new bucket’s permissions
Create a Role in IAM Service to attach your new policy and add a trust relationship with either Cribl.Cloud Workers or EC2 of your Hybrid Workers.
Create Amazon S3 Destination in Cribl referencing your new bucket, Auto authentication method, and enabling Assume Role (for Cribl.Cloud workers only).
Step 1: Create Bucket in Amazon S3 Service
This is the bucket you will use in the Amazon S3 destination configuration in Cribl.
Log in to AWS Management Console > S3 Service > Buckets > Create Bucket

Give your bucket a name and leave all other settings as default (including disabling ACLs)
Note: Amazon S3 bucket names are global, meaning they must be unique across all of AWS. Something like ‘test‘ is going to already be taken. Use a specific, non-generic name here. If the name is already in use, you will get an error.

Click into your newly created bucket. Click on the Properties tab and Copy the ARN. Paste the ARN somewhere in your notes, we will use it later.
Note: Objects tab is where your partitioned data will start showing up once we have it connected in Cribl.
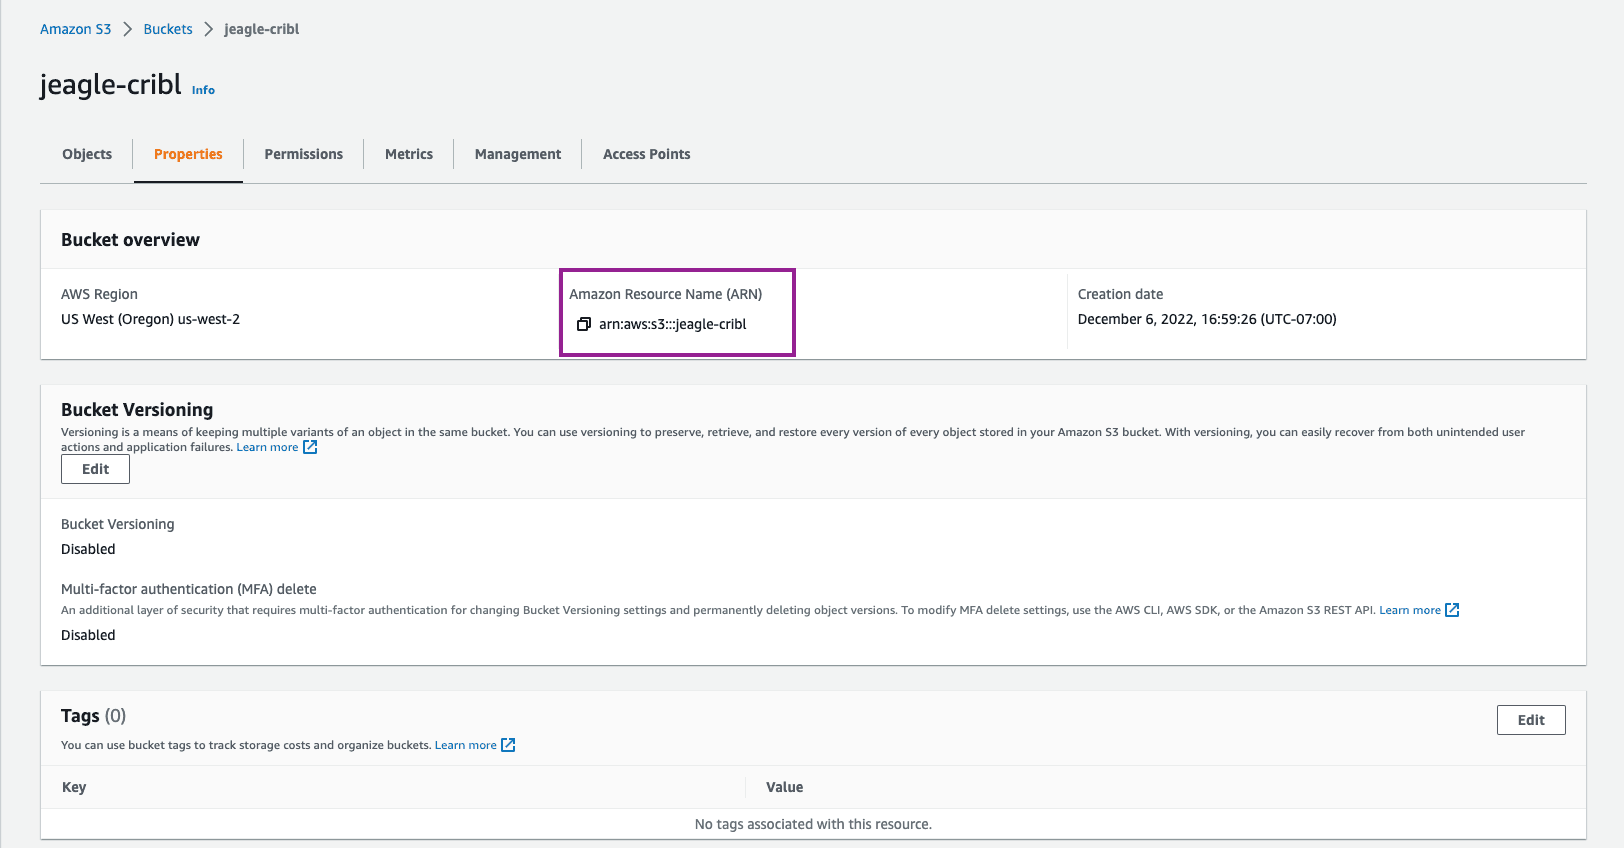
Jenna Tip 1: Note that in the Permissions tab, there is an option to add a bucket policy. We are using IAM policy for this bucket so you do not need to add anything at this bucket level.
Step 2: Create a Policy in IAM Service
This policy will reference the bucket you just created using that bucket ARN you copied.
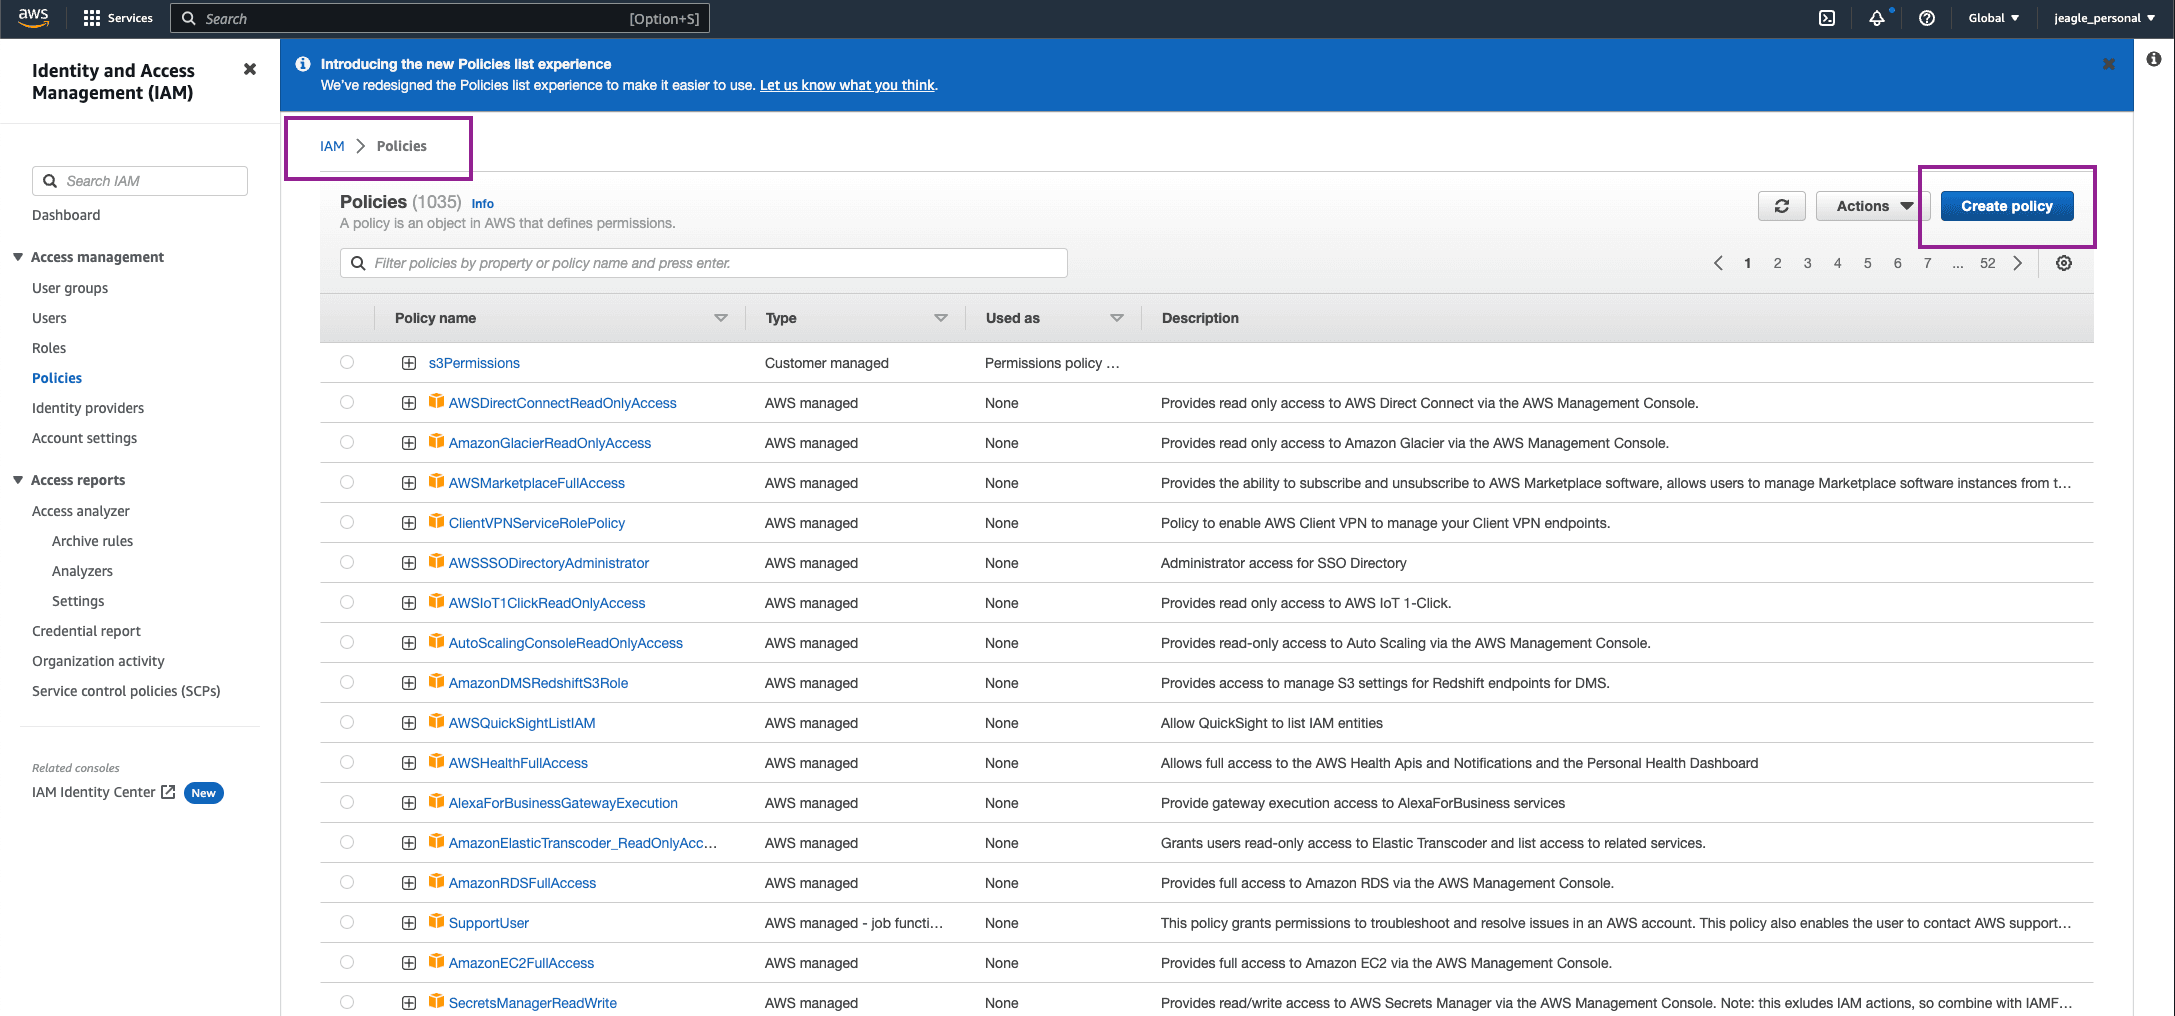
In IAM Service, click Policies > Create Policy
Using a text editor, copy the following block and update it with the Bucket ARN you copied earlier in the two Resource objects:
Jenna Tip 2: the /* is required at the end of your Resource ARN for the Get and Put actions, but not for the List action.
In AWS where you are creating your new policy, click on JSON tab and paste your edited policy from the block above into the JSON editor. Click Next.
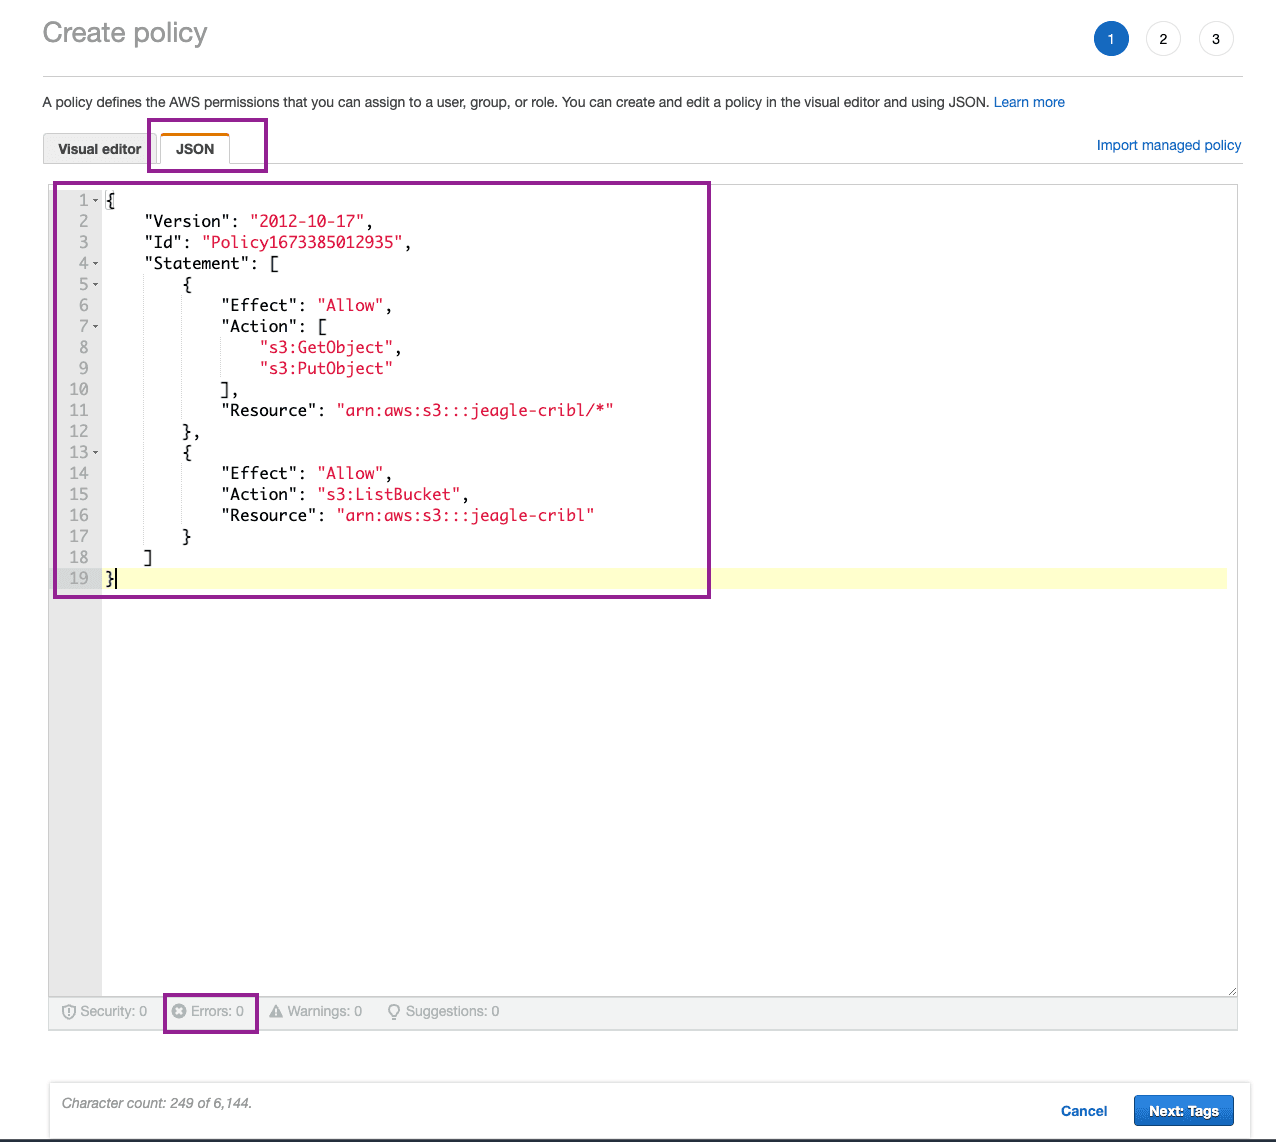
Note: You should see no Errors in formatting.
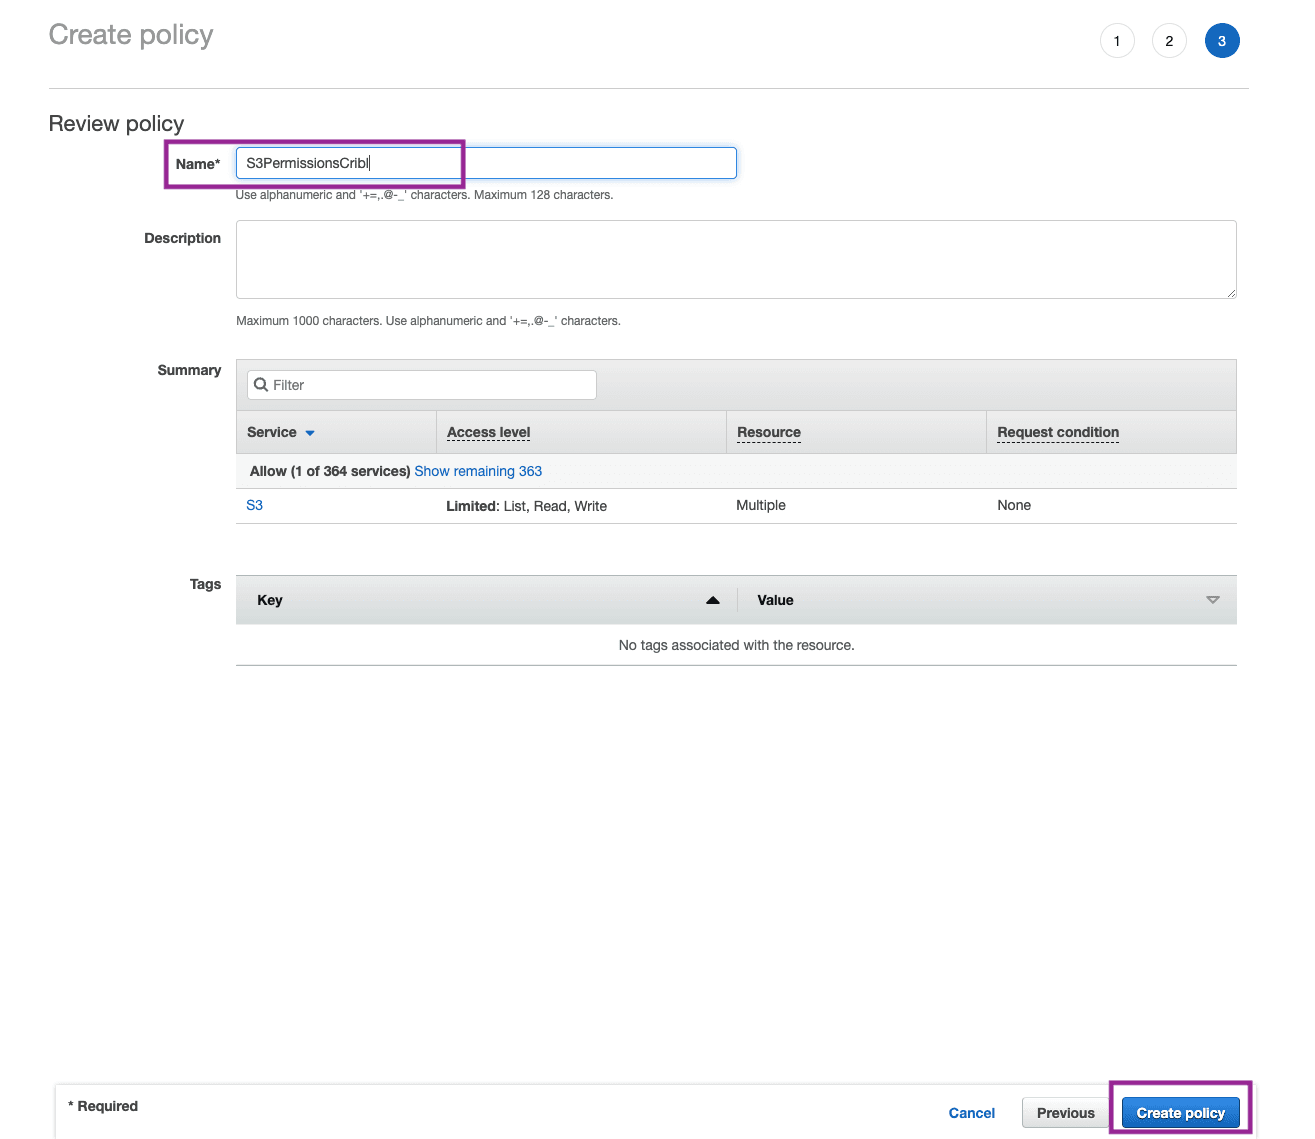
Give your Policy a Name and click Create Policy.
Step 3: Create a Role in IAM Service
In this Step, we have two options:
Follow Cribl.Cloud Across Account Setup – if you are setting up an Amazon S3 destination in the Cribl.Cloud default worker group.
Note: You can follow similar steps if you have your EC2 Worker Node in one account and the Amazon S3 bucket in another account. Some work will need to be done in the EC2 Worker Node account which you can find in Brendan’s blog.
Follow Hybrid Worker EC2 Trust Relationship with Amazon S3 – if your Amazon S3 bucket is in the same account as your EC2 worker node.
Cribl.Cloud Across Account Setup
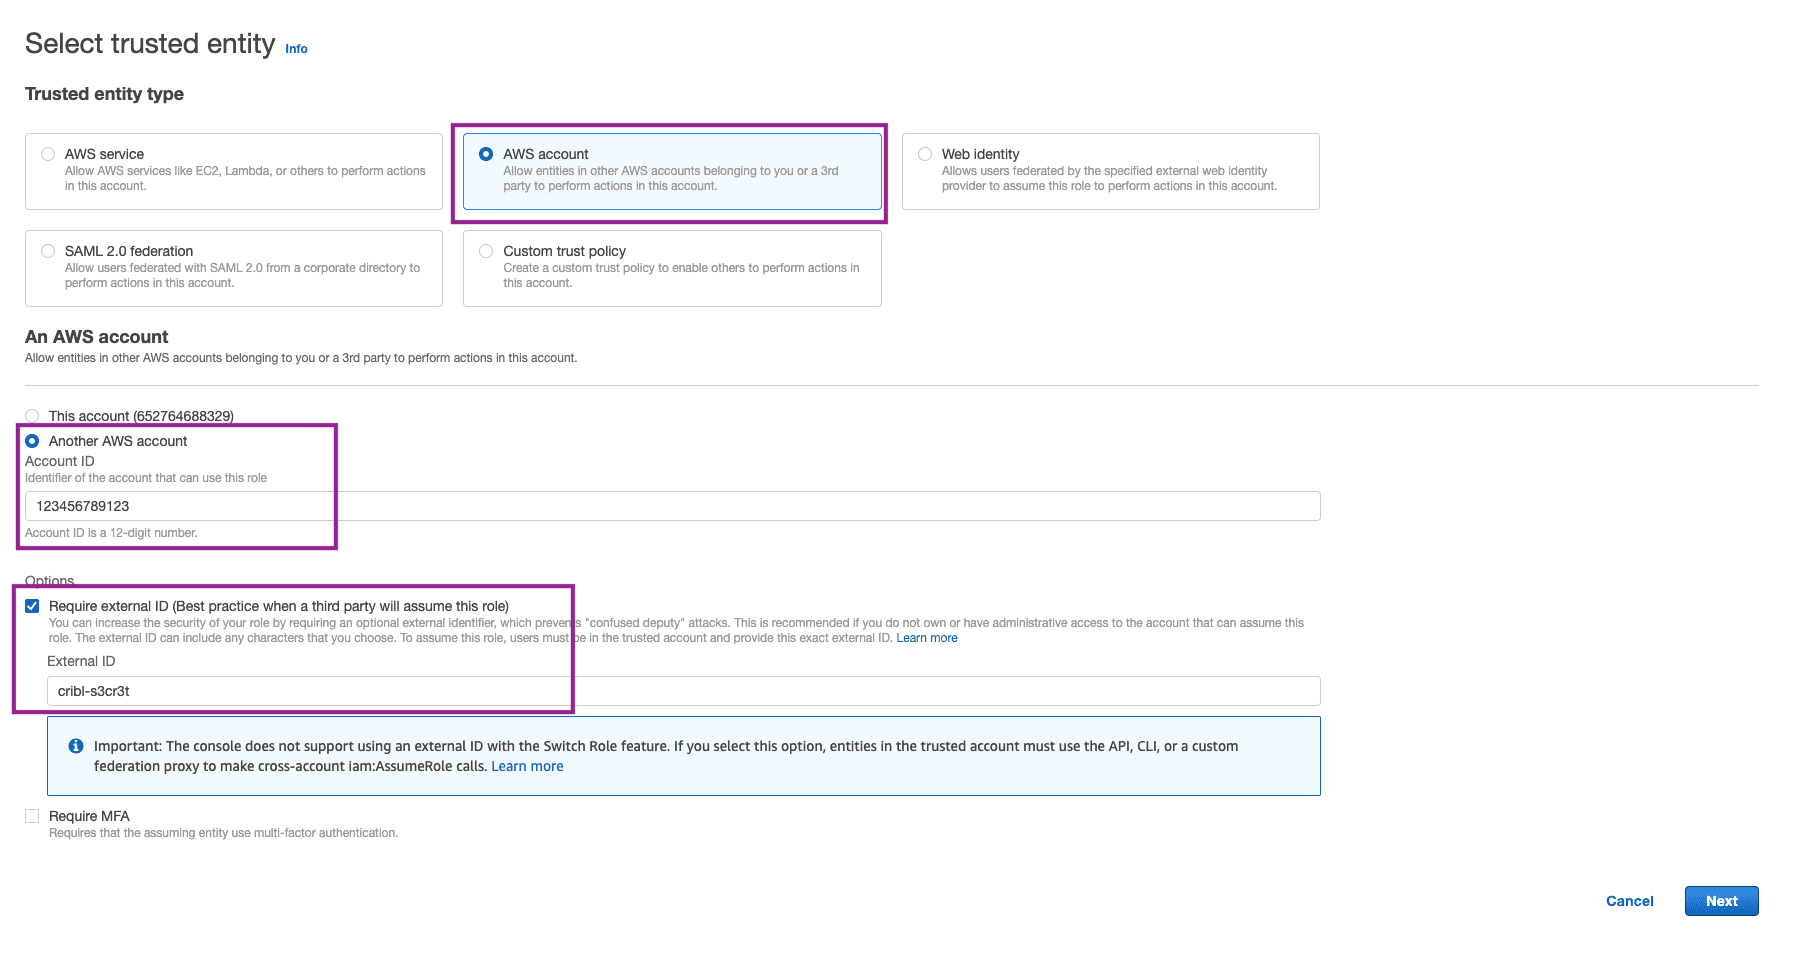
In this step, you will need to set up a trusted relationship between Cribl.Cloud and the Account you have the Amazon S3 bucket in. We will create a Role where we select the Trusted Entity Type as an AWS Account. Then, we will need the AWS Account ID of Cribl.Cloud.
In Crib.Cloud, go to Home > Network Settings > Trust and copy the ARN which includes the Account ID of your Cribl.Cloud instance

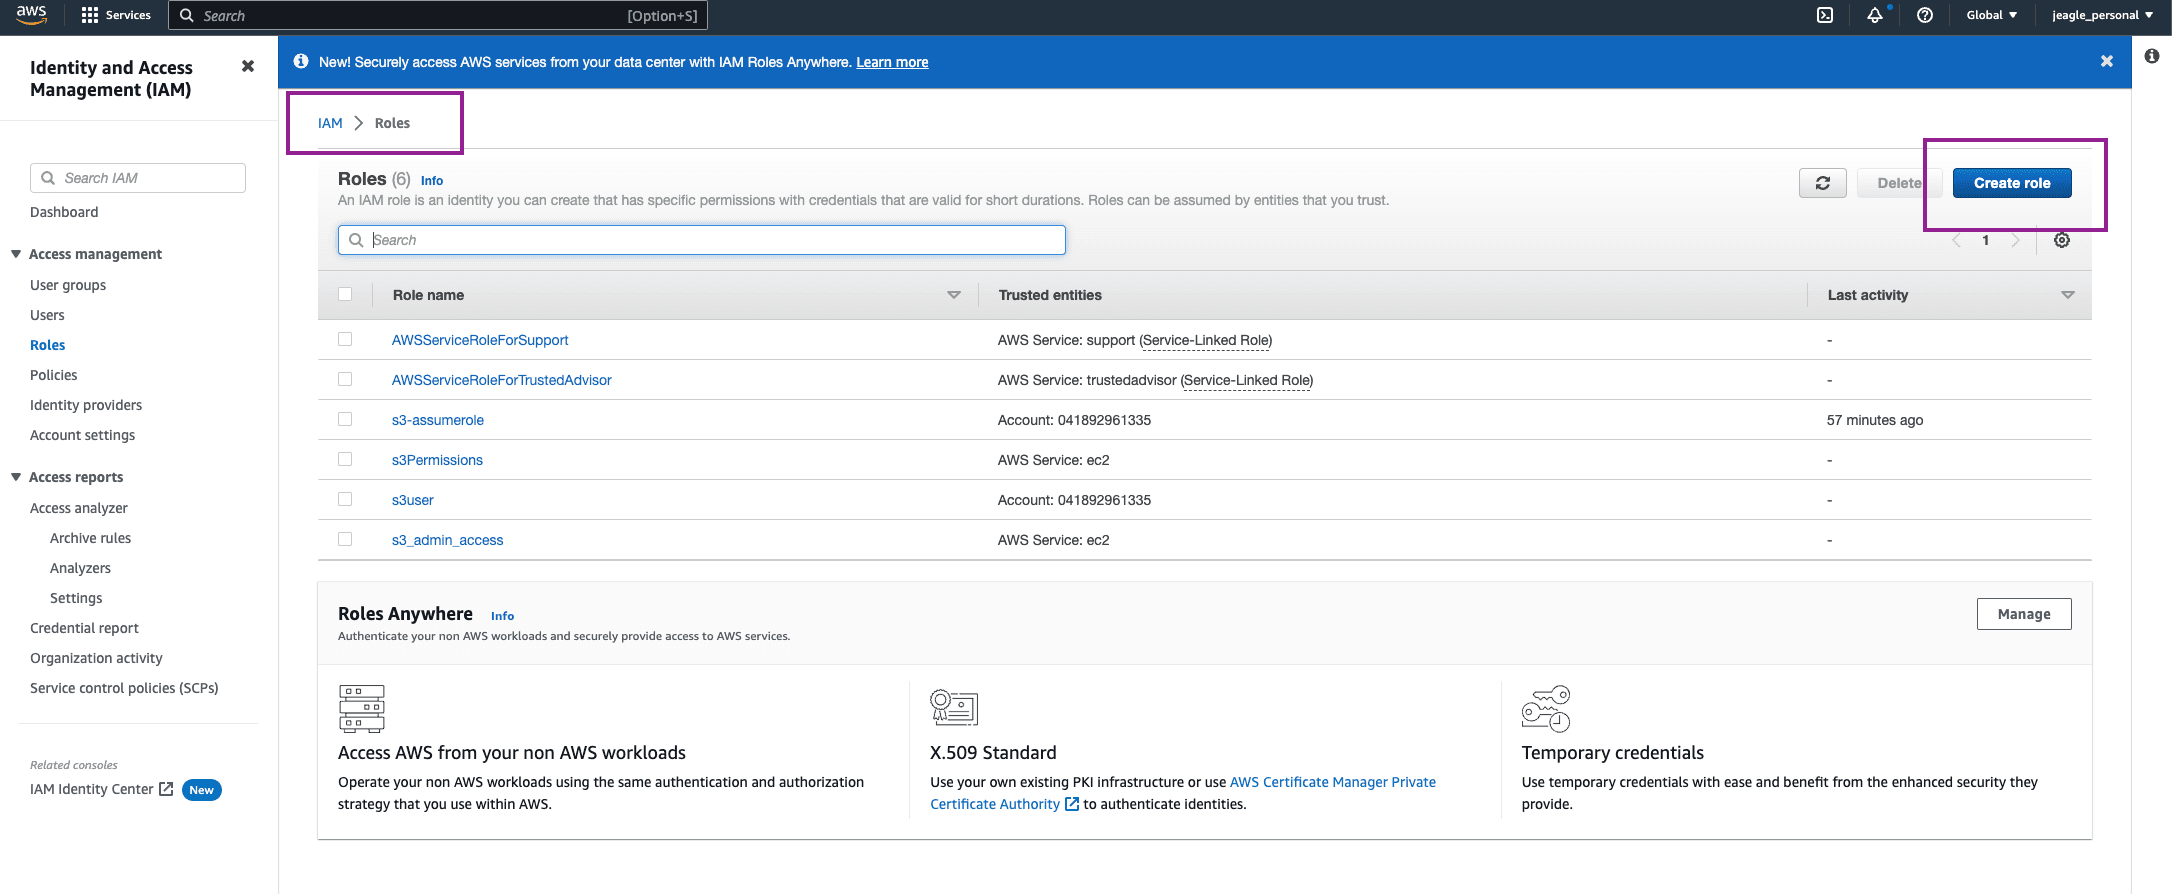
In AWS, go to the IAM Service, click Roles > Create Role

Select AWS Account as the Trusted Entity Type and switch to Another AWS Account option.
Paste the copied ARN from Cribl.Cloud into the Account ID field. Remove everything but the account ID. It will be a 12 digit number.
Check the box to Require External ID. Copy the external ID you use and save it for later. We will use this when we set up the Amazon S3 destination in Cribl. Click Next.
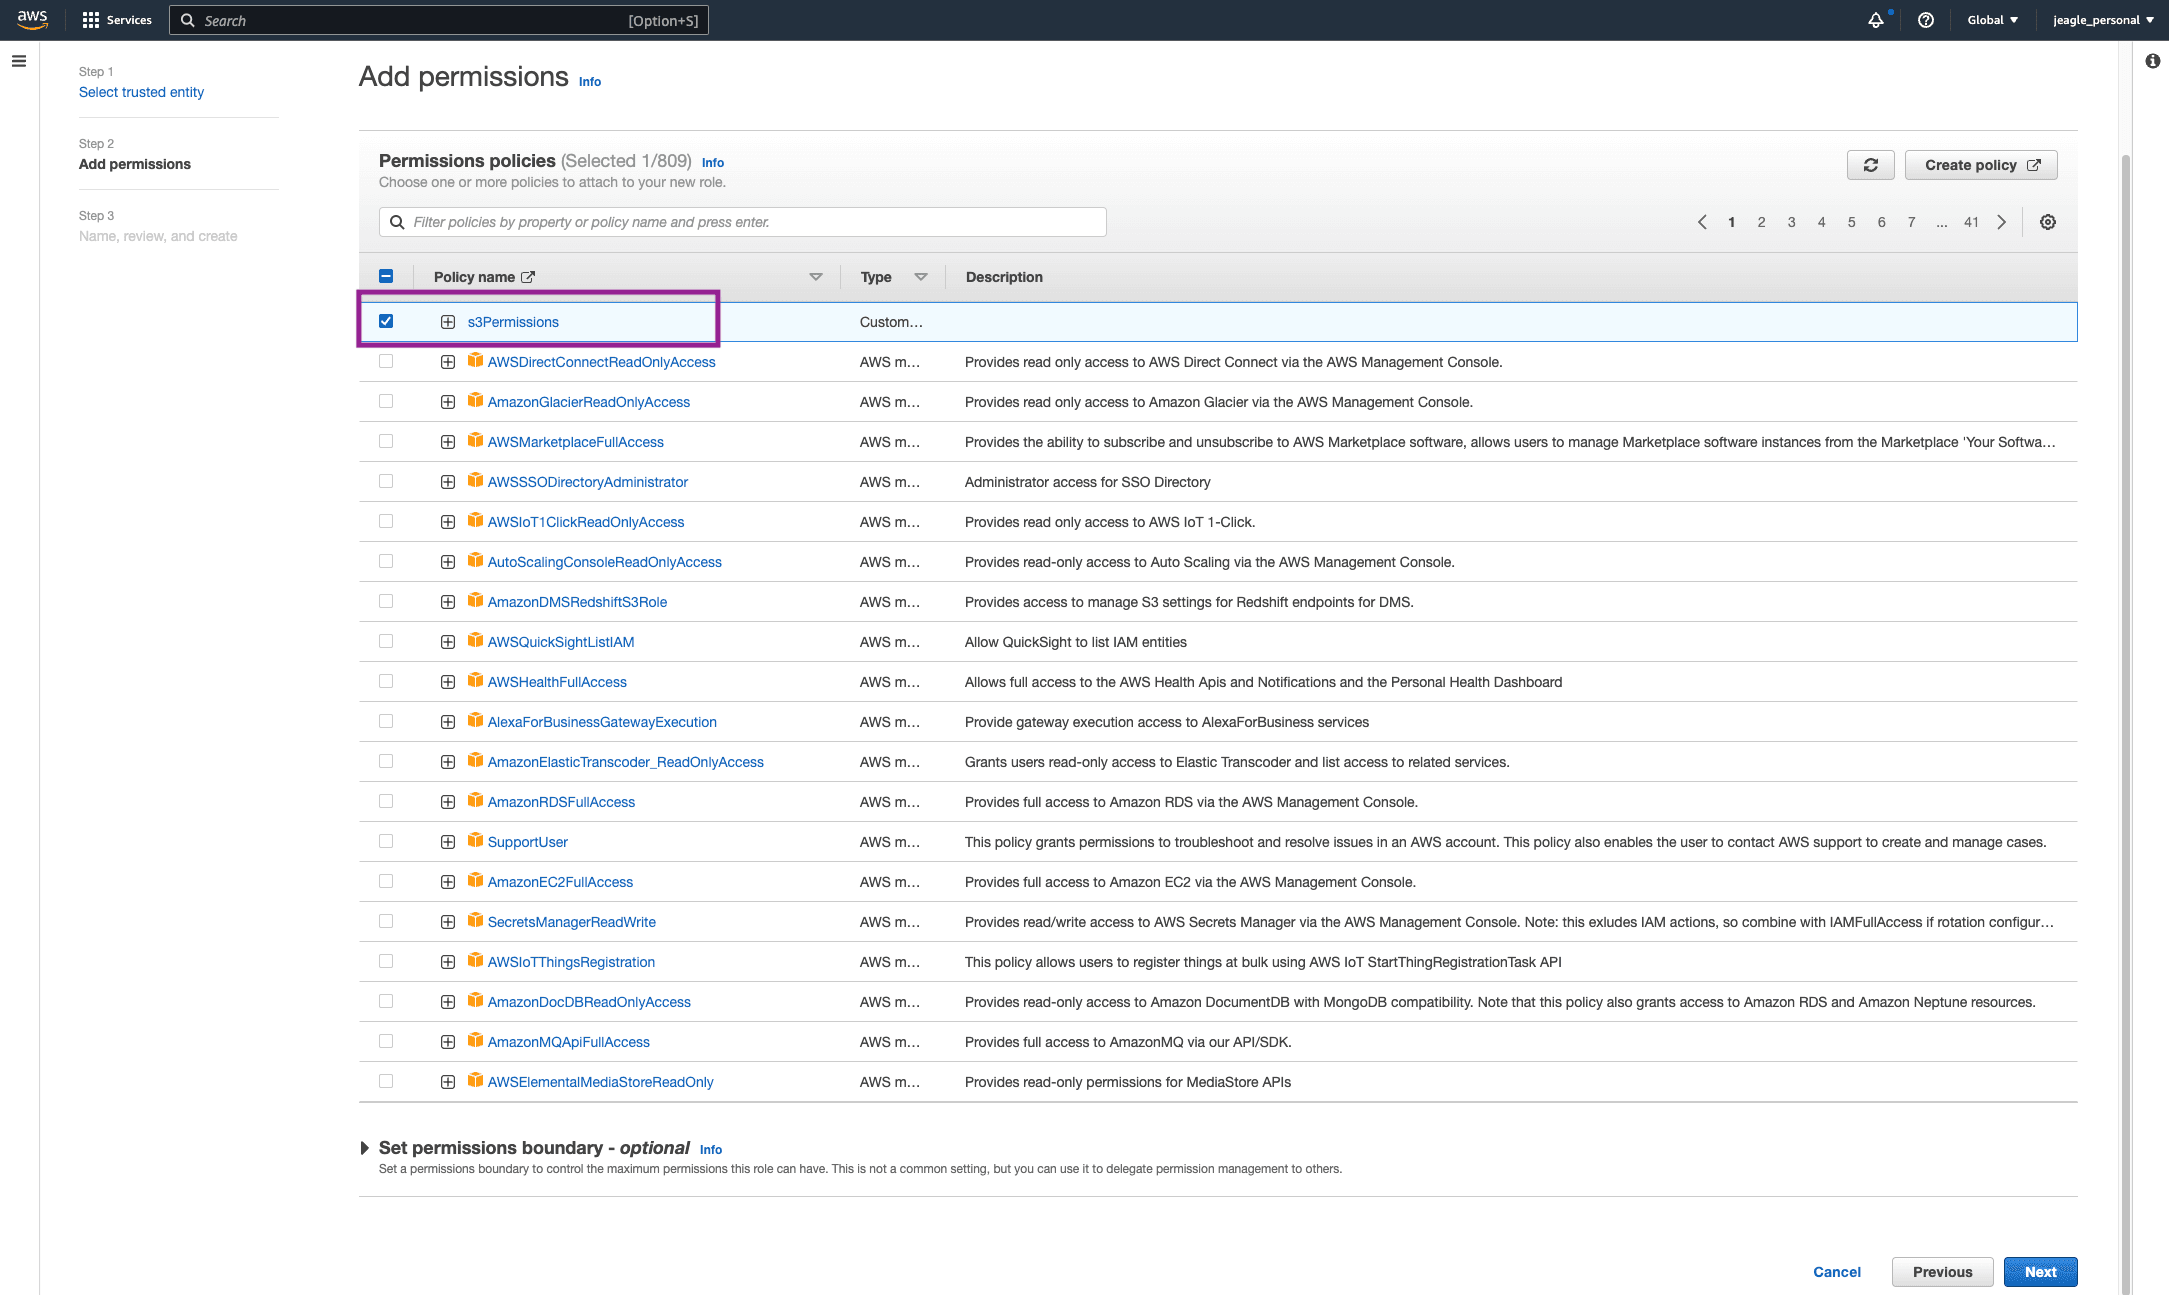
Add Permissions. Search for the Policy you created in ‘Step 2: Create Policy in IAM Service’. Click the box next to this policy and click Next.
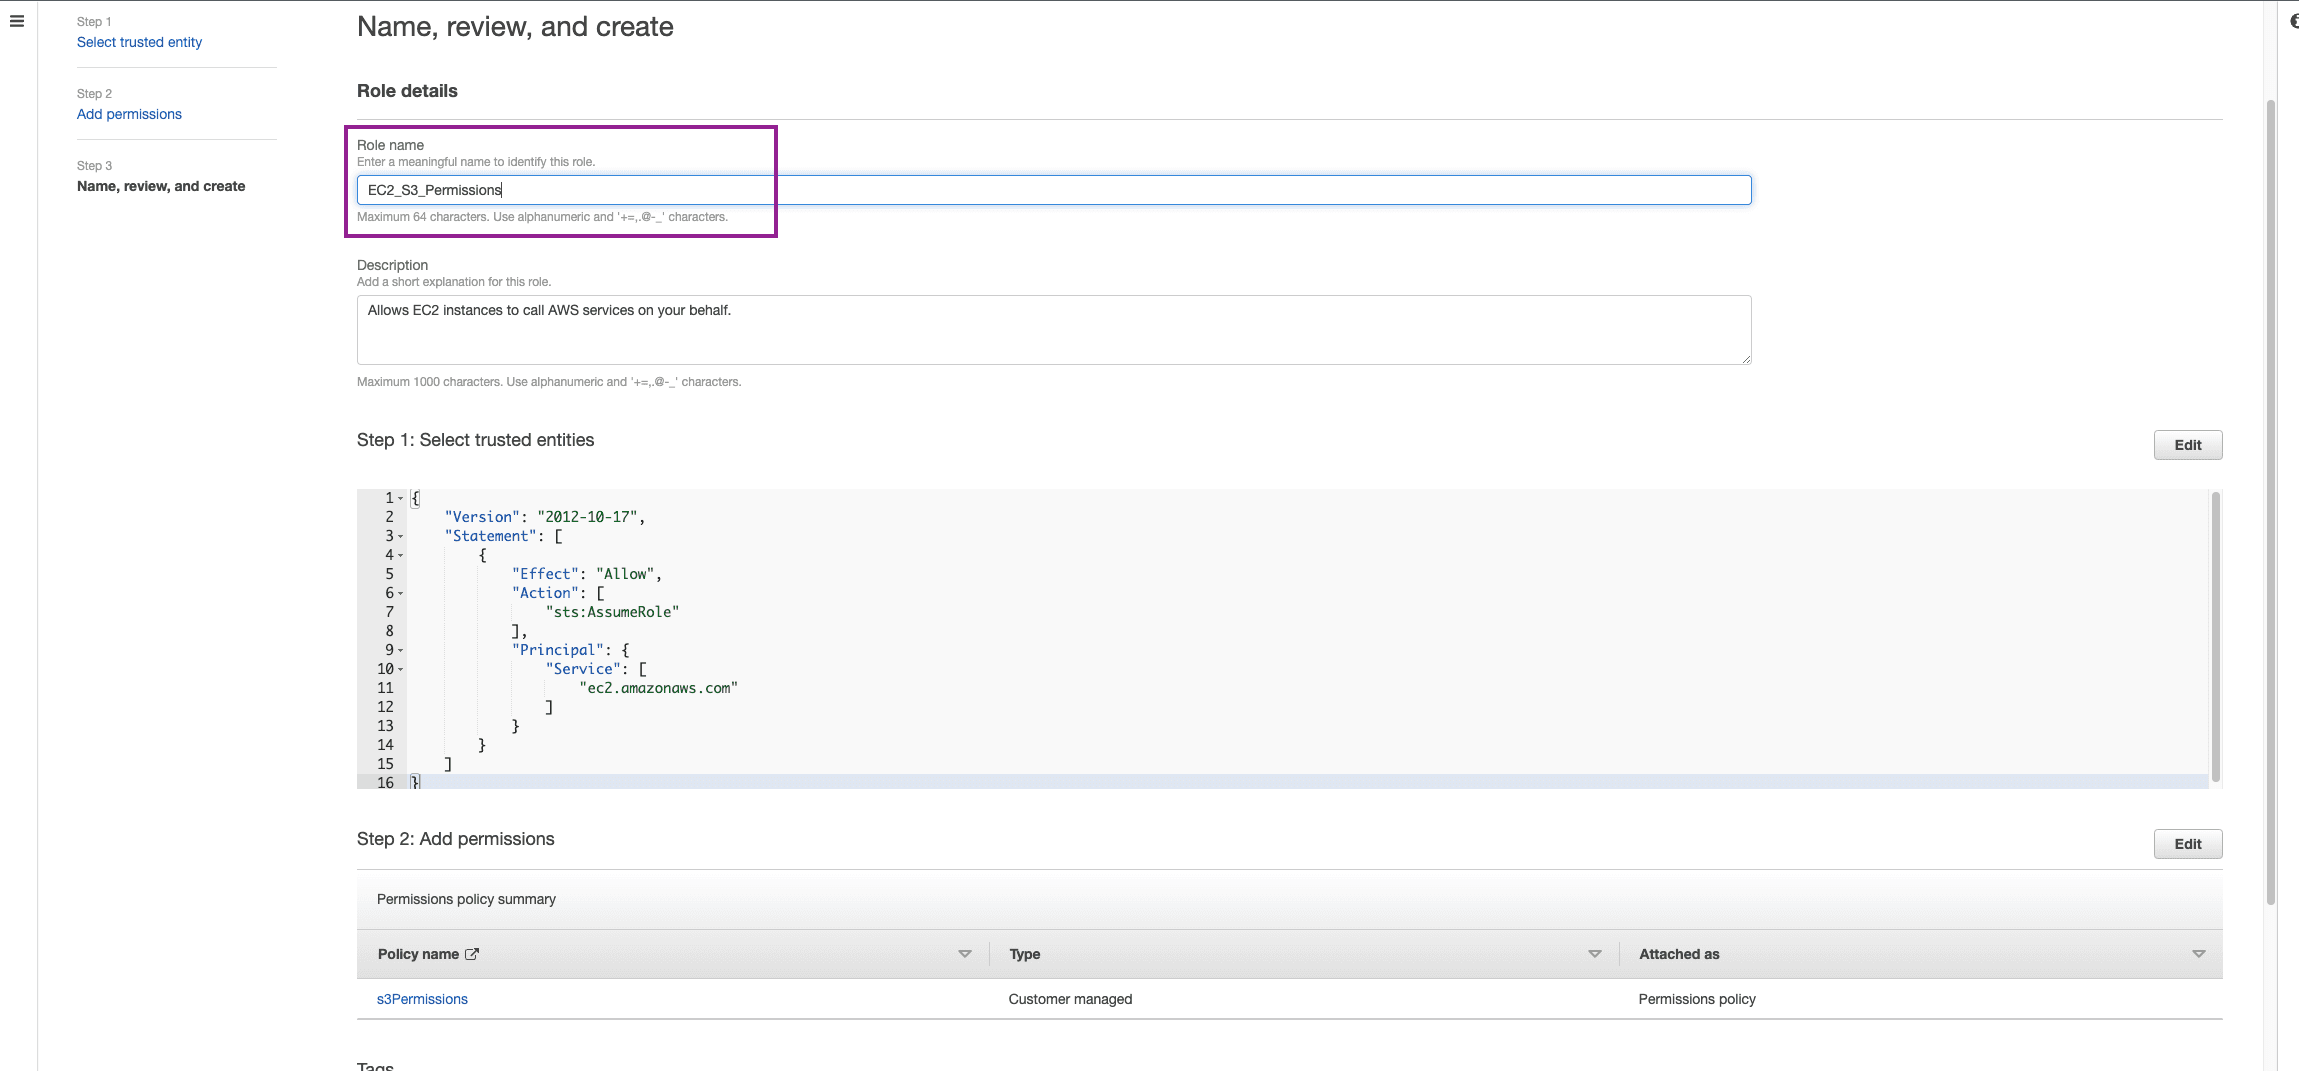
Give the Role a name and Click Create Role. WE ARE NOT DONE. SEE THE NEXT STEP.
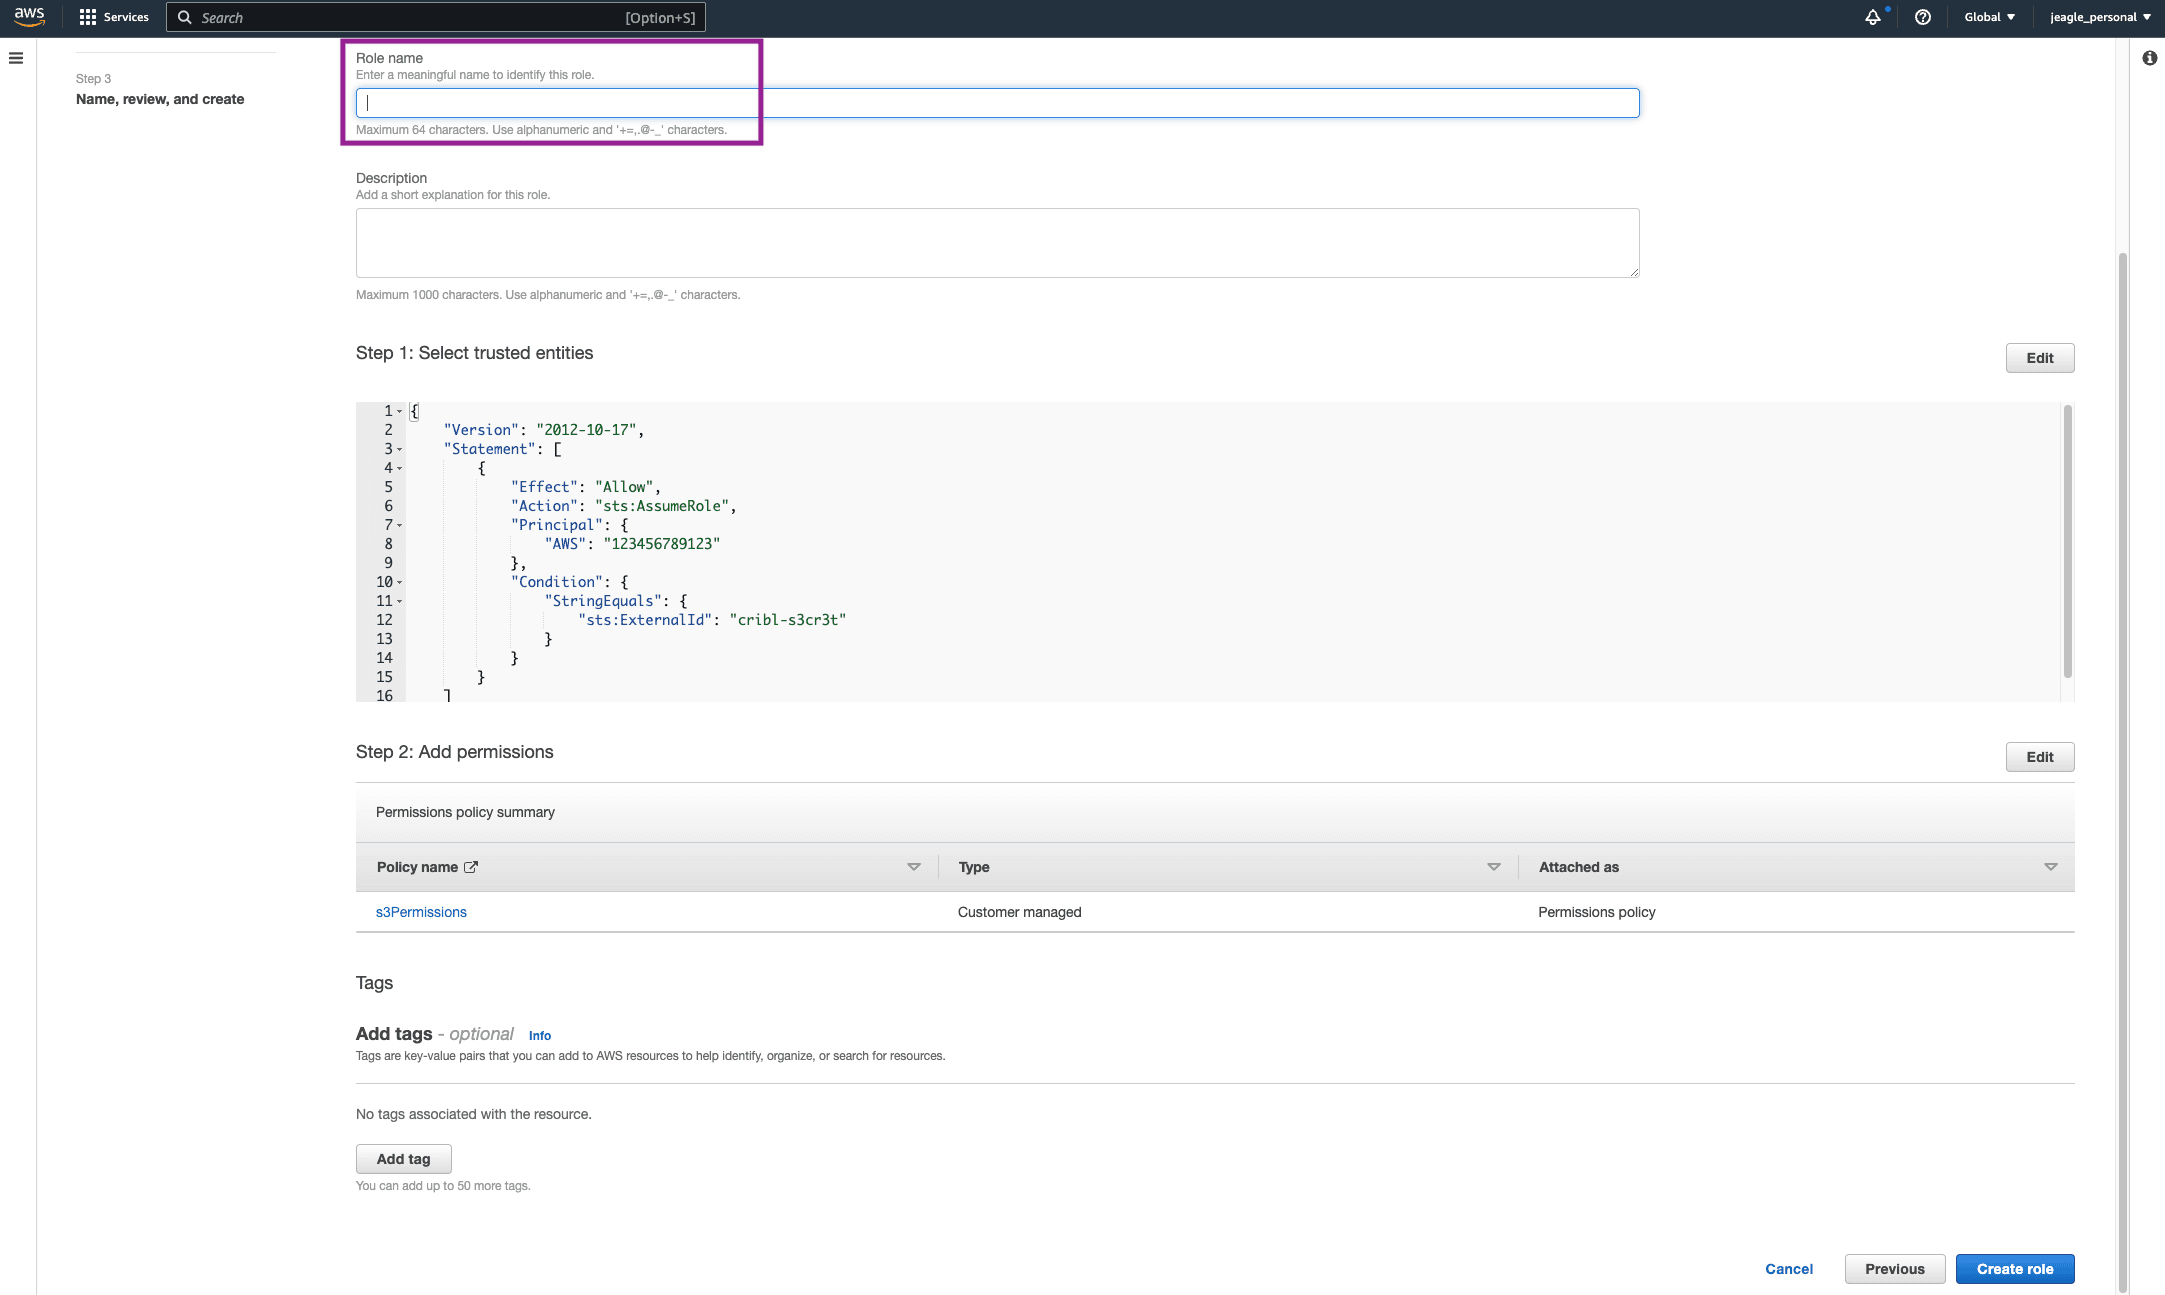
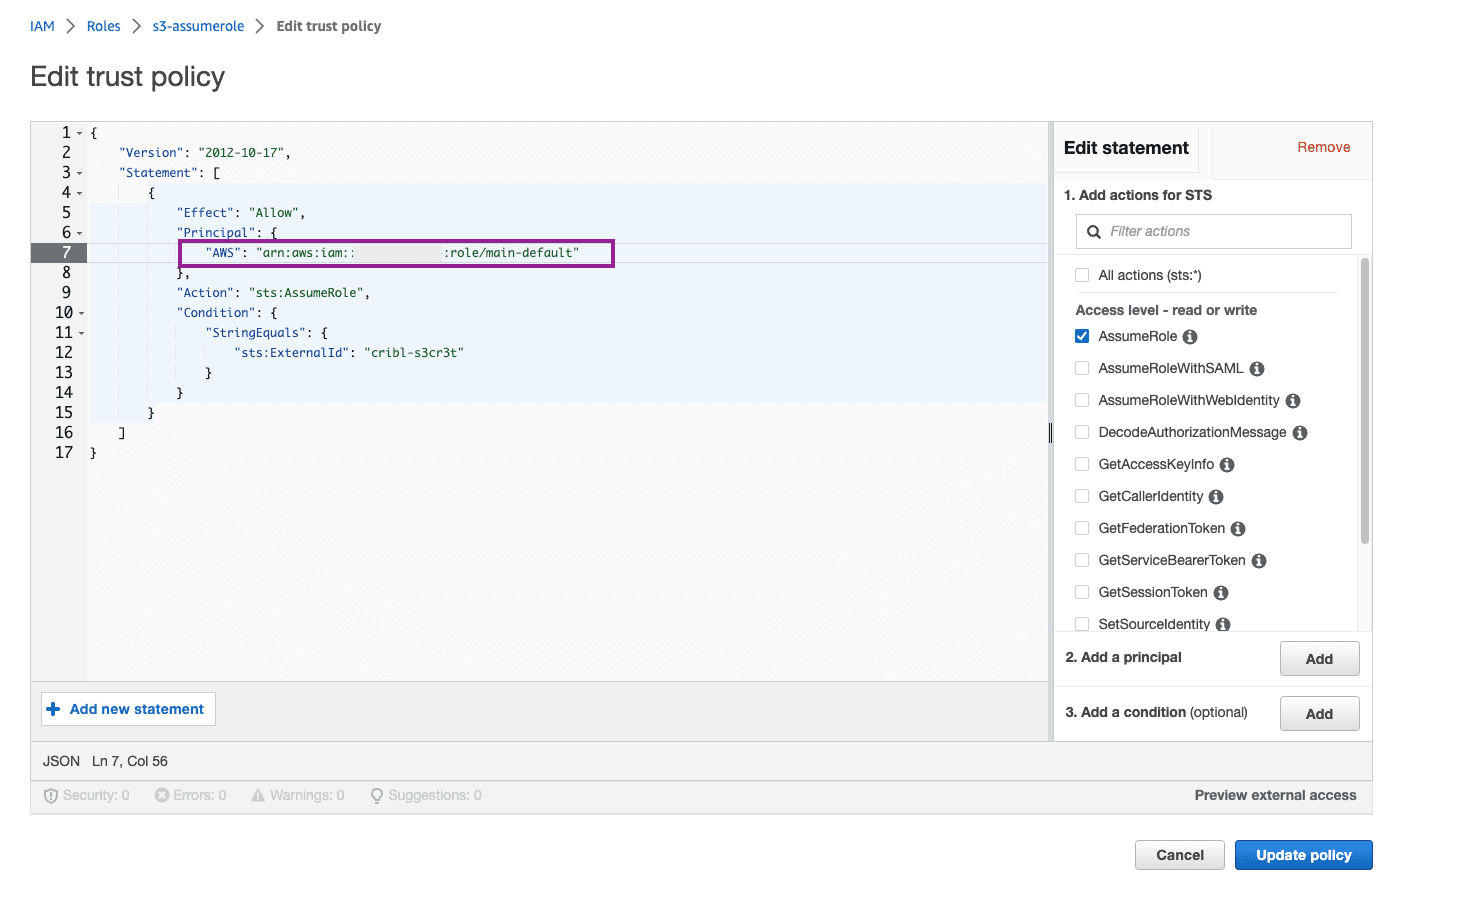
Here is another tip where folks can get stuck in permissions errors! Our Trust Policy is not exactly how we need it. For Cribl.Cloud, we need to include the full ARN you added earlier, not just the Account ID. The AWS setup wizard is weird though and only lets you put the Account ID. So now we need to go back and edit it. Click into your newly created Role > Trust Relationships tab > Edit Trust Policy. Paste the full ARN you copied from Cribl.Cloud into the AWS line. Update Policy.
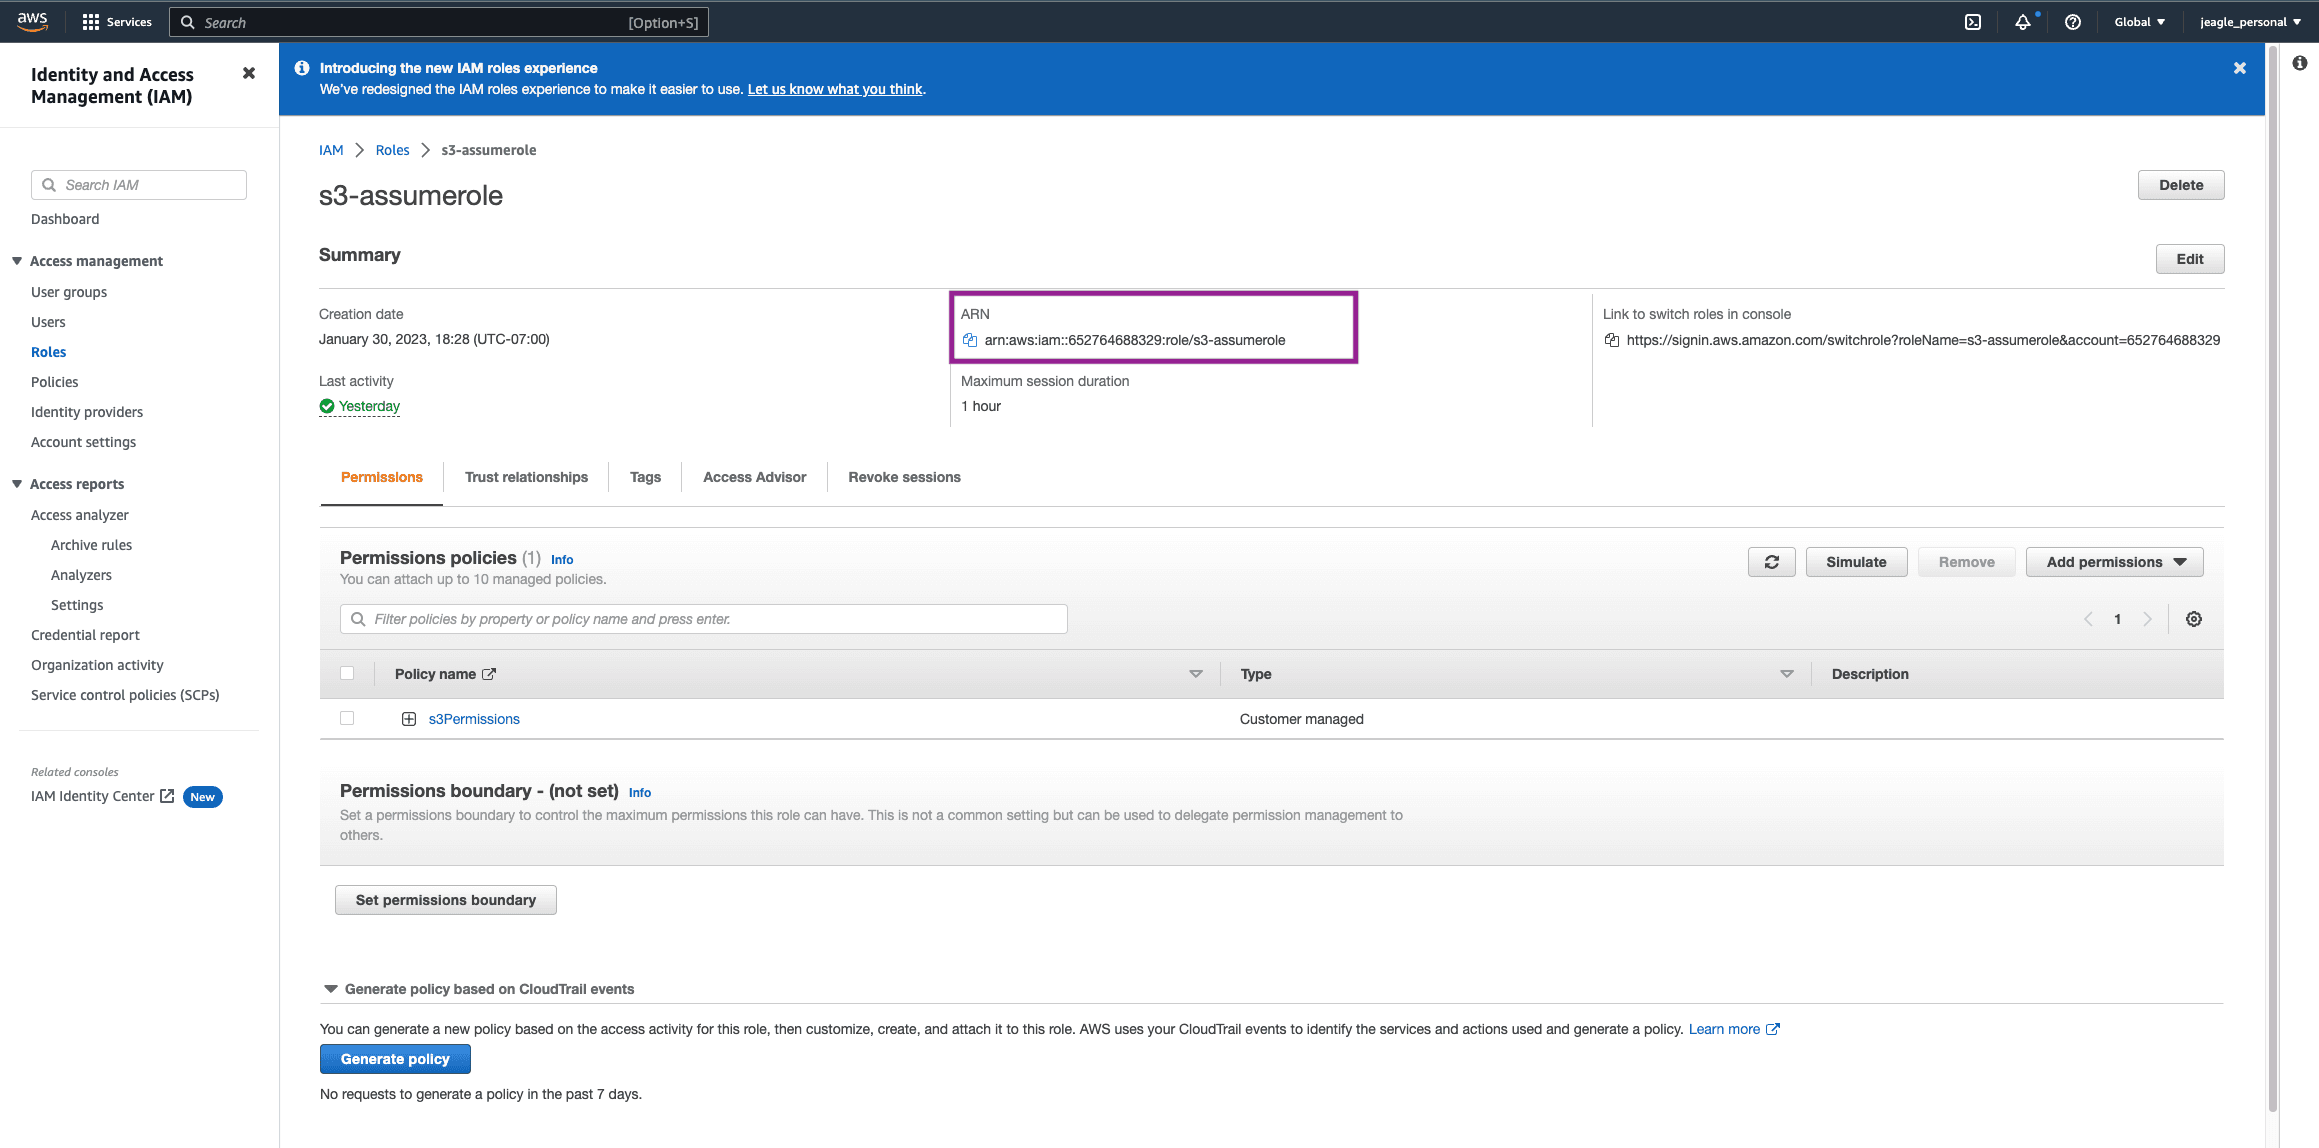
In your new Role, copy the ARN and save it for later. We will add this to the Cribl Destination.
Hybrid Worker EC2 Trust Relationship with Amazon S3
Follow this section if your Amazon S3 destination is being set up in a Hybrid Worker Group (and your Amazon S3 bucket and EC2 Worker Node are in the same AWS Account). We will build a Role with the Trusted Entity as an AWS Service (EC2 in this case).
In AWS, go to the IAM Service, click Roles > Create Role
Select AWS Service as the Trusted Entity Type > EC2 under common use cases and hit Next.

Attach the Amazon S3 Permissions policy you created in ‘Step 2: Create Policy in IAM Service’.

Give the Role a Name and Create Role.
In order for our EC2 Worker Node to know to use these permissions, we need to attach this newly created role to the Security of our EC2 instance. Go to AWS EC2 Service > Worker Node EC2 Instance > Security Tab. You will be able to tell in the Security Tab if the customer has already attached a role to the EC2 instance. If your EC2 admin already has a role here, just make sure the Amazon S3 Permissions policy is also attached to that role. If the IAM Role is blank here, then continue to the next step.
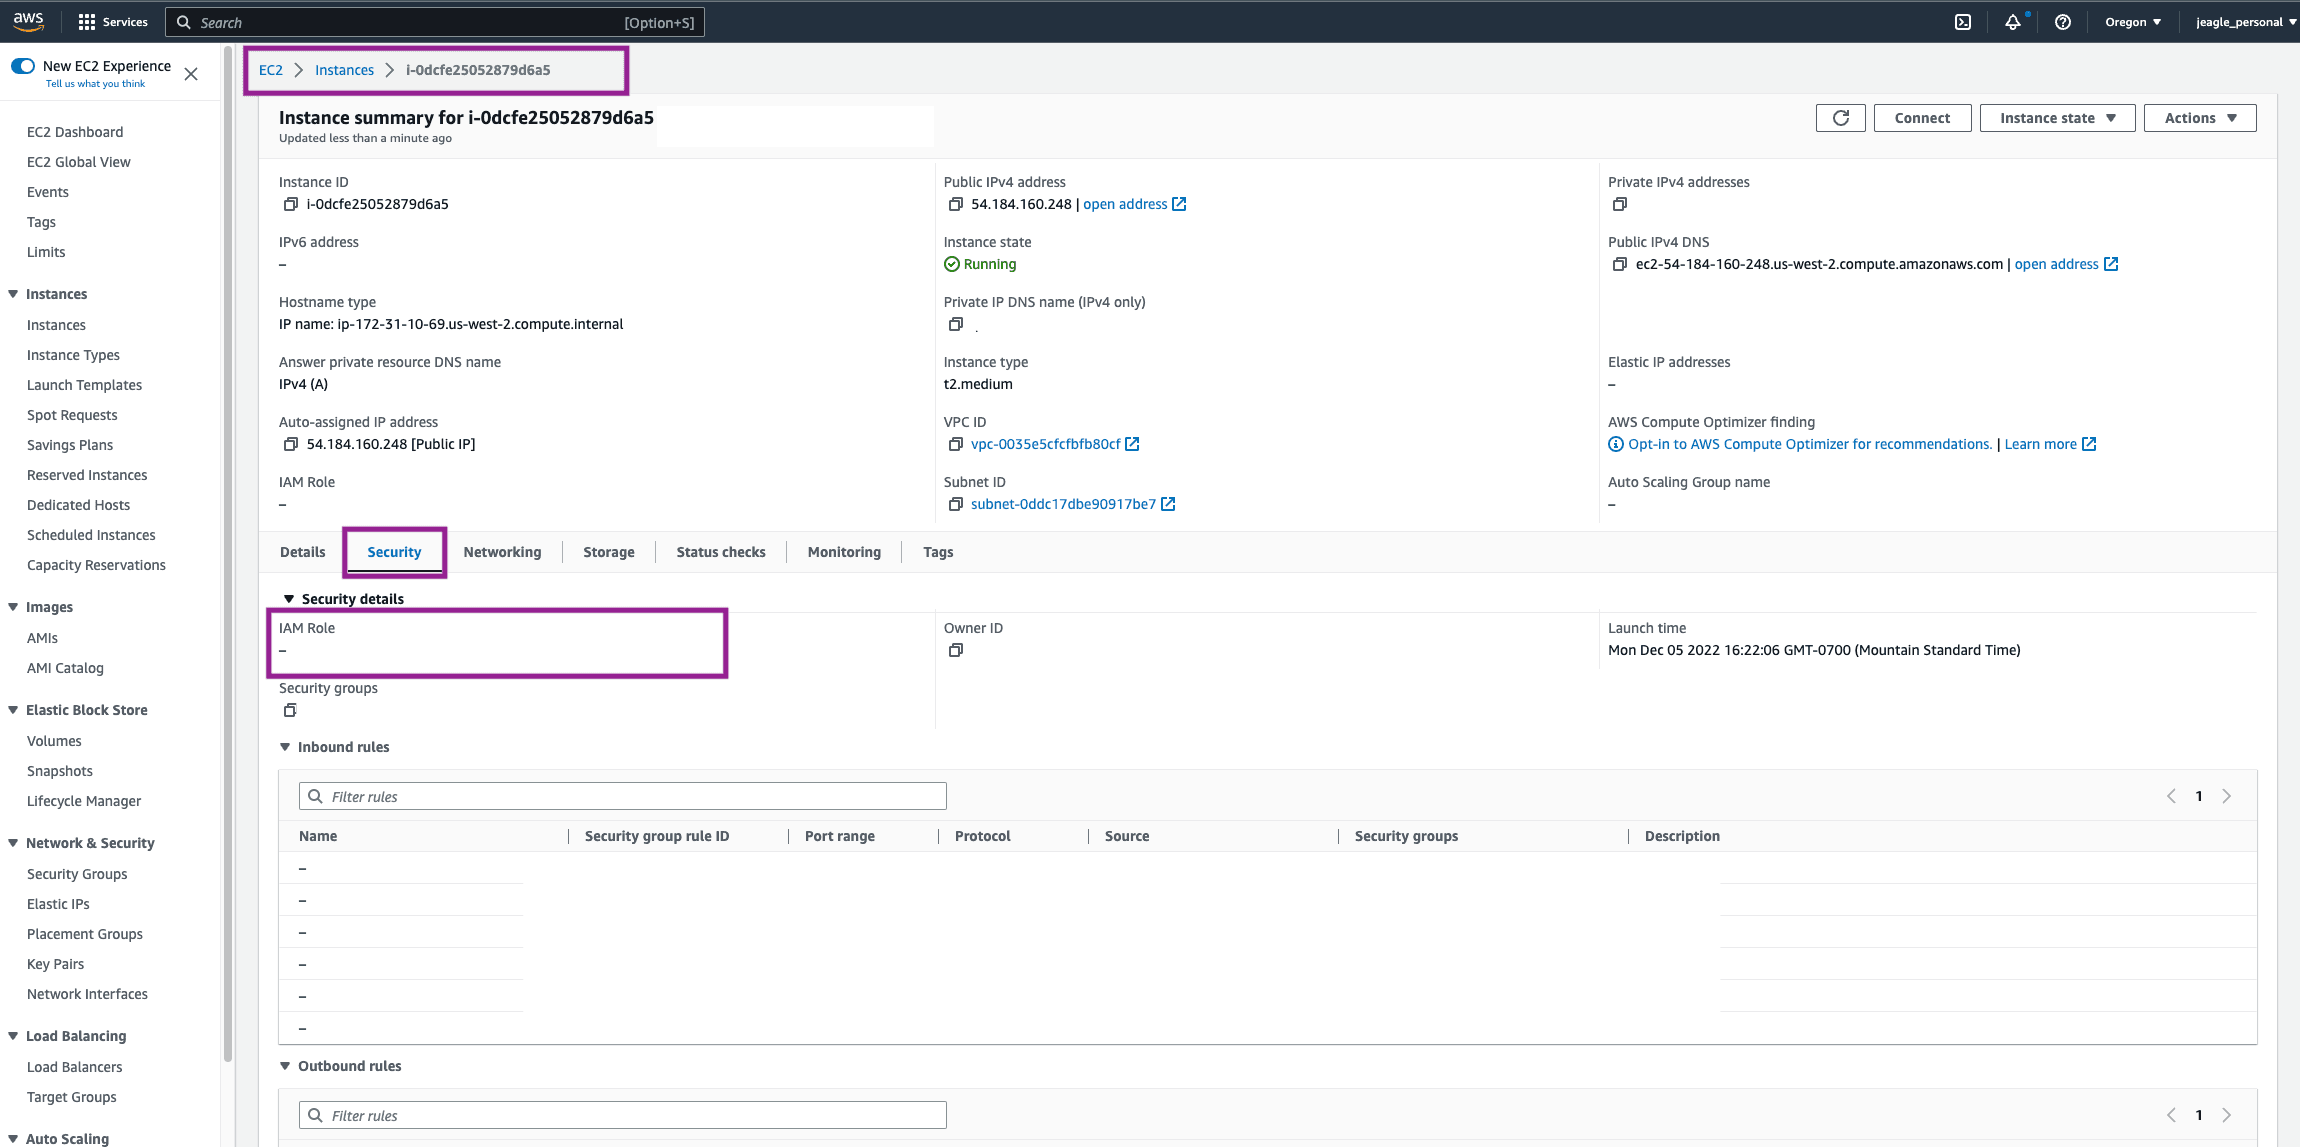
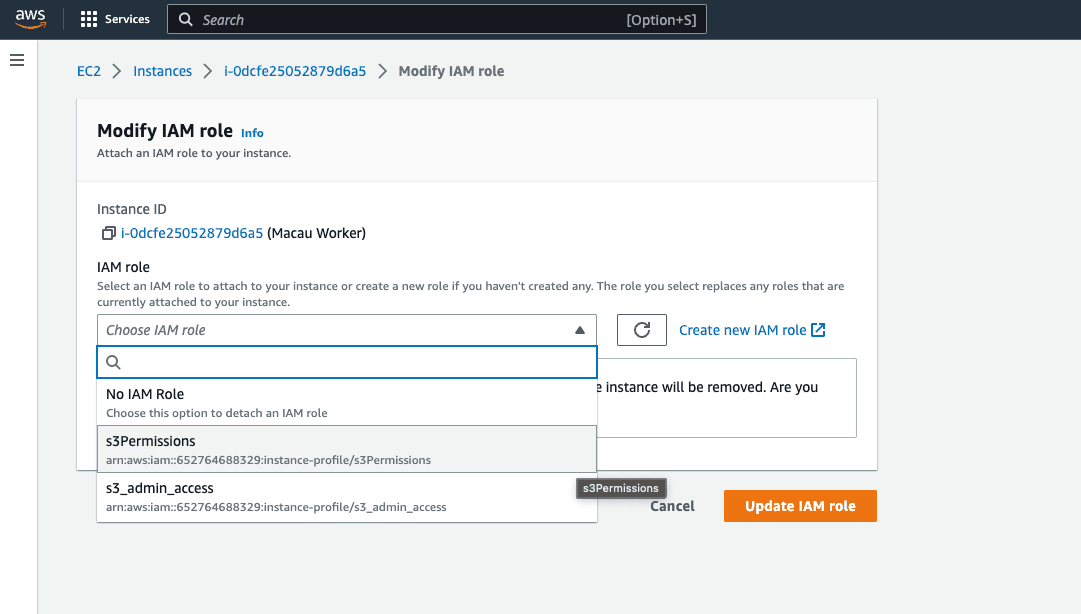
In the top right, click Actions > Security > Modify IAM Role.
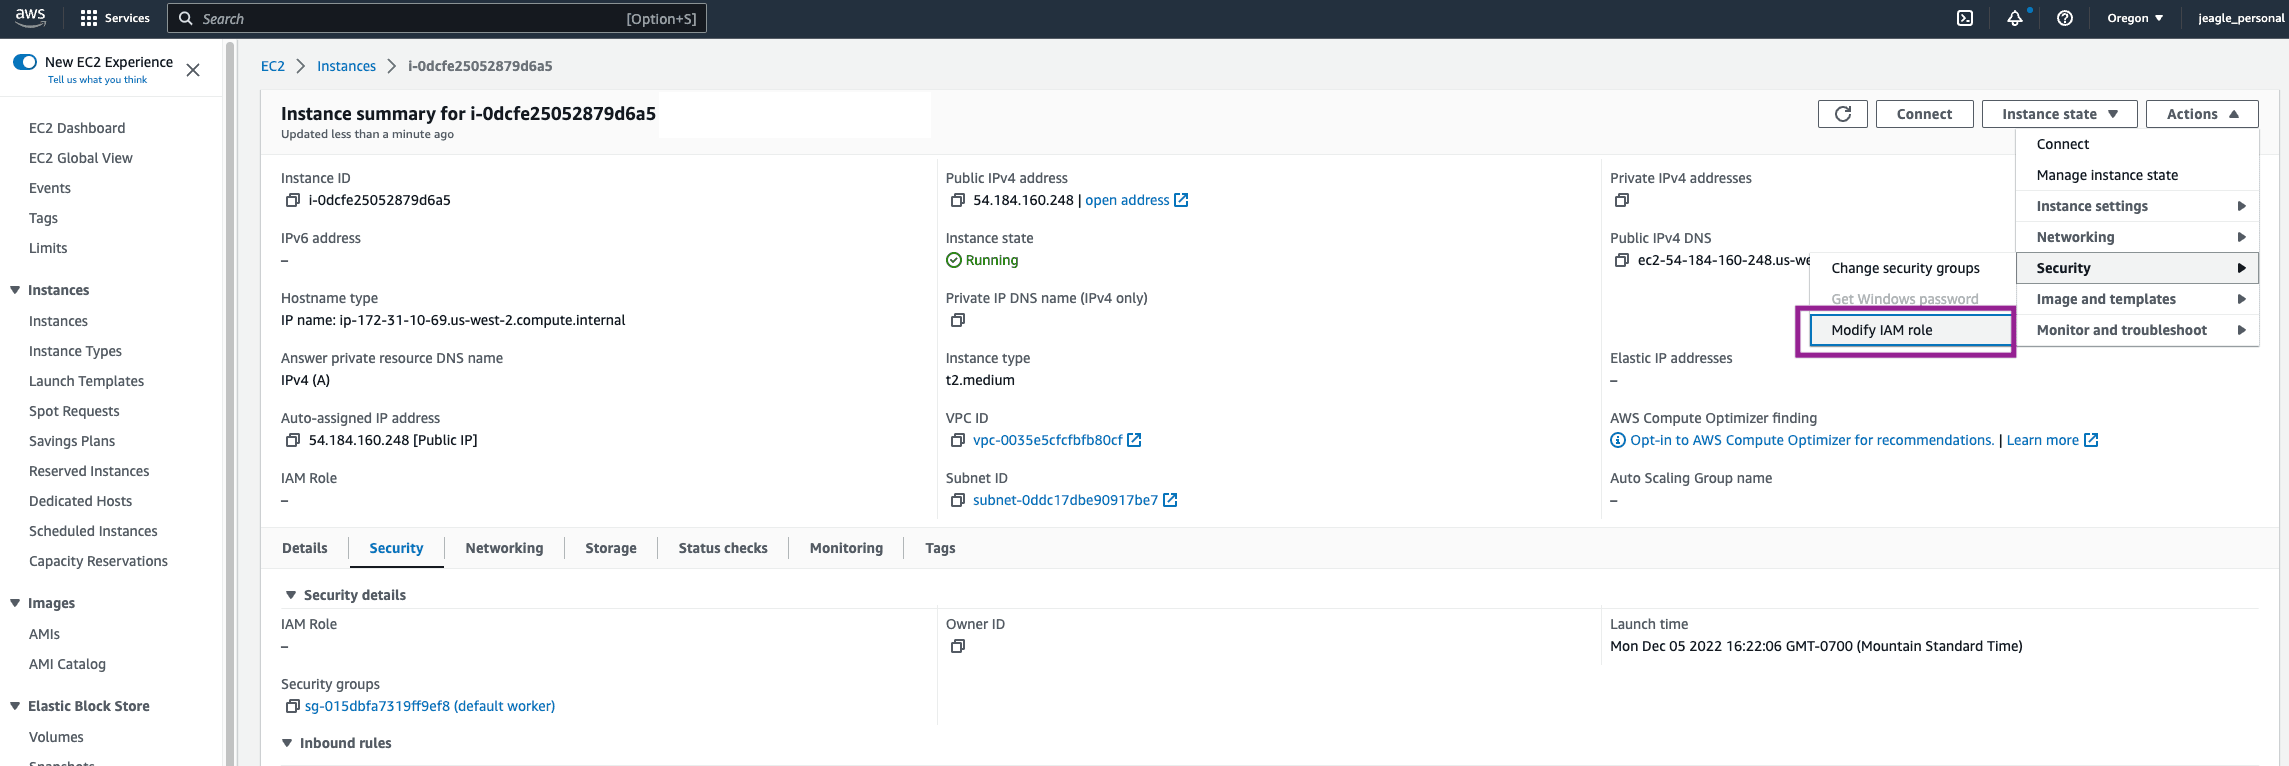
Find the Amazon S3 Permissions Role you created and Update IAM Role. You will now see that Role linked in the Security Tab of your EC2 Instance.
Step 4: Create Amazon S3 Destination in Cribl
We have made it through the bulk of the AWS permissions setup and now we will pivot to the Cribl setup. If you are setting up the S3 Destination in your Cribl.Cloud provided Worker Group, follow the Cloud Worker Group section below. If you are setting up the Amazon S3 Destination in a Hybrid Worker Group, follow the Hybrid Worker Group section below.
Cloud Worker Group
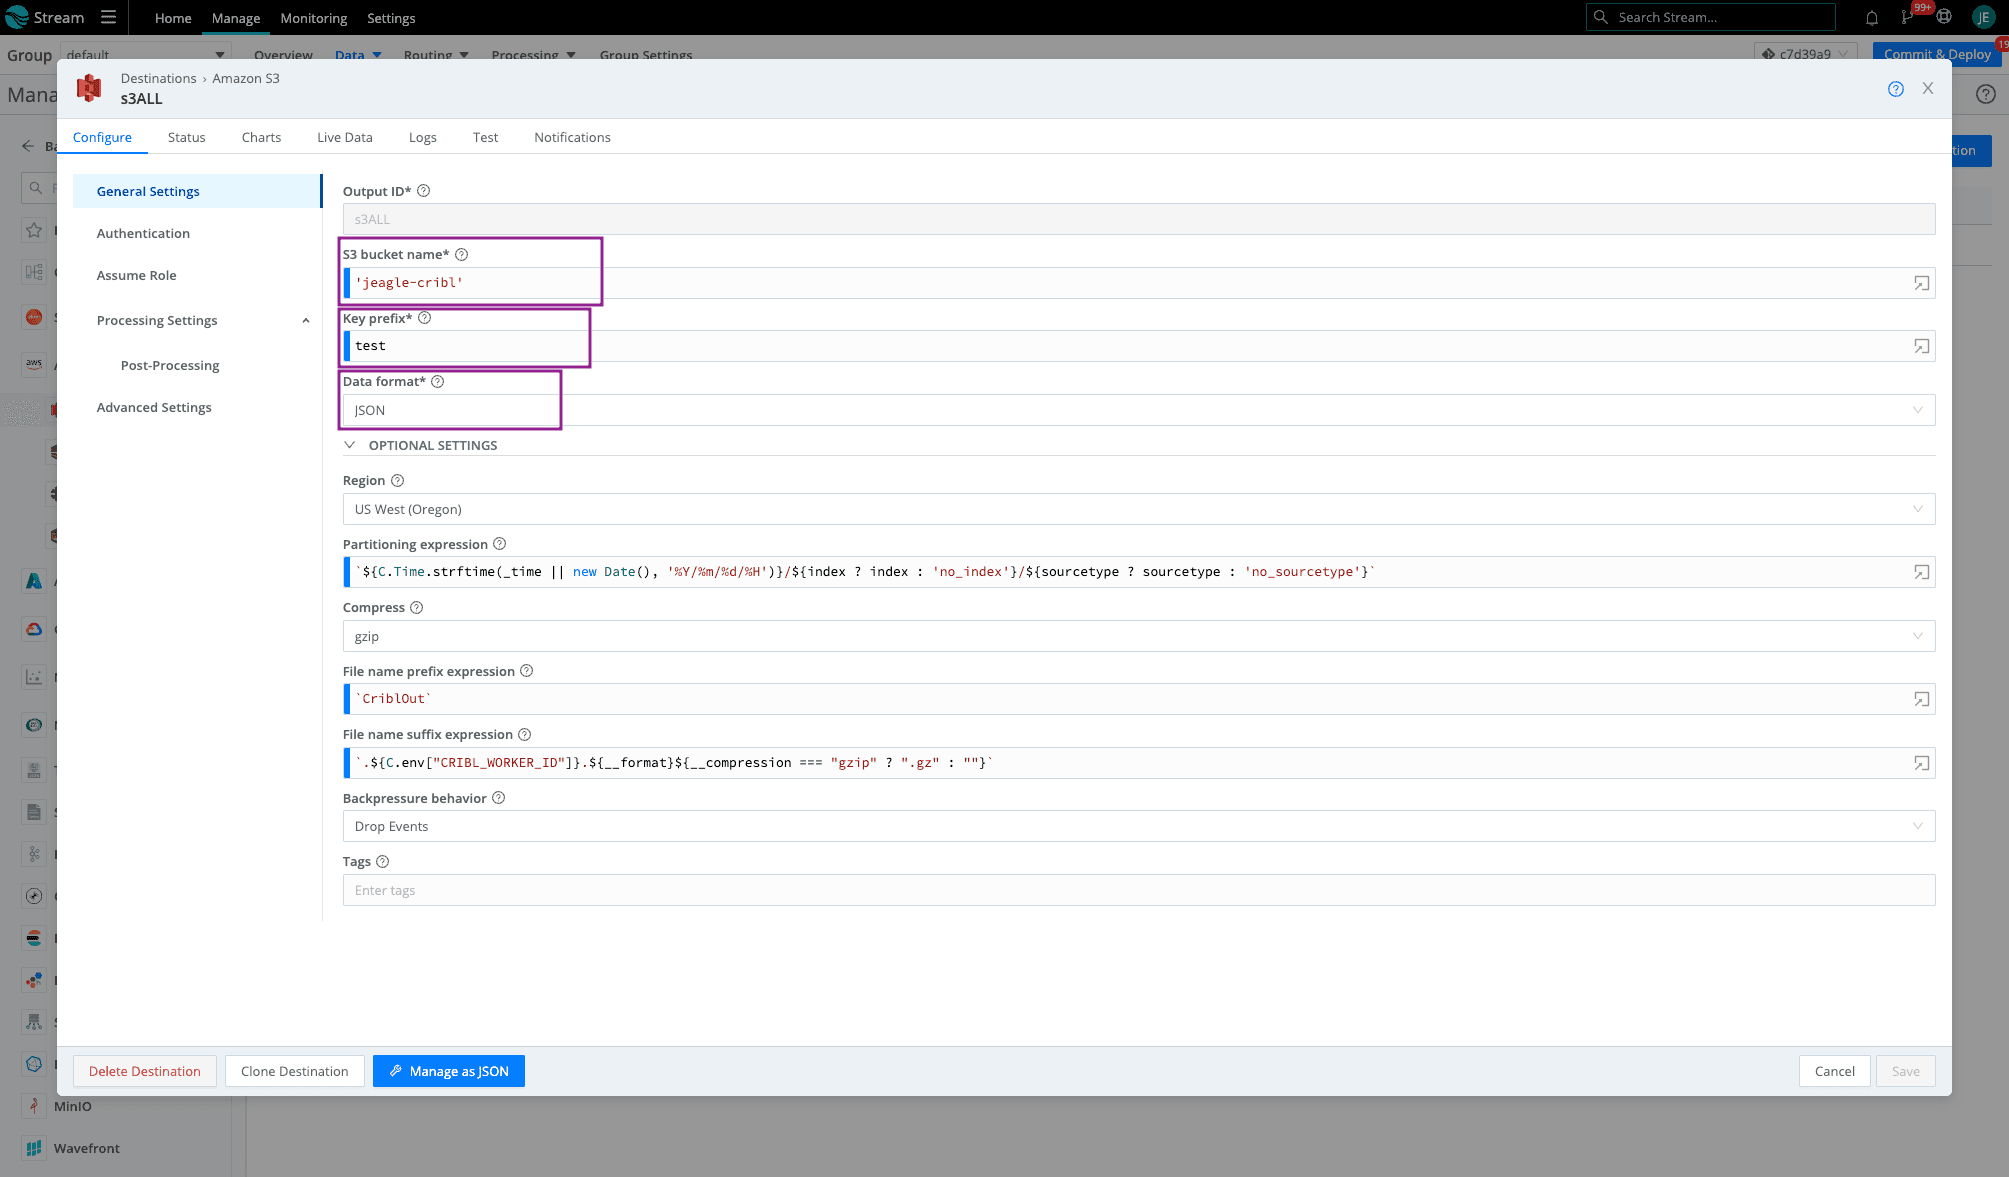
In your default Cloud Worker Group, go to the Amazon S3 Destination. Fill out the required fields and leave the rest default (or check out this blog for more details on these fields).
Bucket name – the name of the bucket we created earlier (as a javascript expression in backticks or quotes)
Key Prefix – prefix to append to files before uploading
Data format – Raw, JSON, or Parquet
The region where the Amazon S3 bucket is located
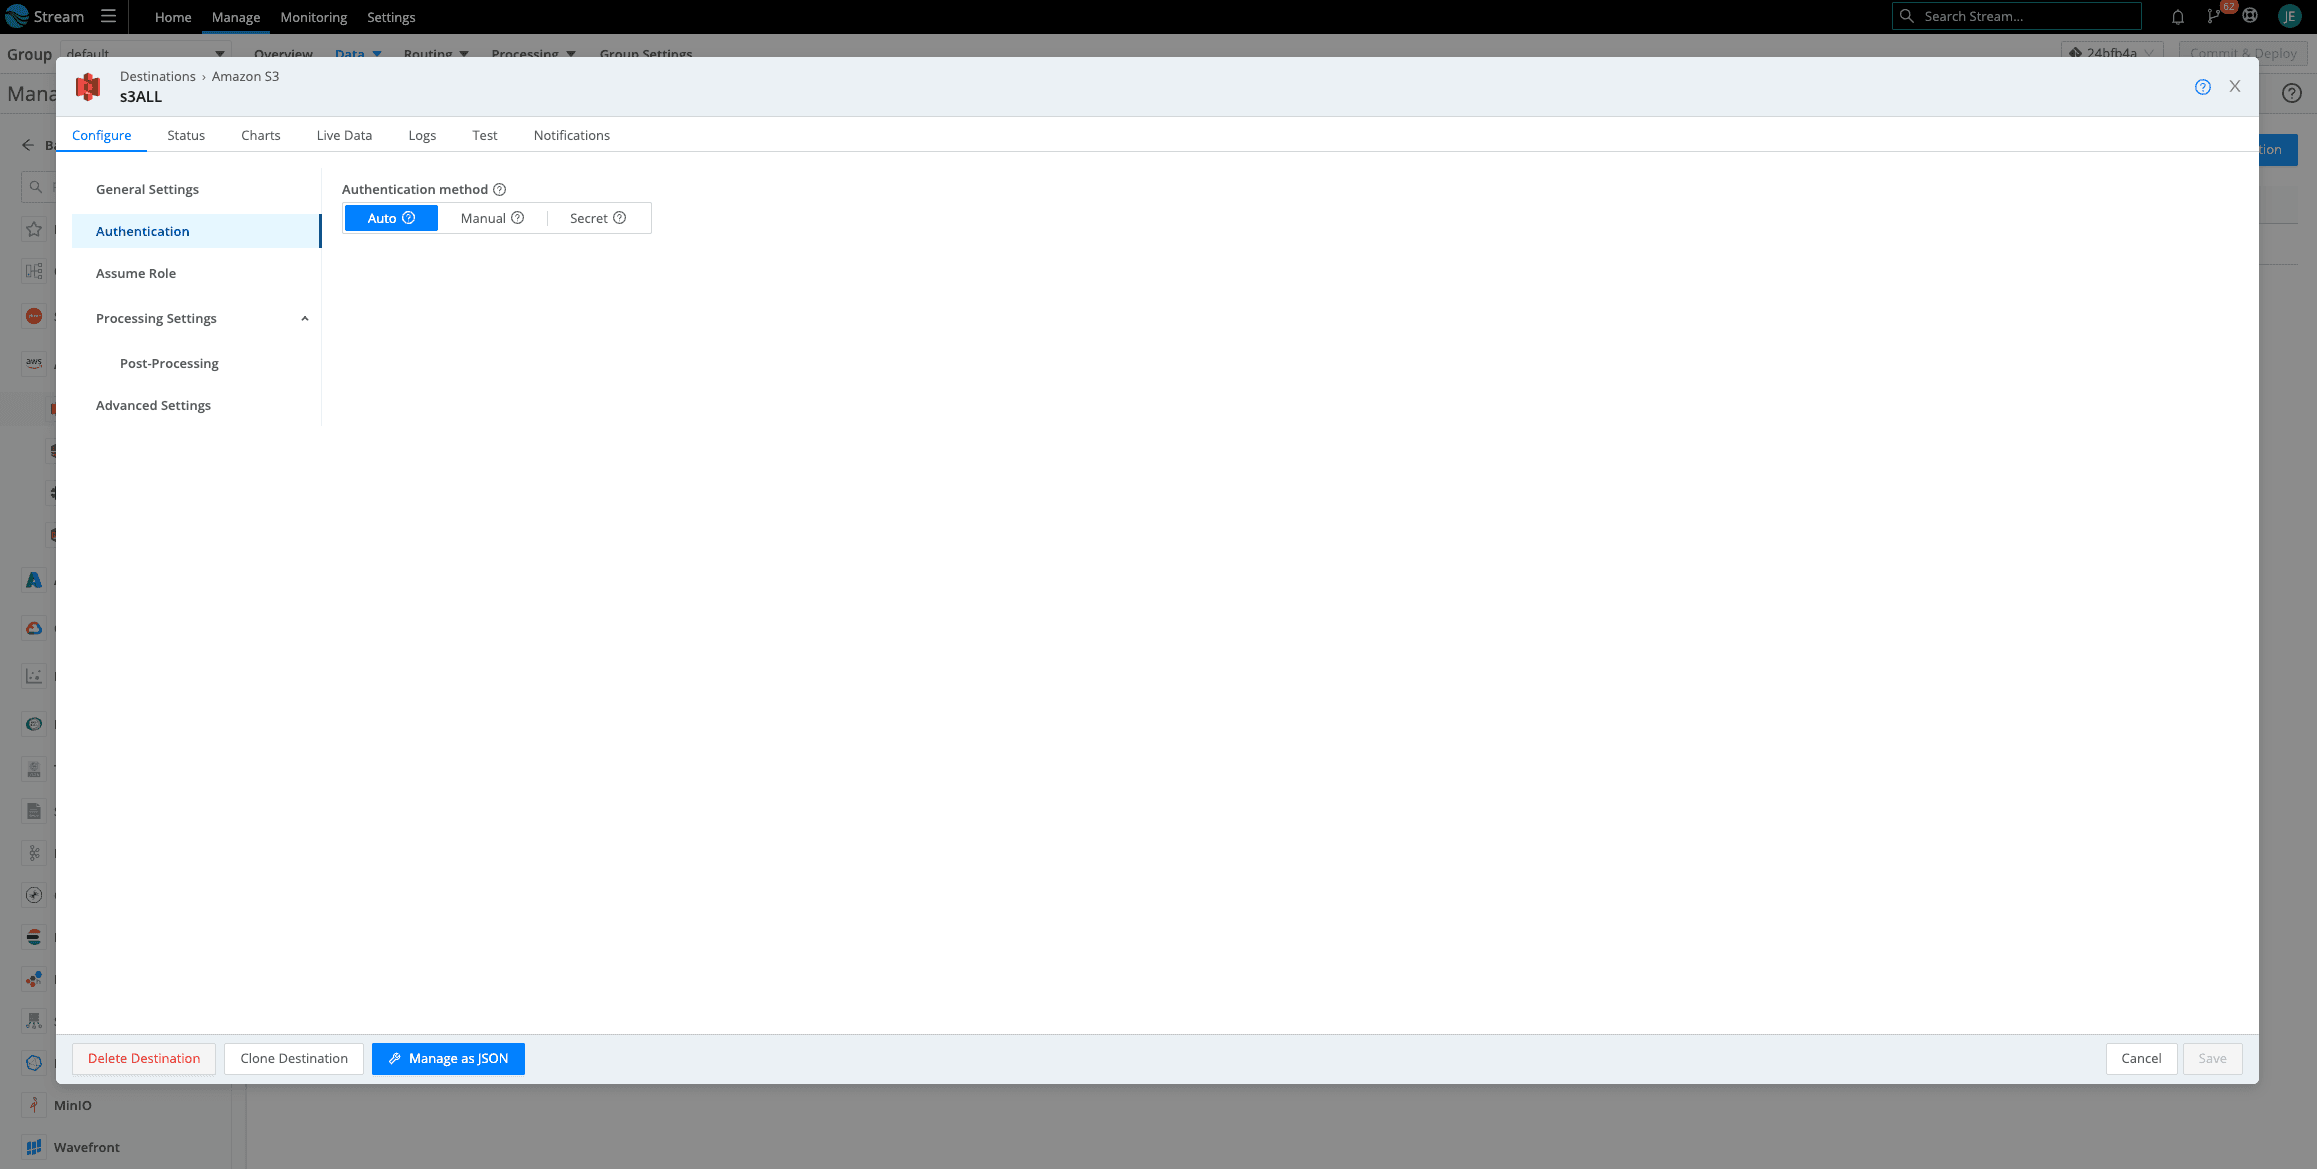
Click on Authentication > Select Auto
Another Jenna Tip!: Make sure you do not have anything in Manual. If you previously had access keys here, delete them. If there is anything in Manual, it will override Auto.
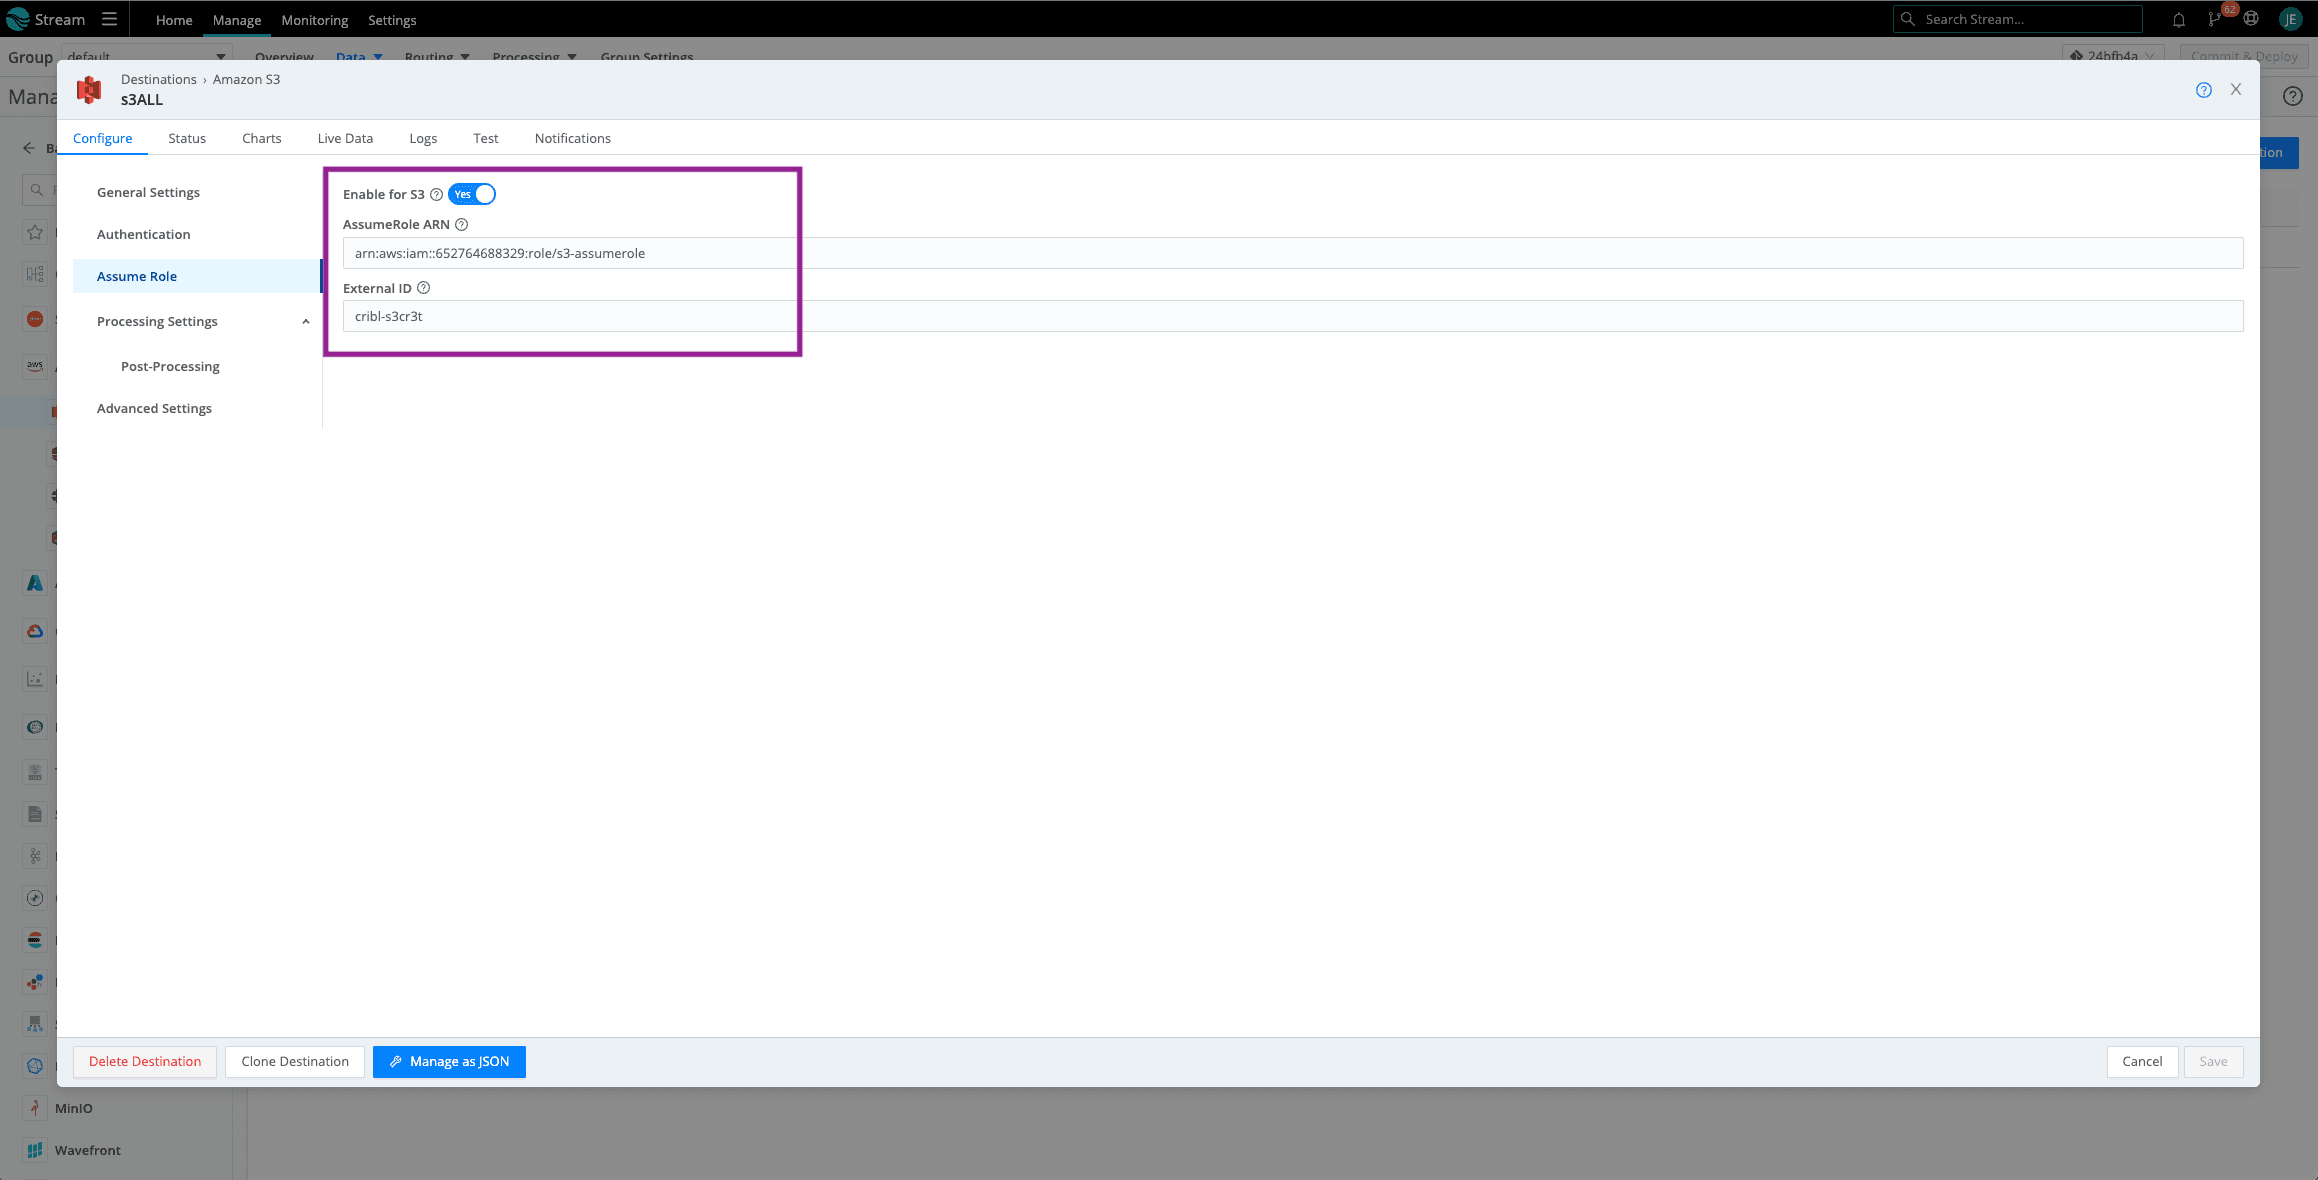
Now let’s add Assume Role. Click on Assume Role and toggle to Enable. Paste the Assume Role ARN you copied previously and the External ID. If you do not have the ARN saved, go back to AWS > IAM > Roles > The role you created for Amazon S3 Assume Roles. See Screenshot. If you need the External ID, click on the Trust Relationships tab and the ExternalID will be nested in the Trust Entity JSON.

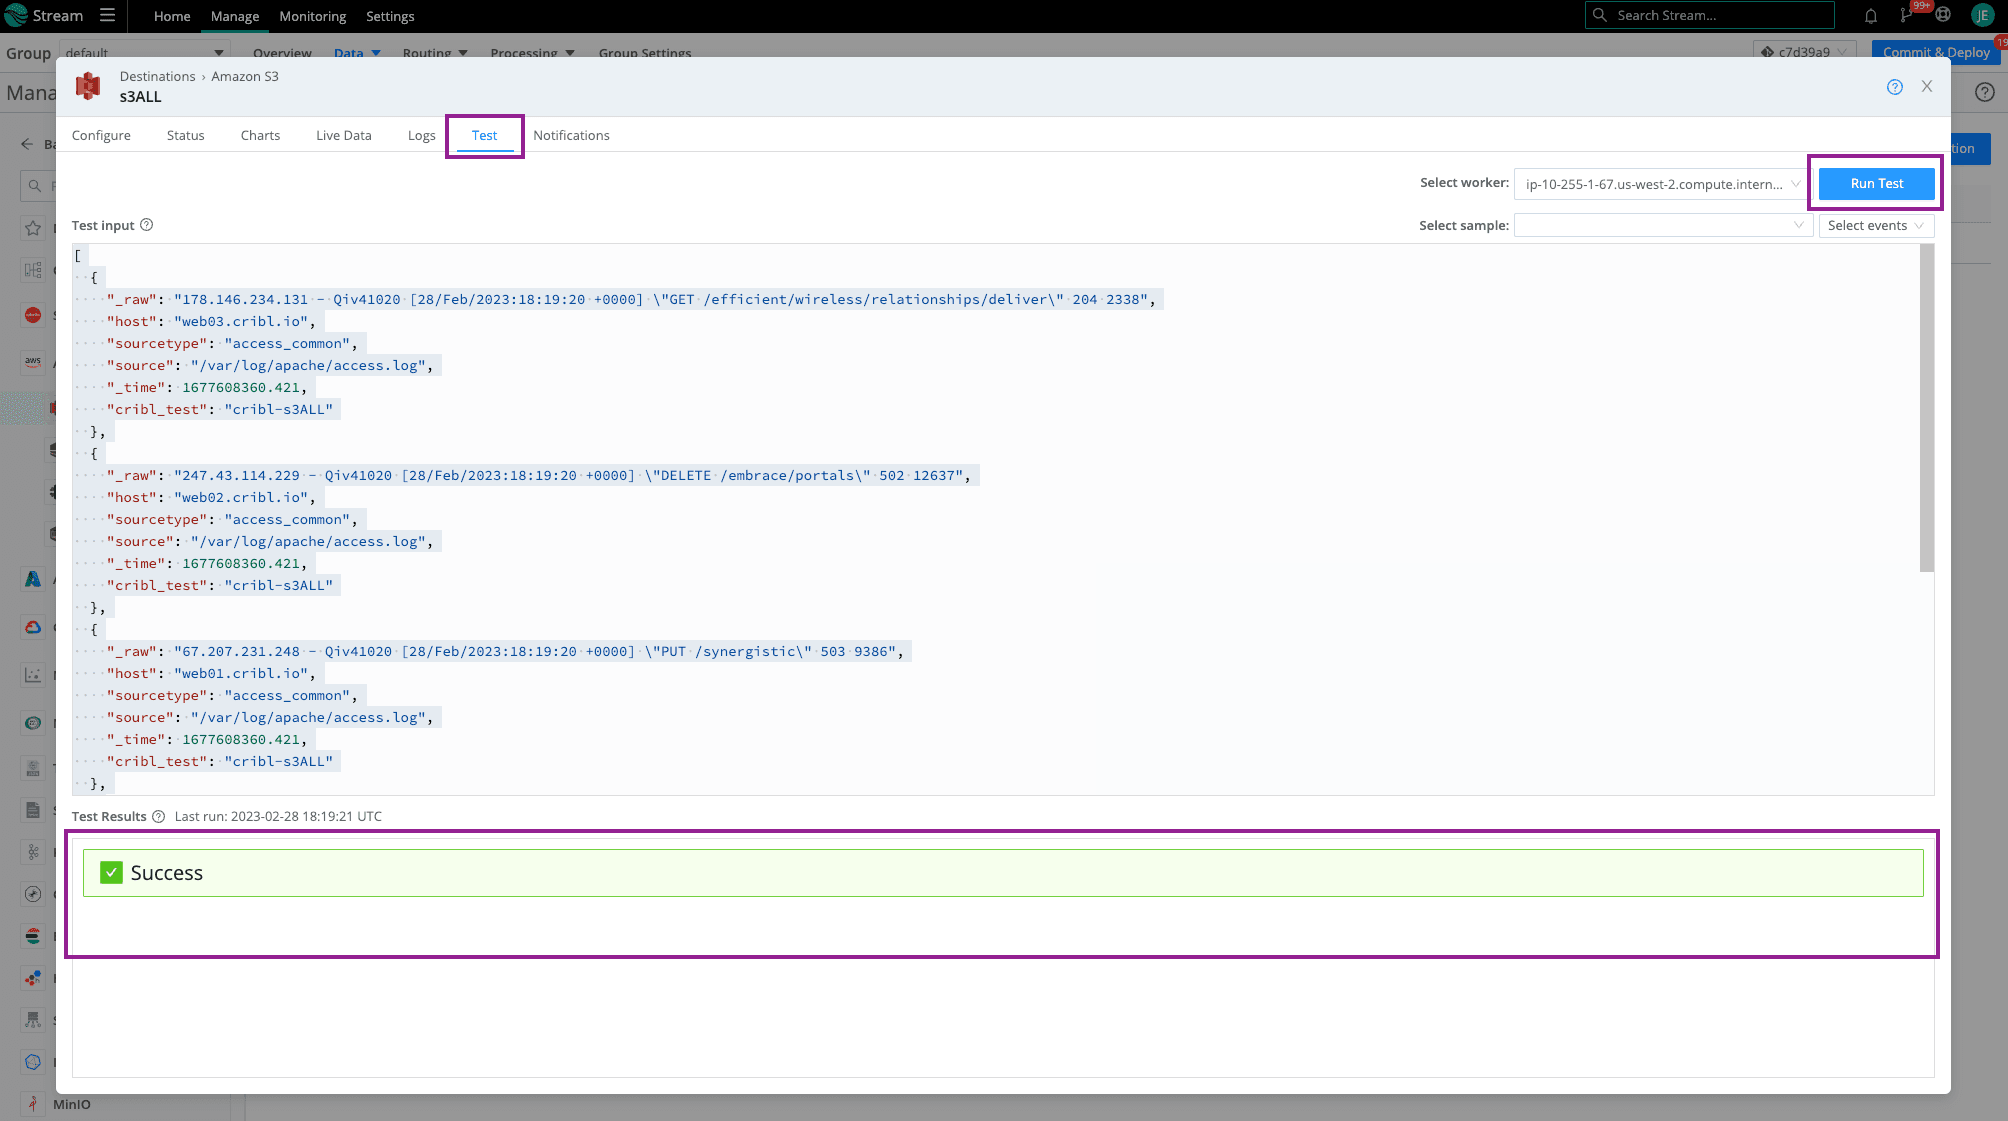
Click save then Click on the Test Tab and Run Test. You should see that beautiful, green Success check mark. When navigating to your Amazon S3 bucket, you should see folders dependent on the partitioning expression setup (using default in this example).
Hybrid Worker Group
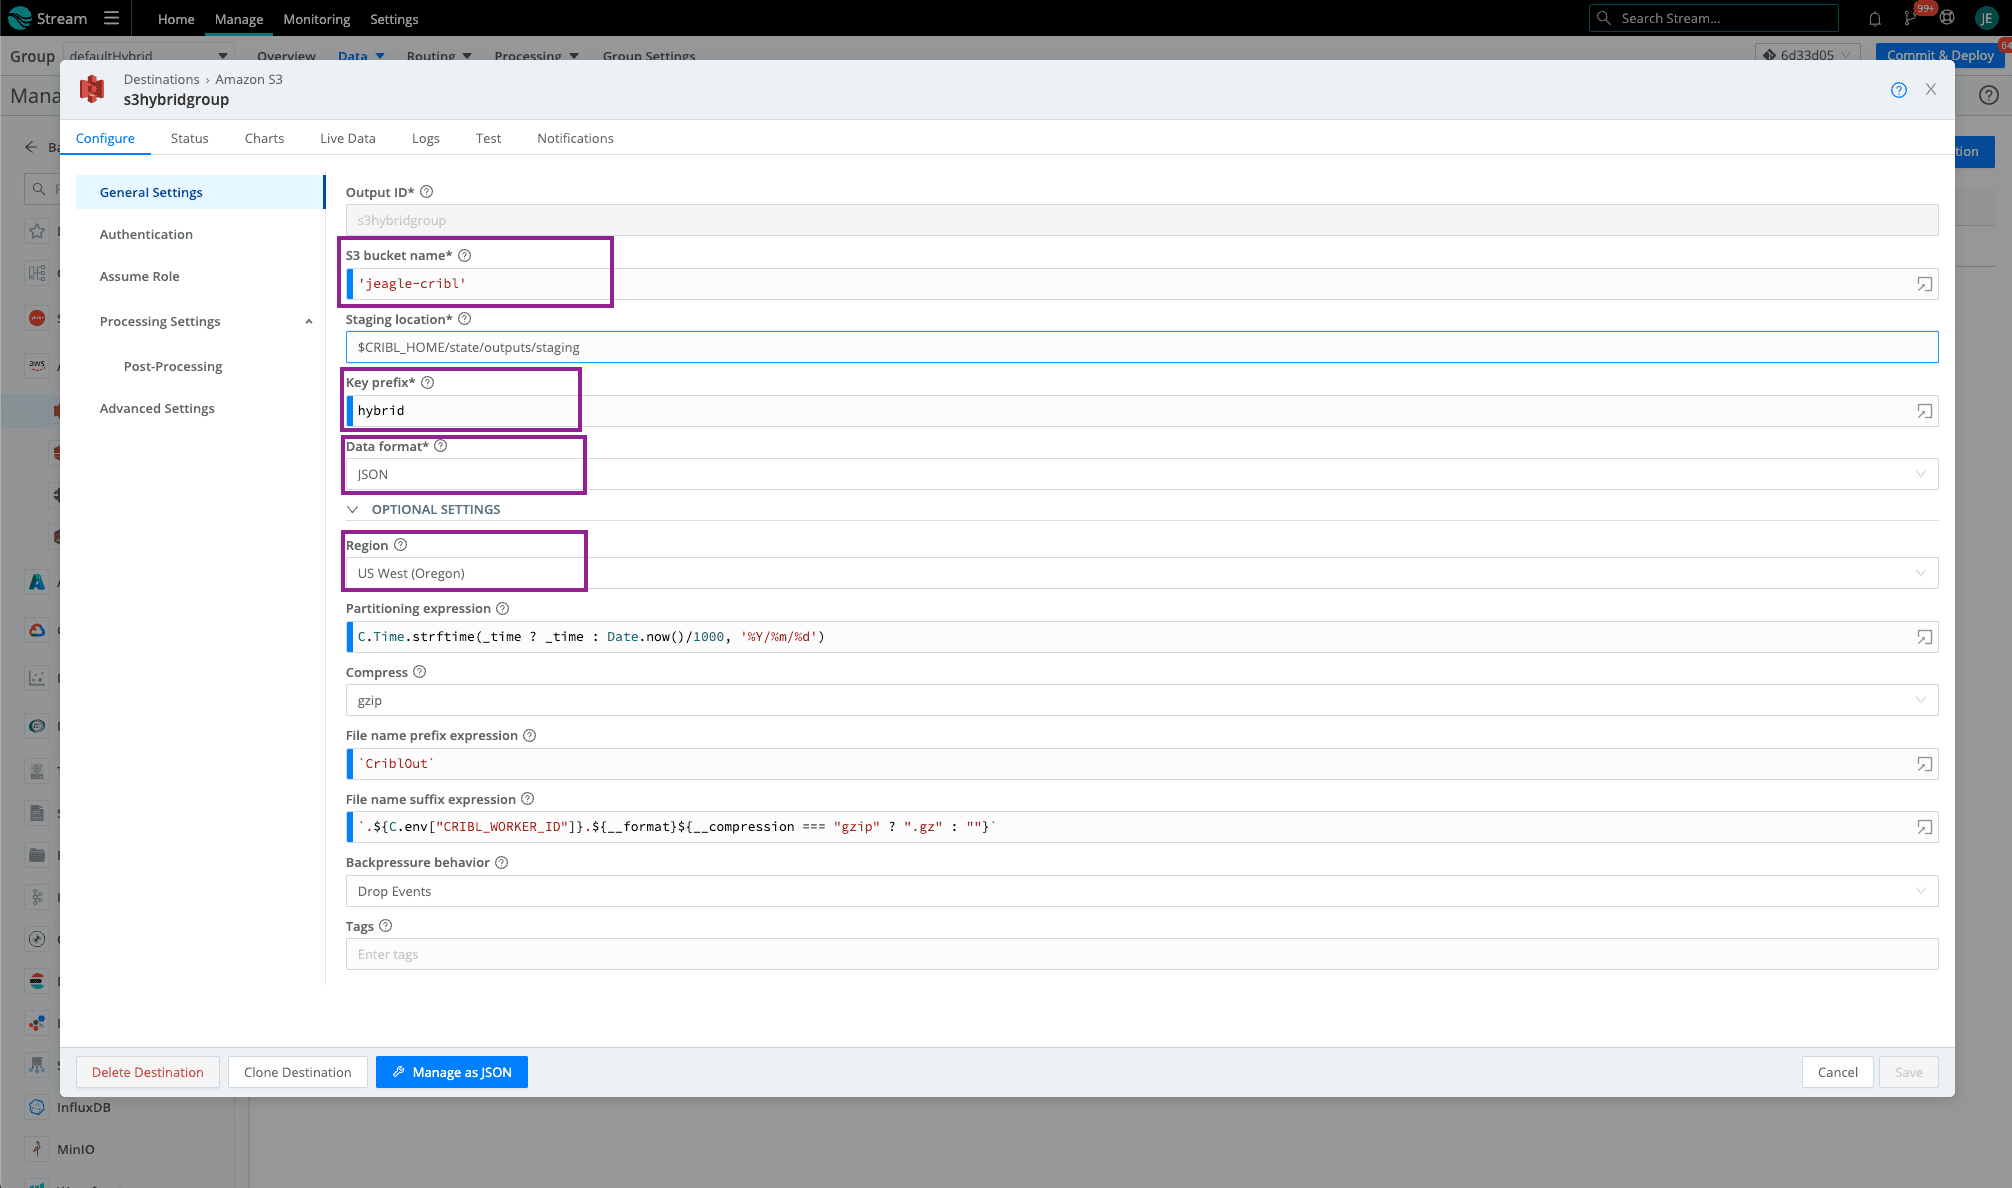
In your hybrid Worker Group (can be defaultHybrid or custom), go to the Amazon S3 Destination. Fill out the required fields and leave the rest default (or check out this blog for more details on these fields).
Bucket name – the name of the bucket we created earlier (as a javascript expression in backticks or quotes)
Key Prefix – prefix to append to files before uploading
Data format – Raw, JSON, or Parquet
The region where the Amazon S3 bucket is located
Click on Authentication > Select Auto

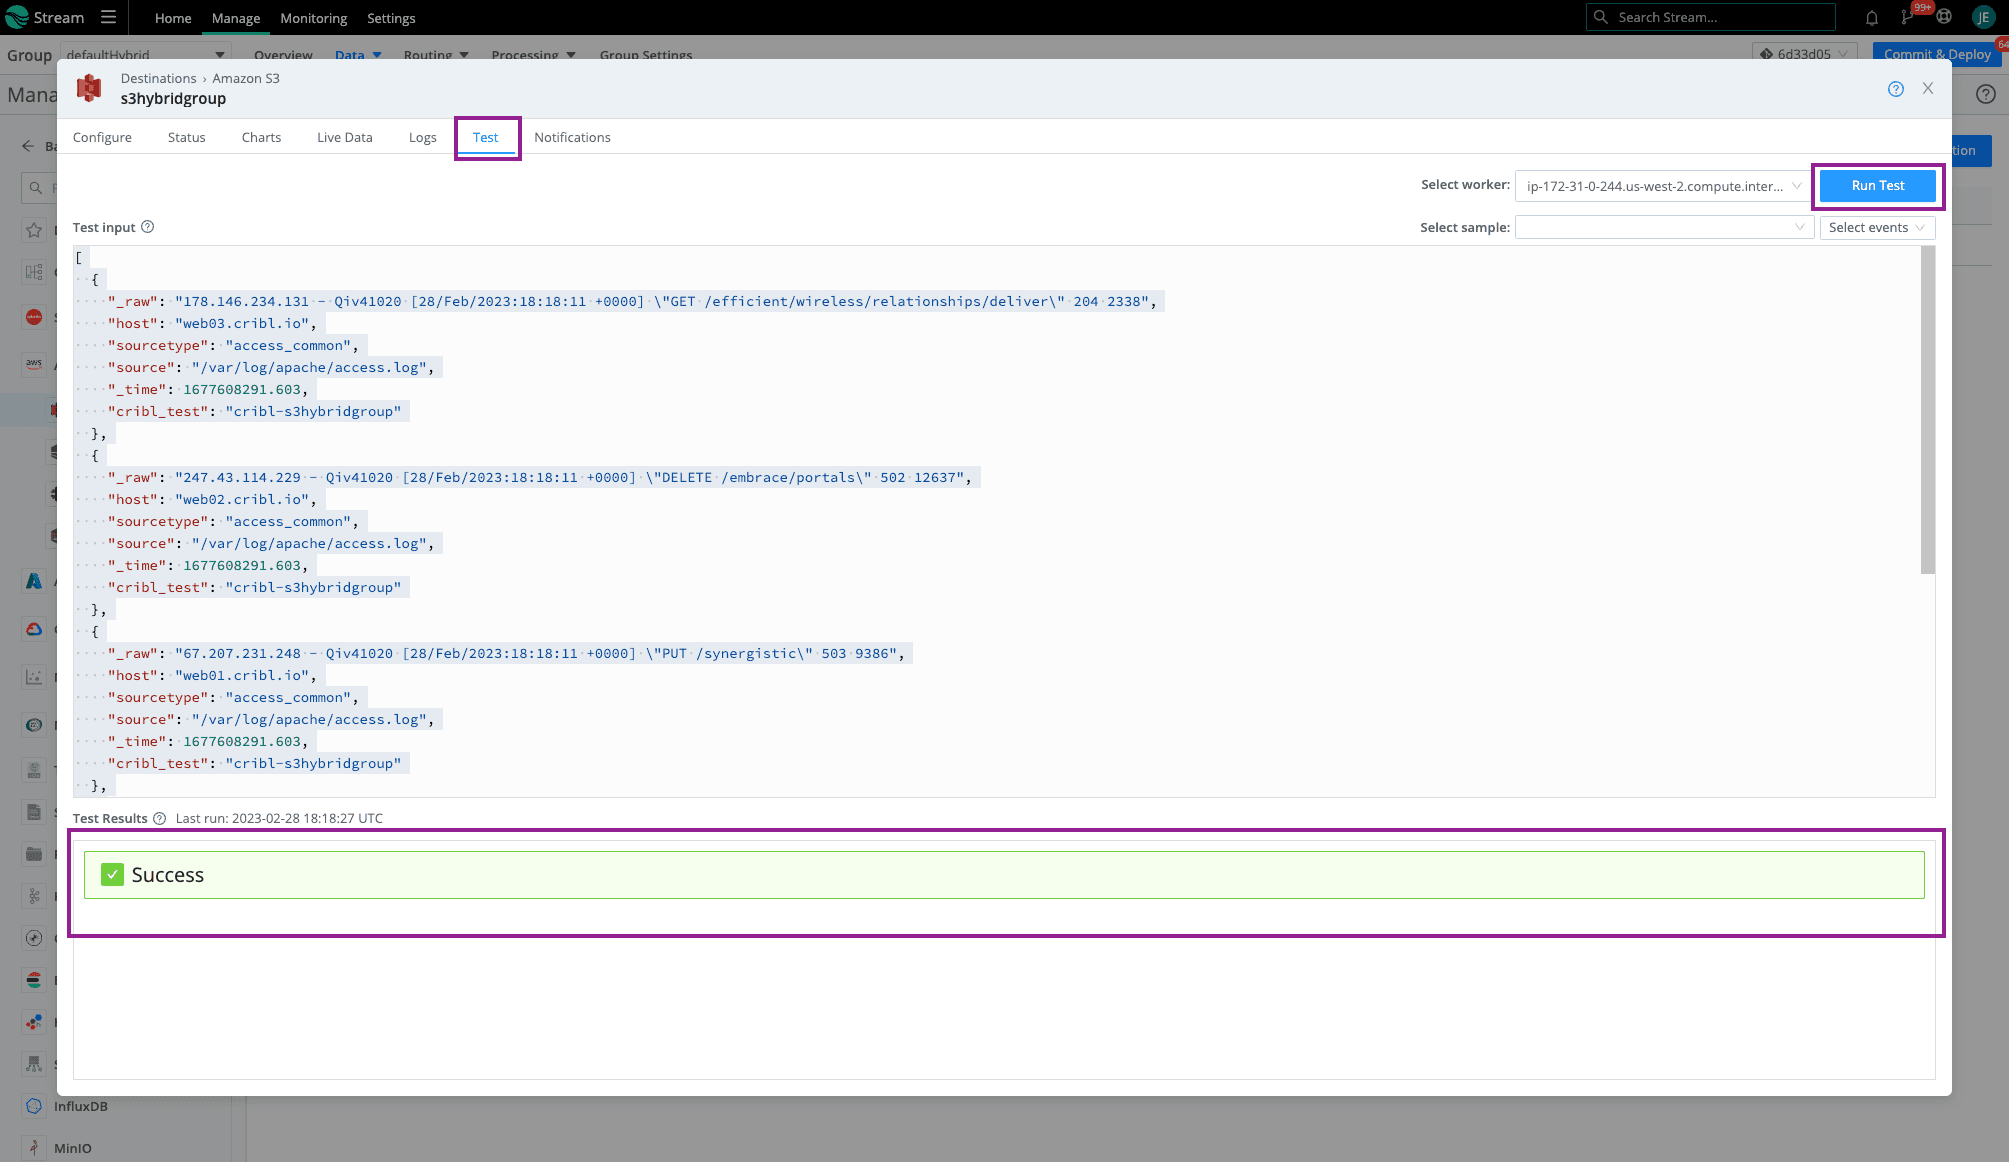
Because these Workers and the Amazon S3 bucket are in the same AWS account, Auto will use the environment variables. In a previous step, we attached the Amazon S3 permissions to this Worker EC2. Click save then Click on the Test Tab and Run Test. You should see that beautiful, green Success check mark. When navigating to your Amazon S3 bucket, you should see folders dependent on the partitioning expression setup (using default in this example).
A final Jenna Tip, as always, Save and Commit & Deploy often! This blog focused on getting Amazon S3 Permissions set up specifically to connect to either Cribl.Cloud Workers or Hybrid Workers. Be sure to check out other blog posts and how-tos that focus on Replay, Search, and Amazon S3 Best Practices. You can also get a breakdown of how Cribl manages data collection across AWS accounts. Below is a video of some other best practices.
The fastest way to get started with Cribl Stream, Edge, and Search is to try the Free Cloud Sandboxes.