All Cloud providers such as AWS, Azure, Google Cloud Platform, and Oracle Cloud offer object storage solutions to economically store large volumes of data and retrieve it on demand. It’s far cheaper to store one petabyte of data in object storage than in block storage. As AWS S3 has become the standard, many on-premise storage appliance vendors have incorporated S3 APIs to store and retrieve data. Oracle wisely continued that trend to OCI (Oracle Cloud Infrastructure). OCI’s Object Storage offers an S3-compatibility API and is relatively easy to set up as described in their documentation.
In this blog, I’ll cover how to enable Cribl Stream to read and write from/to OCI’s Object Storage. Steps include:
Create a new OCI IAM user (optional)
Create an OCI group and add the OCI IAM user to that group (optional)
Create an OCI policy granting permissions to the group previously created (optional)
Create an OCI secret key and corresponding access key for the user
Determine the OCI S3 compliant URL format
Configure the Cribl Stream S3 Destination to write to OCI Object Storage
Confirm files are sent to OCI Object Storage
Configure Stream S3 Collector for replays
It’s worth noting that OCI has additional logical groupings that include a ‘namespace’ and a ‘compartment’. The user id, group, & permission belong to a ‘compartment’. The Object Storage bucket has both a ‘namespace’ and a ‘compartment’ mapped to it. A default ‘compartment’ is created when your root account is created. Per an OCI blog on compartments, they provide an extra level of security isolation and access control. The following image from the blog nicely depicts the purpose of compartments:

And per OCI documentation, Object Storage ‘namespaces’ serve as the top level container for all buckets and objects, and is similarly created when the root user account is created. We will encounter those concepts in various configuration steps.
Steps 1-3 of the below walkthrough are optional for a root user account, as the permissions are inherited. However, as a best practice, creating a new user provides additional levels of security.
Step 1: Create a new user (optional)
1A: Create a new user for S3 API Access: Once you’re logged into the OCI console, click on the 3 lines icon in the top left corner. Click on ‘Identity & Security’, and finally ‘Users’ per the screenshot below:

1B: Select to create a new user
From the ‘user’ screen, create a new user. In the below screenshot, a ‘cribl_oci’ user has been created

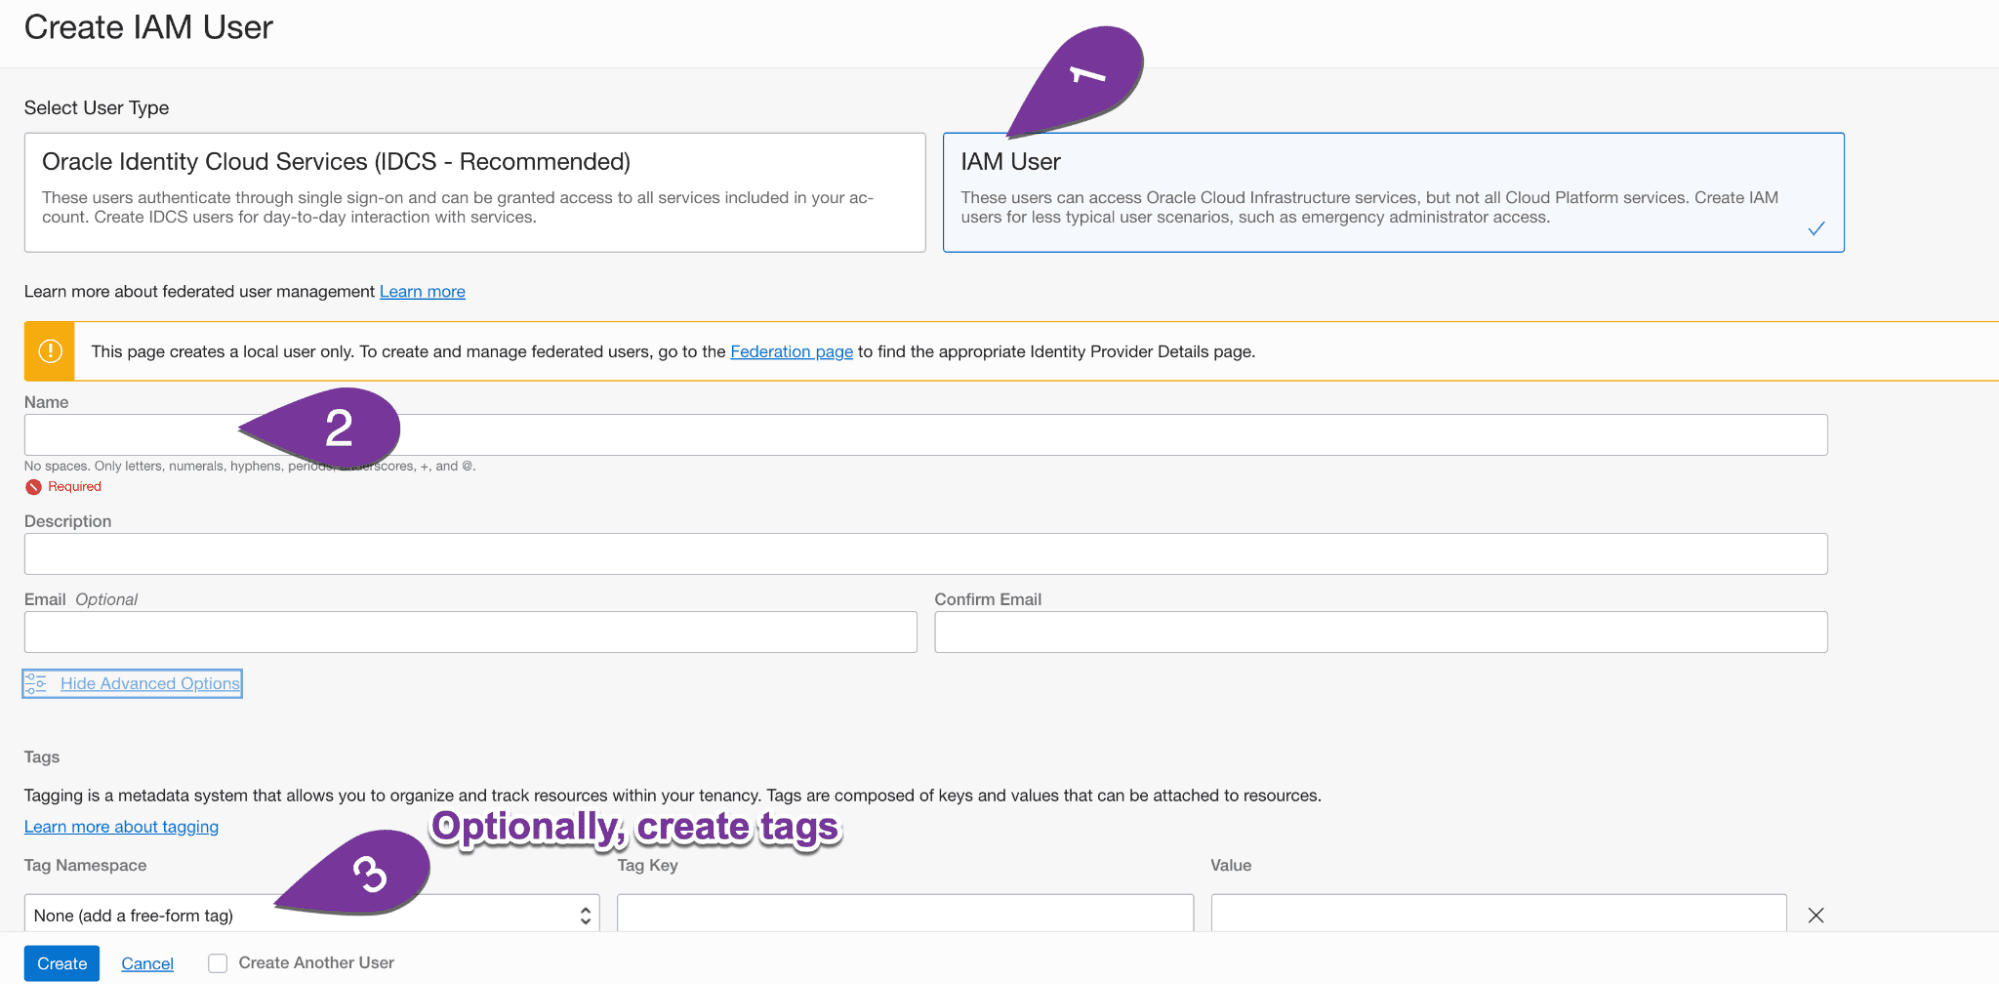
1C: Create an IAM user: From the next screen, select IAM user. Fill in the banks and optionally, create tags (i.e. purpose: S3 API access)
Step 2: Create a group and add the user to that group (optional)
From within the Identity page, access the groups page. Create a new group, and add the recently created user to that group per the screenshots below:

Step 3: Create a policy granting permissions to the group previously created (optional)
While still in the ‘Identities’ page, select policies, and create a new policy:

OCI offers a simple UI to add one policy at a time to grant access.

Copy and paste the 3 lines below, change the bucket name to the bucket in question, and apply to your policy in advanced mode.
Allow group Cribl_ObjectStorage_Access_Group to read buckets in tenancyAllow group Cribl_ObjectStorage_Access_Group to manage objects in tenancy where all {target.bucket.name='CriblBucket', any {request.permission='OBJECT_CREATE', request.permission='OBJECT_INSPECT'}}Allow group Cribl_ObjectStorage_Access_Group to read objects in tenancy where target.bucket.name='CriblBucket'
The first line allows listing all buckets in the user’s tenancy. (read buckets)The second line allows the user to create and inspect objects for the bucket in question.The third line allows the user to read objects within the bucket. (read objects)
Step 4: Create a secret key and corresponding access key for the user
Access the specific user settings one more time, and select ‘customer secret key’ per the screenshots below. Create a new secret key, being sure to copy it before closing the window.

The access key for that secret key can be retrieved by hovering over the secret key list per the screenshot below:

*Keep the secret key and access key handy for configuration within Cribl. The secret key will only be visible once.
Step 5: Determine the OCI S3 compliant URL format
Per OCI documentation, the URL format is as follows: mynamespace.compat.objectstorage.us-phoenix-1.oraclecloud.com
The below screenshot of the Object Store bucket exposes the namespace and region:
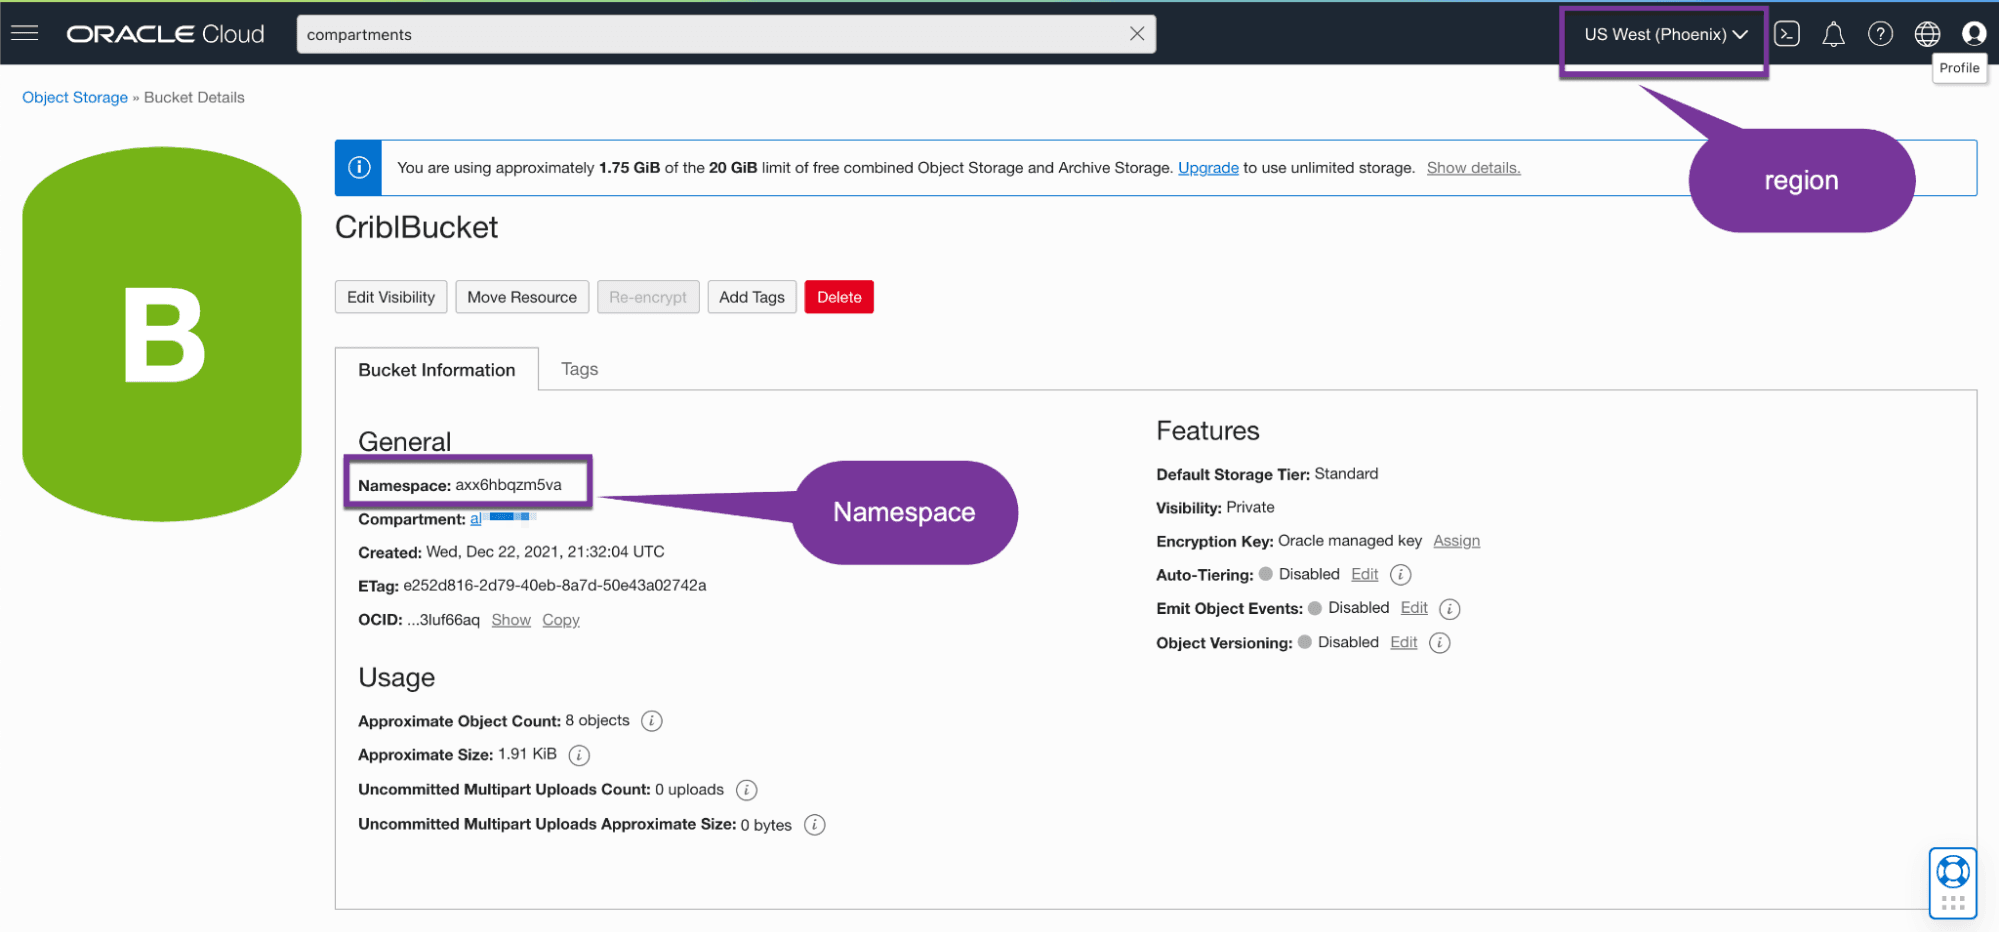
In this case, the URL would be: axx6hbqzm5va.compat.objectstorage.us-phoenix-1.oraclecloud.com
Step 6: Configure the Cribl Stream S3 Destination to write to OCI Object Storage
Access Cribl Stream and populate the destination per the screenshots and instructions below:
From the General Settings tab, leave the region field empty.

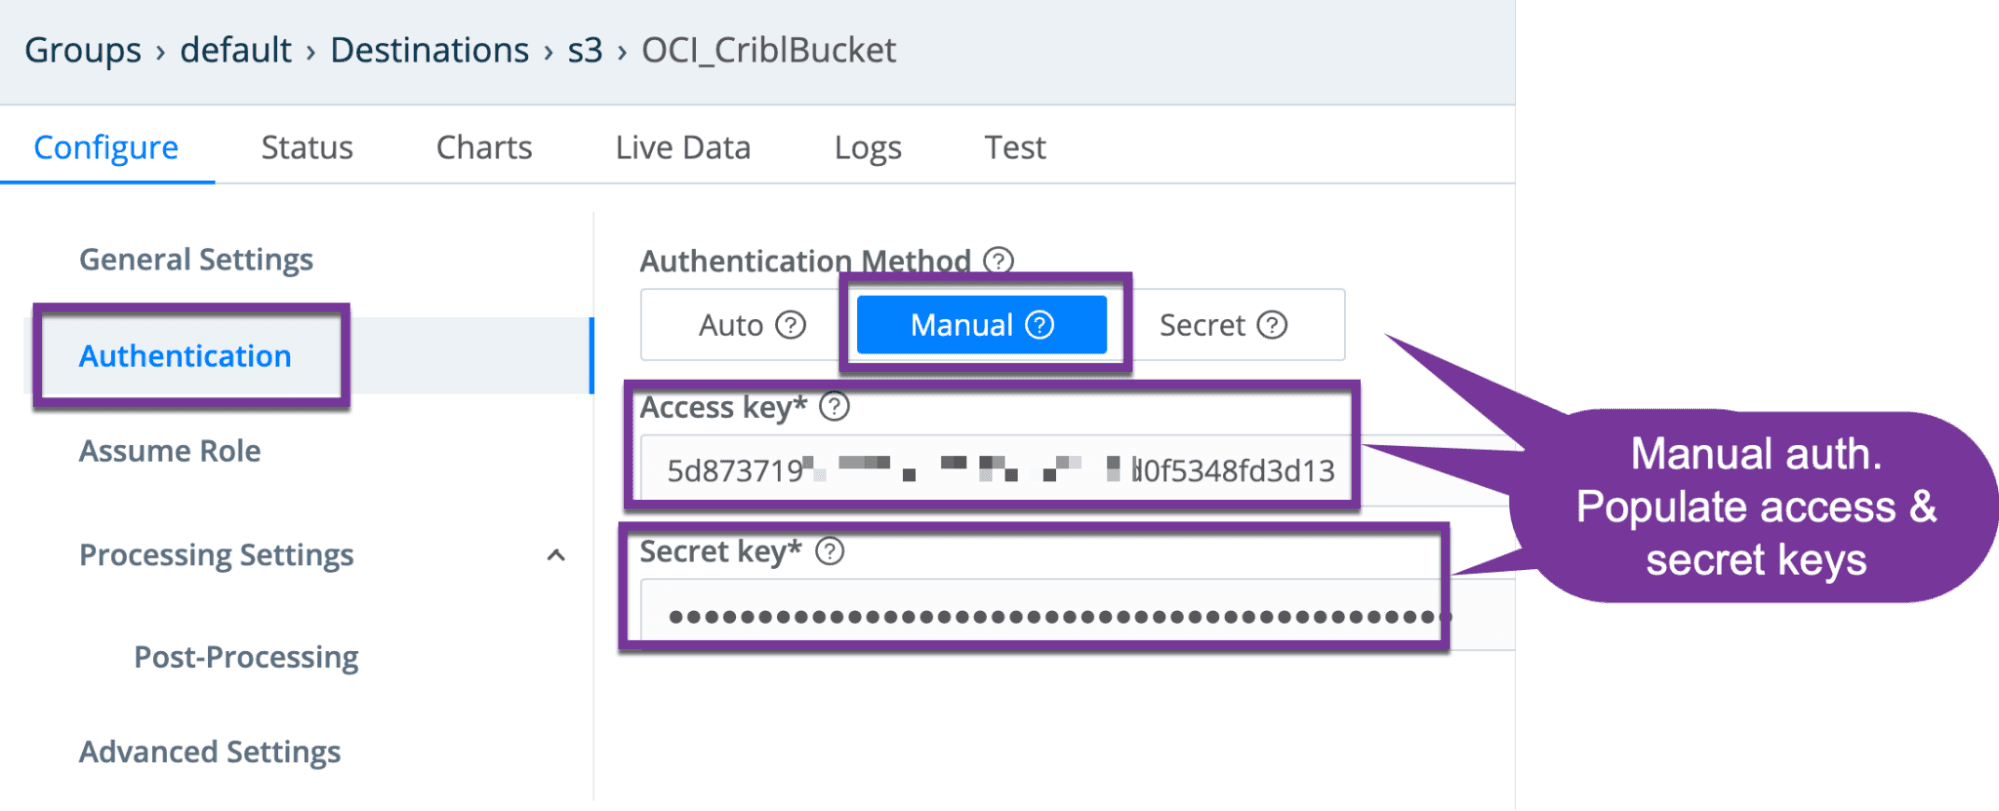
From the authentication tab, select manual, and populate the access and secret key fields.
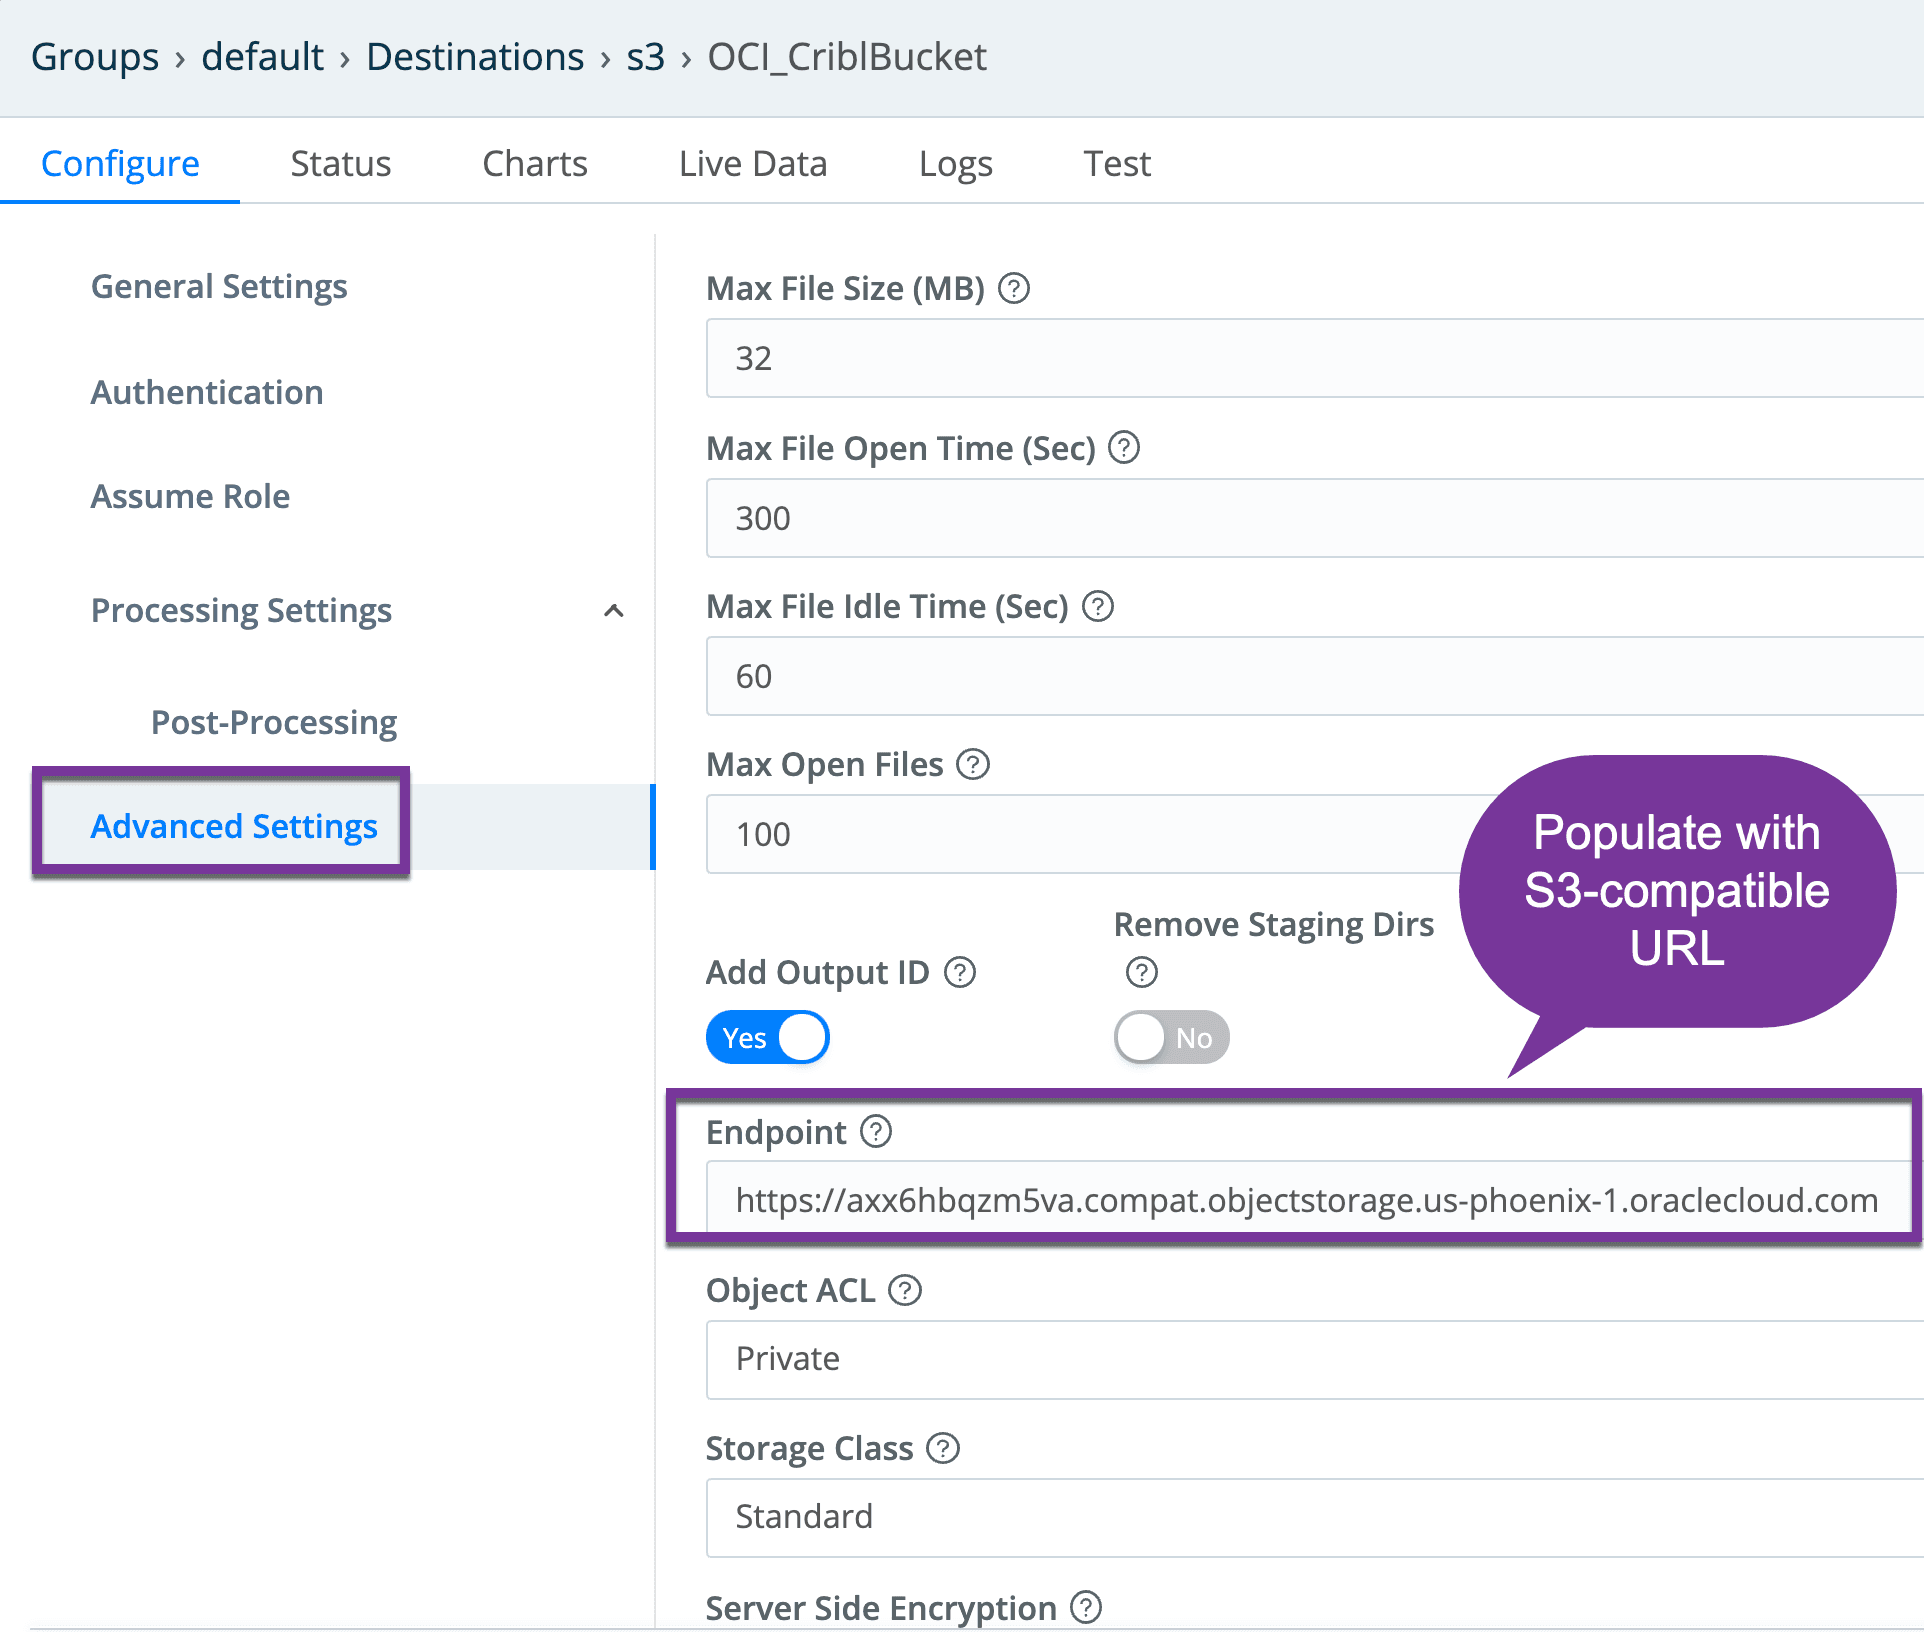
From the Advanced Settings tab, populate the S3 API URLAccess the advanced tab and populate the URL field with the OCI URL devised prior step.
Save the configuration, commit, and deploy.

Step 7: Confirm files are sent to OCI Object Storage
You might need to wait a few minutes for the Cribl timeouts and file size settings to be reached before seeing any files. Within the OCI console, select the bucket in question, and expand the bucket hierarchy to see what was written:

Step 8: Configure Stream S3 Collector for replays
Creating an S3 collector is very similar to the destination we recently created. The same S3-compatibility URL is referenced, as well as manual authentication method with secret and access keys. Also, similar to the Destination, the ‘Region field needs to remain empty.
Creating an S3 collector is very similar to the destination we recently created. The same S3-compatibility URL is references, as well as manual authentication method with secret and access keys. Also, similar to the Destination, the ‘Region field needs to remain empty.
Collector Settings:

Testing replay: Follow the sequence of screenshots below to ‘run’ a replay from the S3 collector entry in question, optionally specify a time filter, and validating results are retrieved. In the below screenshot, the files populated to the bucket in a prior step are retrieved.
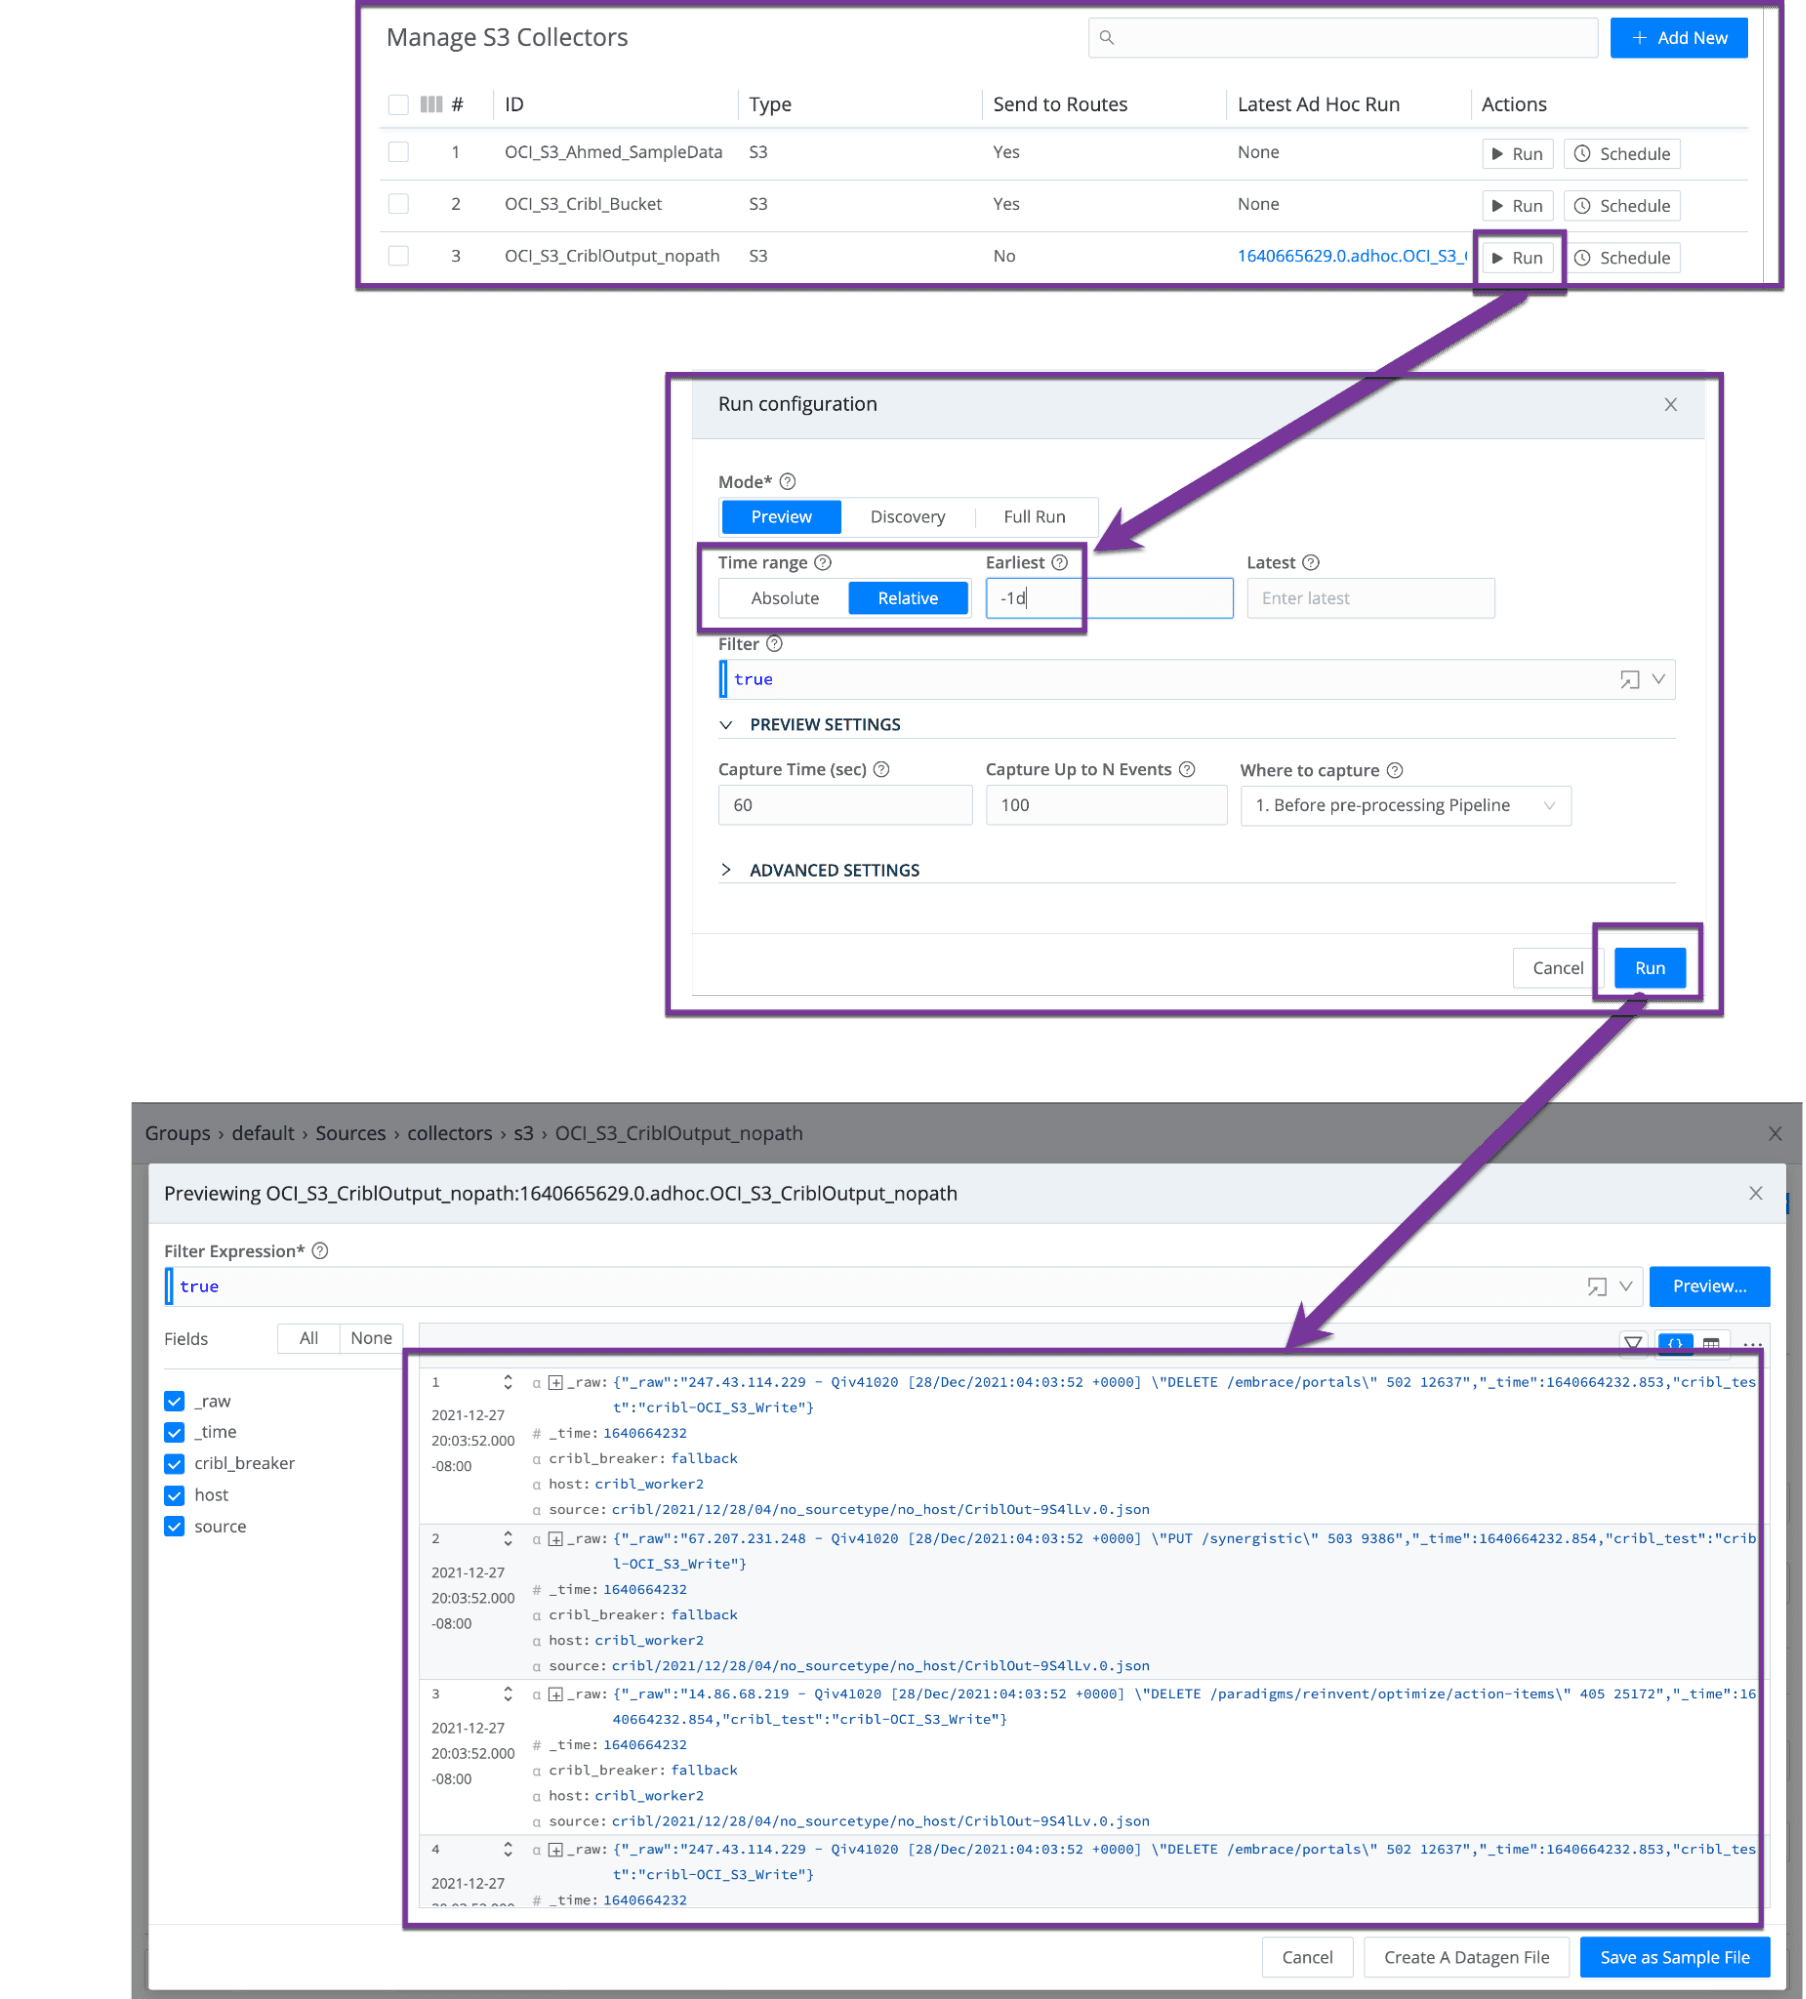
After a commit and deploy, you are now ready to replay data stored in Oracle Cloud Infrastructure (OCI) buckets.
Troubleshooting
Situation: When testing sending data to an OCI bucket destination, you get the following error:Error: 400-Bad Request
Details: “Output OCI_CriblBucket does not exist!”
Resolution: Ensure the worker is up, is communicating with the leader, and has had the configuration deployed successfully. If you just deployed, wait a few more seconds to minutes for the worker to fully come up. Try a different worker in the group if necessary.
Situation: error: BadRequest message: null
Resolution: Ensure that you left the region field empty within the Stream collector or destination configuration.
Situation: No data returned when running a replay.
Resolution:
Apply a filter to limit the results.
If too much data is obtained at once, the system might time out. Wait a few minutes and try again.
Cribl Stream is free to try via download or in the cloud. Sign up for a free account today and see how easy it is to integrate Oracle Cloud Infrastructure Object Storage with Cribl LogStream.
The fastest way to get started with Cribl Stream is to sign-up at Cribl.Cloud. You can process up to 1 TB of throughput per day at no cost. Sign-up and start using Stream within a few minutes.


