
Encryption in Transit – this comes up on every security questionnaire ever, and Transport Layer Security (TLS) is on just about every website these days, but it’s far from easy to implement in a lot of cases. Choices like self-signed certificates versus public certificates have long been a challenge (though there are now so many services out there that provide free or inexpensive certificates, it’s now more a matter of choice than it used to be).
In LogStream, we’re enabling TLS across many of the protocols that we use, but TLS must be configured in order to use it. This is generally fine in a bare-metal or VM-based environment, where you can easily seed the necessary files to support TLS. But it can be a bit more challenging on Kubernetes (K8s), where access to the underlying file system can be a challenge.
In the K8s landscape, there are a couple ways we can add TLS to a LogStream environment, depending on what your requirements are: <foo or bar>.
The Easy Way Out – Load Balancer Termination
Depending on your security requirements, you may be able to terminate the TLS/SSL connection at the load balancer (assuming you’re using Load Balancer as the service type), and have the load balancer speak straight HTTP to the leader. This is the simplest way to enable encrypted access to the Leader.
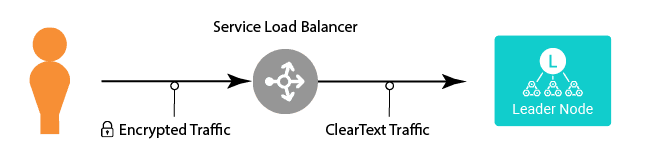
The advantage of this is pure simplicity – you can apply a single certificate to the load balancer, and you’re effectively done. In some environments, the certificate will automatically be renewed as well, eliminating future headaches.
With the Cribl Helm charts, this is easy to do via service annotations. The actual annotation will vary depending on your K8s implementation – the most exhaustive list I’ve found is in the K8s Service documentation here – but if you’re using Amazon’s Elastic Kubernetes Service (EKS), the TLS annotations are:
service.beta.kubernetes.io/aws-load-balancer-ssl-cert
Value: ARN to Certificate Manager Certificate.Purpose: The certificate for the load balancer to use for all TLS traffic
service.beta.kubernetes.io/aws-load-balancer-backend-protocol
value: http/https/ssl/tcpPurpose: The protocol to be used between the load balancer and the pods.
service.beta.kubernetes.io/aws-load-balancer-ssl-ports
Value: List of ports.Description: Whether some ports need to be encrypted, and some clear text.specifying the encrypted ports here will make only those ports TLS encrypted.
In our case, since we’re protecting a service exposing a single TCP port, we only need the first annotation. Consider the below snippet from a values.yml file:
service:
  externalType: LoadBalancer
  annotations:
service.beta.kubernetes.io/aws-load-balancer-ssl-cert: arn:aws:acm:us-west-2:556493984487:certificate/c2b4b4v8-6778-4k64-8394-26983a209g3a
In this, we specify an externalType of LoadBalancer (meaning the “user facing” service will be set up with a load balancer in front of it), and we set the annotation to assign an AWS Certificate Manager certificate ARN to the service, making it available via HTTPS on the original port of 9000.
This is the easiest way to do this, but some organizations have security rules that require end-to-end encryption…
The Challenge – End-to-End Encryption
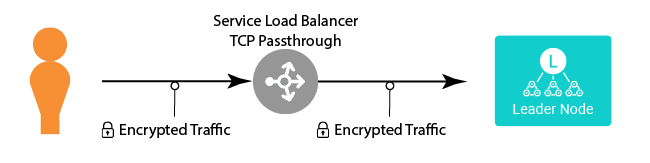
This approach requires either 1) terminating SSL at the load balancer, but having the load balancer talk to the leader via SSL/TLS; or 2) doing TCP passthrough at the load balancer, and terminating the encryption on the Leader node directly. Here we’re going to cover the latter option, since you can combine the Load Balancer Termination approach with the below approach to achieve the first option.
The Helm charts are set up with the API server port (port 9000 on the Workers and the Leader) as cleartext ports. On the Leader we need to do a number of things (currently via the cribl-leader chart), to be able to run the Leader using HTTPS:
Create a tarball of the files that the Leader will need, and put that into a K8s ConfigMap in the namespace we’re installing into.
Use the
config.healthSchemeHelm chart option to set the liveness and readiness checks to use HTTPS.Use the
extraConfigmapMountsHelm chart option to mount the ConfigMap from step 1 on the Leader’s pod.Use the
envHelm chart option to instruct the chart to extract the tarball from the ConfigMap, and to put the resulting files in the right place.
Necessary Files
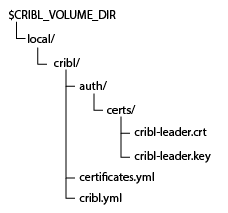
At left, you’ll notice that we need a few files to be loaded into the cribl/ configuration directory. On the Helm charts, that is /opt/cribl/config-volume.
The certificates.yml file defines the certificates we have in the system. For this example, I have a certificate that I’m naming cribl-leader, so in the certificates.yml file, I have this:
cribl-leader:
  description: Leader Cert
The two files in the certs/ subdirectory are named after the name we set in certificates.yml, but with specific suffixes:
crt– the certificate file itself (cribl-leader.crt).key– the key used to create the certificate (cribl-leader.key); and, if using a commercially signed certificate, pem – the full CA chain (which would becribl-leader.pem).
In this example, I’m using a self-signed certificate, so I don’t have the CA chain file. I used this command line to generate the certificate:
openssl req -newkey rsa:2048 -nodes -keyout cribl-leader.key -x509 -days 365 -out cribl-leader.pem
Finally, the cribl.yml file configures the Leader node to speak HTTPS, and to use the certificate. The section that’s relevant in the cribl.yml file is the api section. In this example, my cribl.yml file looks like this:
api:
  retryCount: 120
  retrySleepSecs: 5
  baseUrl: ""
  disabled: false
  revokeOnRoleChange: true
  authTokenTTL: 3600
  headers: {}
  ssl:
disabled: false
certPath: $CRIBL_HOME/local/cribl/auth/certs/cribl-leader.crt
privKeyPath: $CRIBL_HOME/local/cribl/auth/certs/cribl-leader.key
  host: 0.0.0.0
  port: 9000
You can create these files by hand, or just configure a running instance of LogStream and then grab the files. Once you have the files laid out like the directory tree shown above, you need to create a tarball of them, and then feed them into a ConfigMap.
For example, in my case, I’m installing into a namespace called logstreamtest, and I’m going to create a ConfigMap called certsetup, so I’ll run these commands from the top level of the above tree:
tar zcf certsetup.tgz local/cribl/{certificates.yml,cribl.yml,auth/certs}
kubectl create configmap certsetup --from-file=certsetup.tgz=./certsetup.tgz -n logstreamtest

You can verify that the tarball got base64-encoded and fed into the ConfigMap as certsetup.tgz with the following command: kubectl get configmap/certsetup -n logstreamtest --output=yaml – of course, substitute whatever names you’re using for the ConfigMap and the namespace to get your data.
Configuring the Helm Chart
There are three things to configure for the Helm chart. I recommend that you use a values.yml file to do this, since the --set syntax gets ugly quick. I’ll show you example snippets for each item.
extraConfigmapMounts Option
This option points the chart at the ConfigMap we created, and mounts it as a directory on /var/tmp/certsetup. The tarball will be the only file in that directory when it’s mounted within the Leader pod.
extraConfigmapMounts:
  - name: certsetup
configMap: certsetup
mountPath: /var/tmp/certsetup
config.HealthScheme Option
This option sets the live and ready checks to use either HTTP (default) or HTTPS.
config:
  healthScheme: HTTPS
env Option
This one is the trickiest of the bunch – basically, we’re going to take advantage of the feature in the cribl/cribl container that allows us to execute shell commands before it starts LogStream.
env:
  CRIBL_BEFORE_START_CMD_1: if ! [ -e $CRIBL_VOLUME_DIR/certsetup-flag ]; then tar -xzf /var/tmp/certsetup/certsetup.tgz --dir=$CRIBL_VOLUME_DIR/; touch $CRIBL_VOLUME_DIR/certsetup-flag; fi
  NODE_TLS_REJECT_UNAUTHORIZED: "0"
This defines an environment variable, CRIBL_BEFORE_START_CMD_1, containing the following script (reformatted for readability):
if ! [ -e $CRIBL_VOLUME_DIR/certsetup-flag ]; then
  tar -xzf /var/tmp/certsetup/certsetup.tgz --dir=$CRIBL_VOLUME_DIR/;
  touch $CRIBL_VOLUME_DIR/certsetup-flag;
fi
Since the script would be executed every time a pod restarts, and your config will evolve over time, you really want the tarball extraction to happen only once. That’s why the script checks for a file called certsetup-flag – if it doesn’t already exist, it will execute the tarball extraction and then touch that flag file, ensuring that it won’t run the extraction again.
The tricky part about this is that depending on what other options you specify in the chart deployment, there may already be CRIBL_BEFORE_START_CMD_1 set, so I recommend that you try this:
Set everything but this env var.
Run
helm install --dry-run --debug cribl/logstream-leader -f.Look at the manifest file that command generates, to see what environment variables are already set.
That’s really it. If you run: helm install cribl/logstream-leader -f -n , the chart will deploy a leader in the namespace using the config specified in the file.
The Helm charts provide a great deal of flexibility for implementing whatever scenario you need. You can find them on GitHub – try them on your own Kubernetes cluster!
The fastest way to get started with Cribl LogStream is to sign-up at Cribl.Cloud. You can process up to 1 TB of throughput per day at no cost. Sign-up and start using LogStream within a few minutes.