
The time has come,’ the Admin said,
to speak of many things:
Of Cribl – WEF – and scaling WEC—
Of Windows Logs – and things.
Windows logs are critical to a smoothly running Technology Organization, with Cribl Stream, the Data engine for IT and Security, scaling to meet your Windows logging needs is easier than ever. With Stream, you can use a load balancer, and with some math to scale the number of workers to collect the amount of data you expect, you can use workers to collect Windows logs from a large number of endpoints. Endpoint logs are the lifeblood of observability in an incident response program. With Cribl Stream, it is possible to use workers as a Windows Event Collector (WEC) using the Windows Event Forwarding Source. Using Cribl Stream as your Windows Event Collectors, you can simplify your WEC infrastructure by sending directly to your observability pipeline and taking immediate advantage of our capabilities to route, shape, collect, and transform your Windows data directly in our web interface. In this blog, we will walk through how to set up multiple workers behind a network load balancer in AWS and send Windows logs to Cribl Stream.
There are two options when configuring a WEF source: mTLS or Kerberos. Both will work behind a load balancer. First, we will address the issues around scaling.
Scaling
From an endpoint perspective, we saw ~1TB per 10,000 workstations based on a real customer environment. This was while collecting from 3 channels: Security, System, and Application. Ideally, we will create a worker group with some fault tolerance, but that does not offer complete HA. For this example, we will assume that the data will go to two destinations, an s3 bucket (in full fidelity) and an analytics tool (the data converted from XML to JSON, with null values removed, resulting in a 40% reduction). Using these numbers, we get a total of 2.6TB of thruput. Using an x86-based processor at 3GHz, we will need 7 worker processes to meet processing requirements. The preferred way is to create a worker group with 3 machines, each containing at least 6 CPUs and 12GB of memory. (If you want to do aggregations and/or lookups on the log data, consider 24GB of memory instead of 12GB). With a minimum of 6 CPUs per worker, there will be a level of fault tolerance to allow one worker to experience issues while not impacting the ability to collect endpoint logs and allowing space for growth without rearchitecting the worker group.
Worker Creation
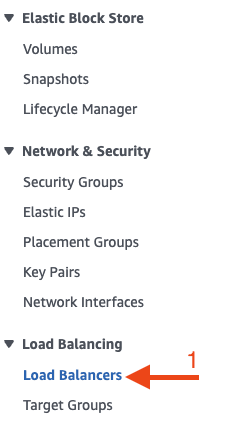
For this example, we will be building out the environment in AWS. To meet throughput requirements and provide fault tolerance, we will need 5 t2.xl (or 3 t2.2xl) EC2 instances. To save time, you can use the bootstrap script from the Cribl UI to add the workers to your worker group as they are created. To do this, in Stream, click Manage, then Workers.

Next, click Add/Update Worker Node, then add.

This modal will appear. If you have created a worker group specifically for WEF, select that group in the Group drop-down. Then click copy script.

In the EC2 instance creation: name the instance something you will remember. In this example, it will be named Support-WEF-LB.
Select the AMI you wish to use. In this example, Ubuntu will be selected. (No screenshot shown).
Next, under user data, type ‘#!/bin/bash‘, then paste the script you copied from the Cribl UI.

Under the Summary, in the box for ‘Number of instances’, enter 5. Then click ‘Launch instance’.

The time has come to choose your authentication type. For authentication with mTLS, keep reading. For Kerberos, please skip to the Kerberos Section. Please keep in mind that as of the writing of this blog post (version 4.2.1), load-balanced WEF using Kerberos is only supported on-prem or hybrid workers.
Before choosing the mTLS route, (at the time of this writing, version 4.5.1), it is a requirement that the CA that signs the auto-enrollment certificates for the endpoints is also the same CA that signed the certificate for the Stream source. If your environment has multiple Intermediate CAs that sign certificates or have multiple and/or different CAs for servers and workstations, Kerberos will be an authentication that needs to be used.
mTLS
TL;DR
Pre-requisite: Certificate auto-enrollment setup and configured
Setup Load balancer
Create DNS entry for Load Balancer
Create a CSR for the FQDN of the Load Balancer
Sign the CSR
Configure the Cribl WEF source
Configure Windows GPO
Load Balancer Creation
In AWS, in the EC2 Service, create a new load balancer.

Select the scheme (internal or internet-facing) appropriate for your setup, set the listening port to 5986, Select the proper VPC and subnet, and give the NLB a static IP. Please write down the IP. It will be needed when we create a DNS entry.
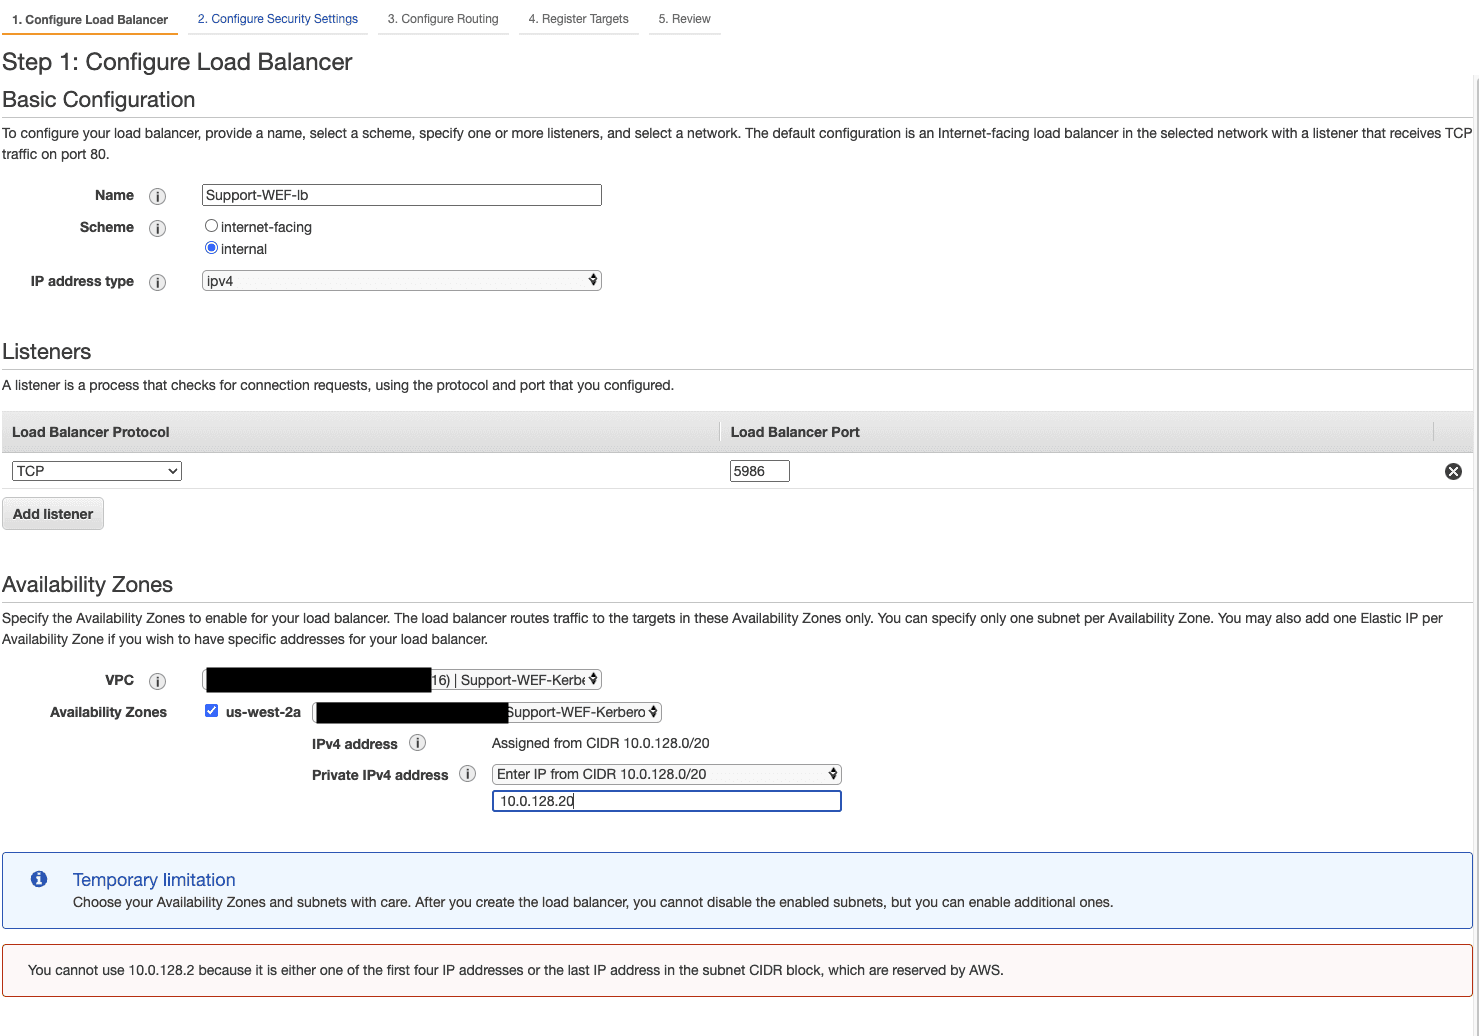
In step 3 of the NLB creation, create a new target group with the target type ‘Instance’ and set the port to 5986.

In Step 4, select the instances you created earlier in this process.

Click Review. Then, create if all the settings are correct.
Now that the NLB has been created. Please create a DNS entry for the IP of the load balancer. For this example, we will be using the FQDN cribl-lb.weftest.local
Create Certificate Signing Request
For this example, the CSR will be created on a Linux box. In this example, the CSR will be created on one of the workers, but the CSR can be created somewhere else if preferred.
Use openssl to create a CSR.

openssl req -new -newkey rsa:2048 -nodes -keyout cribl-lb.weftest.local.key -out cribl-lb.wef-test.local.csr
Be sure to set the Common Name (CN) to: cribl-lb.weftest.local

Copy the CSR to the desktop of a user on the Active Directory Certificate Authority Server that has permission to create a certificate.
Now, we need to make sure that there is a certificate template.
In the server manager application, click Tools, then Certificate Authority.

Select your CA, right-click on Certificate Templates, and then click Manage.

Right-click on Computer, then click Duplicate Template.

Select the Subject Name tab, then select ‘Supply in Request’

Select the General tab, name the template Computer-selfSigned, and click OK.

Open a Powershell prompt and run the following command: certreq -submit -attrib "CertificateTemplate:Computer-selfSigned" .\Desktop\cribl-lb.wef-test.local.csr --force

Select the CA that is also used for auto-enrollment and click OK (Remember the CA you used. It will be needed later):

Make a note of the RequestId:

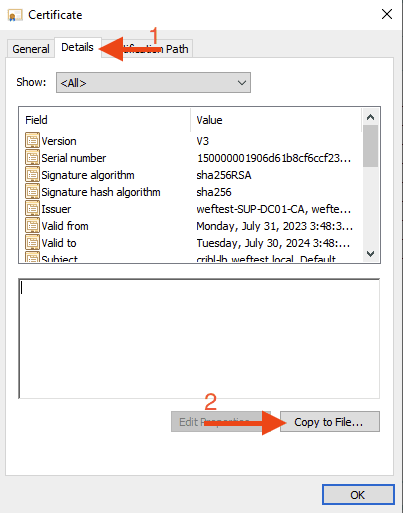
Back in the Certificate Authority window, click Issued Certificates, Right click on the RequestId of the created certificate, then click Open.

Click details, then Copy to File.
Start walking through the Certificate output wizard, select Base-64 as the format to export the certificate, and save it to a location that is easy to remember.

Get the thumbprint of the CA certificate used to sign the cert: Get-ChildItem -Path Cert:\LocalMachine\My
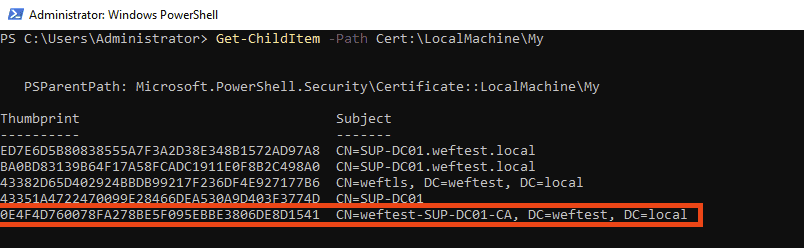
For this cert, the thumbprint is: 0E4F4D760078FA278BE5F095EBBE3806DE8D1541 (Keep this thumbprint handy it will be needed later.)
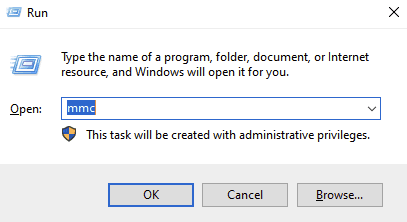
Next, we have to export the CA. To do this, open Run, type mmc, then click OK.
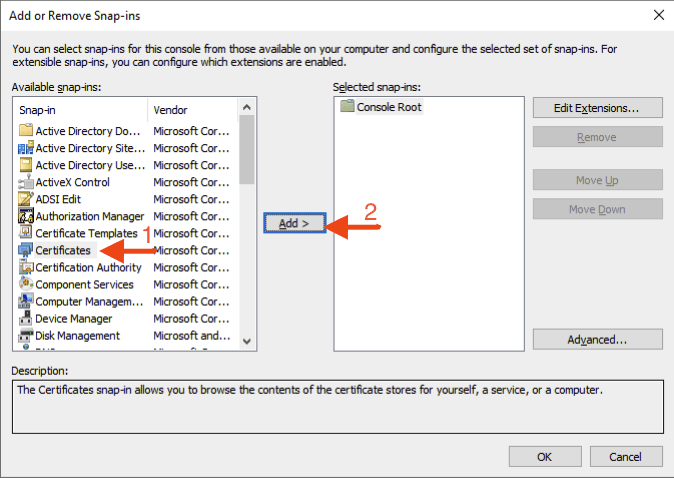
Click File, then Add/Remove Snap-in.

Next, select Certificates and click Add.
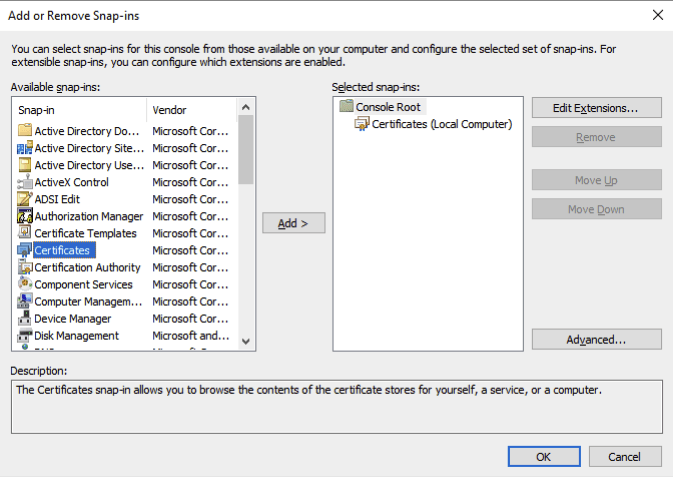
Select Computer Account and click Next.

Your window will now look like this below. Click Next.
Under Certificates (Local Computer) > Personal > Certificates. Open the CA certificate, click the Details tab, then click Copy to file.

Following the same process, the certificate as above to export this certificate as a base64-encoded format and save it to a memorable place.
Next, create the WEF source. Name the source, then click Create.

Name the certificate. Using a name like the FQDN can help. Then drag and drop the cert for cribl-lb.weftest.local to the certificate field (labeled 1), and paste the Private Key into the Private Key field (labeled 2) (This can be found on the machine where the CSR was created. It will be called cribl-lb.weftest.local.key, for this example), drag and drop the CA cert to the certificate field (labeled 3). If you use an intermediate CA, include the entire Root CA Chain. Click Save.

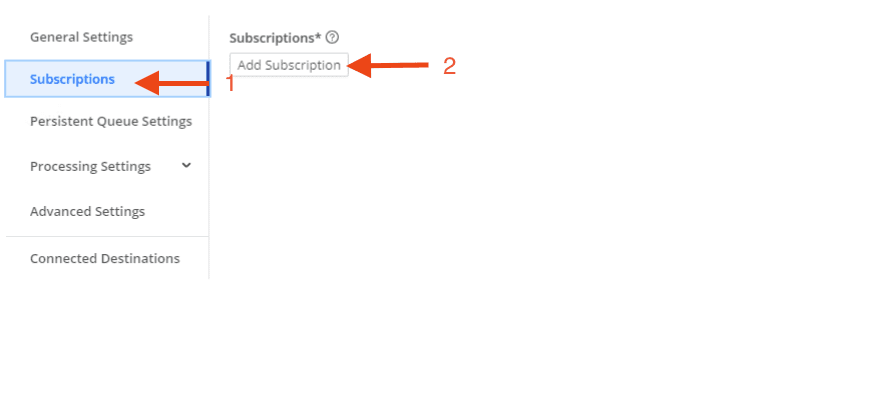
Next, click Subscriptions, then Add Subscriptions.
Configure your Subscription to match what is shown below:
Important: Additional Settings
Finally, there are some additional settings that need to be tweaked in order to ensure the source works smoothly.
In your WEF source, click Advanced Settings.
The Keep-alive timeout must be set higher than the smallest subscription Batch timeout
Save your changes, then commit and deploy the change to the worker group.
On your LB, the idle timeouts need to be greater than the largest subscription batch timeout.
Create GPO Entries to Enable Windows Event Forwarding
Lastly, create the GPO entries to enable Windows Event forwarding for machines on your network.
Open the Group Policy Editor tool (gpmc.msc) and edit the default Domain Policy (the policy you wish to edit may differ in your environment).
Navigate to Computer Configuration > Policies > Administrative Templates > Windows Components > Event Log Service. Double-click Security, then in the Settings pane, select Configure log access.

In the resulting modal, under Options > Log Access, enter the following Log Access configuration:
O:BAG:SYD:(A;;0xf0007;;;SY)(A;;0x7;;;BA)(A;;0x1;;;BO)(A;;0x1;;;SO)(A;;0x1;;;S-1-5-32-573)(A;;0x1;;;S-1-5-20)
Navigate to Computer Configuration > Policies > Administrative Templates > Windows Components. Select Event Forwarding to open the Group Policy Editor.

For this example, the subscription manager is:
Server=http://cribl-lb.weftest.local:5986/wsman/SubscriptionManager/WEC,Refresh=60, ,IssuerCA=<CA_thumbprint>
The CA thumbprint is the thumbprint we saved earlier: 0E4F4D760078FA278BE5F095EBBE3806DE8D1541
GPO updates periodically on its own. If you would like to accelerate the process, from a command prompt on a computer affected by the gpo change, you can run gpupdate /force.
You should now be up and running with Windows Event Forwarding running through a load balancer.
Kerberos
TL;DR
Setup Load balancer
Create DNS entry for Load Balancer.
Create a Service Account on AD and set the password to never expire. If password expiration is set, cutting a new keytab at each password reset is required.
Using the ktpass command, generate a keytab to map the Service account to an SPN that matches the FQDN of the Load-Balancer.
Install krb5-user on each worker. (on RedHat krb5-libs and krb5-workstation)
Place keytab in the same location on each Worker.
Configure the Cribl WEF source.
Configure Windows GPO.
Load Balancer Creation
In AWS, in the EC2 Service, create a new load balancer.


Select the scheme (internal or internet-facing) appropriate for your setup, set the listening port to 5985, Select the proper VPC and subnet, and give the NLB a static IP. Please write down the IP. It will be needed when we create a DNS entry.

In step 3 of the NLB creation, create a new target group with the target type ‘Instance’ and set the port to 5985.

In Step 4, select the instances you created earlier in this process.

Click Review. Then, create if all the settings are correct.
Now that the NLB has been created. Please create a DNS entry for the IP of the load balancer. For this example, we will be using the FQDN cribl-lb.weftest.local
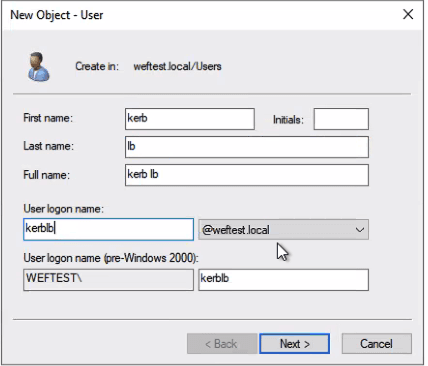
Create a Service Account in AD
Inside Active Directory User and Computers, create a new user. For this example, the user will be named `kerblb`
Set the password not to expire. If you want to have the password expire, you will need to cut a new keytab file every time you reset a password and upload it to your workers that are supporting WEF.

In the account tab, under account options, check the boxes next to ‘This account supports Kerberos AES 128 bit encryption’ and ‘This account supports Kerberos AES 256 bit encryption’

Next, from your current user’s root user directory, run the ktpass command to create a keytab file. The Service Principal Name of this key tab must match the FQDN of the load balancer.

ktpass /princ http http/cribl-lb.weftest.local@WEFTEST.LOCAL /pass <password for service account> /mapuser WEFTEST\kerblb /crypto AES256-SHA1 /ptype KRB5_NT_PRINCIPAL /out cribl-lb.weftest.local.keytab
Generic format of ktpass command:
ktpass /princ http/<fqdn-of-loadbalancer>@<AD-domain> /pass <password for service account> /mapuser <domain>\<user> /crypto AES256-SHA1 /ptype KRB5_NT_PRINCIPAL /out <filename>.keytab
The output from the cmd prompt will look like this:

If the command is successful, you will also notice the username for ‘kerblb’ will update to the SPN: http/cribl-lb.weftest.local@WEFTEST.LOCAL

Next, create a folder cribl-keytab in /opt on each worker node. Then copy the keytab file you created to /opt/cribl-keytab on each worker.
Before creating your WEF source in Cribl, krb5-user must be installed on each worker (on RedHat, krb5-libs, and krb5-workstation are required) in the worker group used for WEF collection. Then edit the /etc/krb5.conf file with information specific to your environment; remember, for this example, weftest.local is our AD domain and sup-dc01.weftest.local is our kdc and admin server.
[libdefaults]

default_realm = weftest.local

[realms]

weftest.local = {

kdc = sup-dc01-weftest.local

admin_server = sup-dc01.weftest.local

}
Now you can create a WEF source in Cribl. The configuration will look like this.

The source’s Service Principal Name (SPN) must match the SPN of the keytab that was created. The keytab location must be the full path to the keytab on the workers.
Create a subscription for the source.

IMPORTANT: Please note that the Batch Timeout must be set to 90
Important: Additional Settings
Finally, there are some additional settings that need to be tweaked in order to ensure the source works smoothly.
In your WEF, source click Advanced Settings.
The Keep-alive timeout must be set higher than the smallest subscription Batch timeout
Save your changes, then commit and deploy the change to the worker group.
On your LB, the idle timeouts need to be greater the largest subscription batch timeout.
Create GPO Entries to Enable Windows Event Forwarding
Lastly, create the GPO entries to enable Windows Event forwarding for machines on your network.
Open the Group Policy Editor tool (gpmc.msc) and edit the default Domain Policy (the policy you wish to edit may differ in your environment).
Navigate to Computer Configuration > Policies > Administrative Templates > Windows Components > Event Log Service. Double-click Security, then in the Settings pane, select Configure log access.

In the resulting modal, under Options > Log Access, enter the following Log Access configuration:
O:BAG:SYD:(A;;0xf0007;;;SY)(A;;0x7;;;BA)(A;;0x1;;;BO)(A;;0x1;;;SO)(A;;0x1;;;S-1-5-32-573)(A;;0x1;;;S-1-5-20)
Navigate to Computer Configuration > Policies > Administrative Templates > Windows Components. Select Event Forwarding to open the Group Policy Editor.

For this example, the subscription manager is:
Server=http://cribl-lb.weftest. local:5985/wsman/SubscriptionManager/WEC,Refresh=60
GPO updates periodically on its own. If you want to accelerate the process, from a command prompt on a computer affected by the gpo change, you can run gpupdate /force.
You should now be up and running with Windows Event Forwarding running through a load balancer.
If, after running all these commands, you see an error like this:

It means that krb5-user is not installed/configured on the workers.
Important: Additional Settings
Finally, there are some additional settings that need to be tweaked in order to ensure the source works smoothly.
In your WEF source, click Advanced Settings.
The Keep-alive timeout must be set higher than the smallest subscription Batch timeout
Save your changes, then commit and deploy the change to the worker group.
On your LB, the idle timeouts need to be greater than the largest subscription batch timeout.
SPECIAL THANKS:
Special thanks to John Pondrom and Kyle McCririe, for their help setting up and tearing down the lab with me. In addition to validating settings and configurations. without their help, this blog would not be what it is.