1. Getting Started
Customers like New York Presbyterian and AECOM use Cribl to optimize what they’re sending to their SIEM. This helps them to manage costs, enhance performance, easily onboard new data sources and tools, and help analysts focus on detection content and investigations versus tool management.
To do this for yourself, you can deploy several Cribl Stream technical use cases:
- Routing: Customers like Volkswagen and University of Kansas Health System are replacing inadequate log collection and transportation tooling to route data to multiple SIEMs during evaluation and migration periods and you can too! This gives CISOs a level of comfort that they have parity in the old and new SIEM or UEBA tools when it comes to data collection and detection content–with the added bonus of accelerated data onboarding, and normalization and enrichment in the stream. Again, this saves time for analysts and allows them to focus on investigations and protecting the business versus data collection and preparation.
- Optimization: Pull out repetitive or unnecessary fields–this can be from 15% on Palo Alto logs to 70% on Windows logs. And reduction isn’t about taking out context–it’s taking out repetitive or meaningless fields, or flattening JSON to make room for more of the critical sources and fields you need. This lets you keep pace with data growth and make informed decisions–while keeping your license and storage costs flat. Reduction not only saves storage space, it also optimizes analytics system performance which reduces return time on search queries and accelerates analyst investigations.
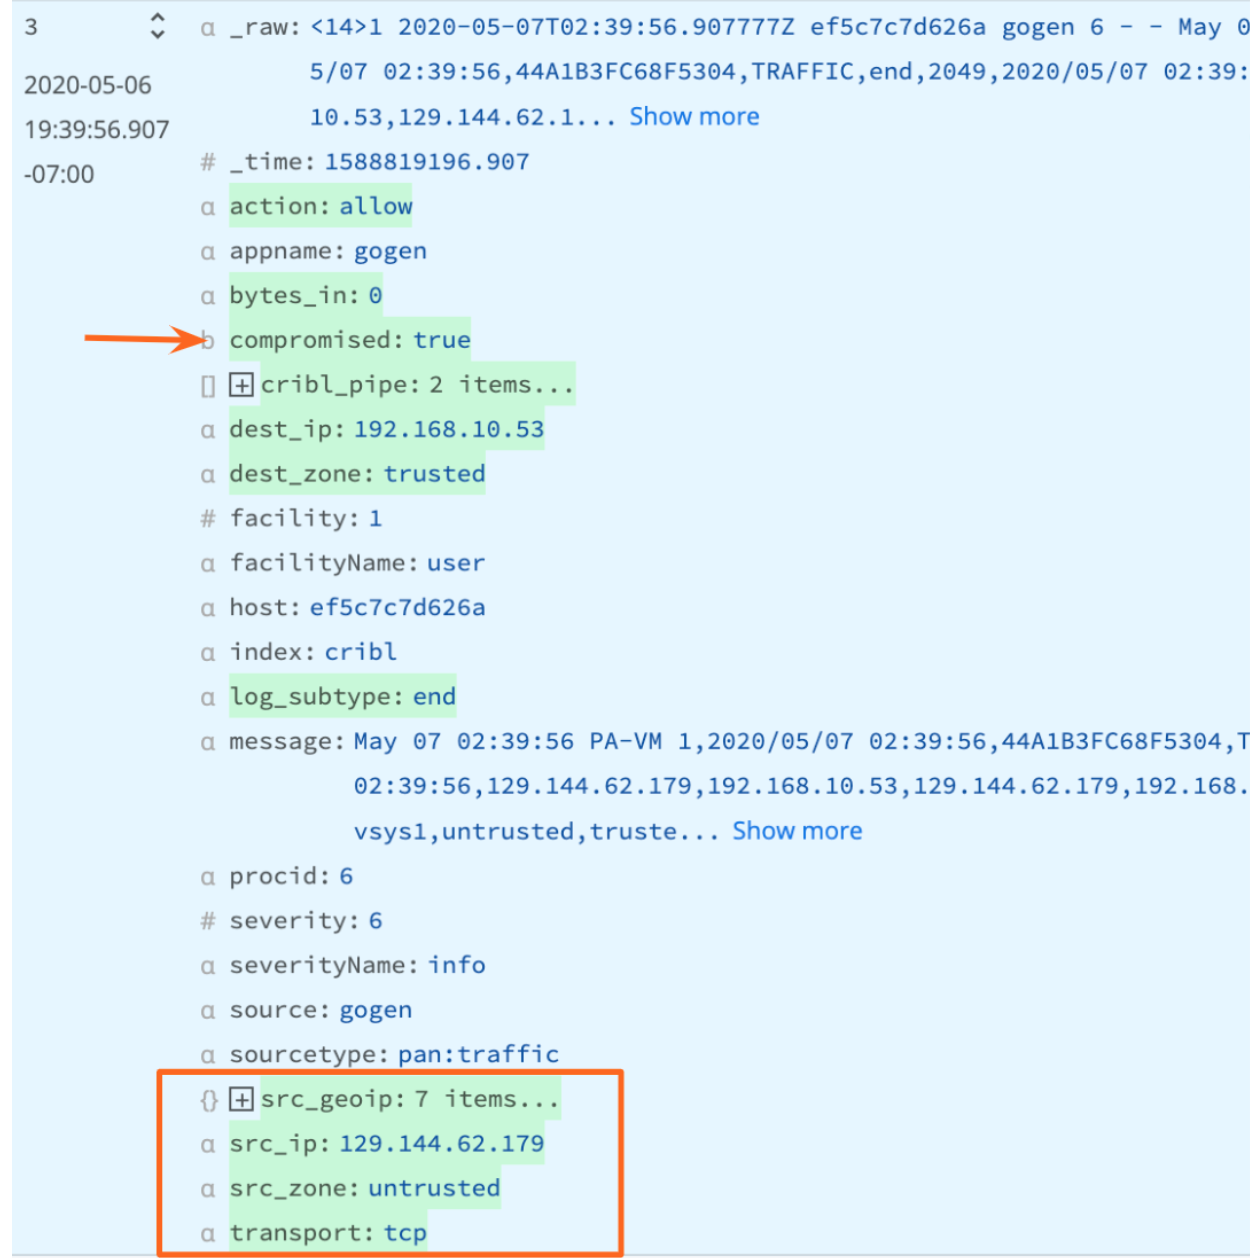
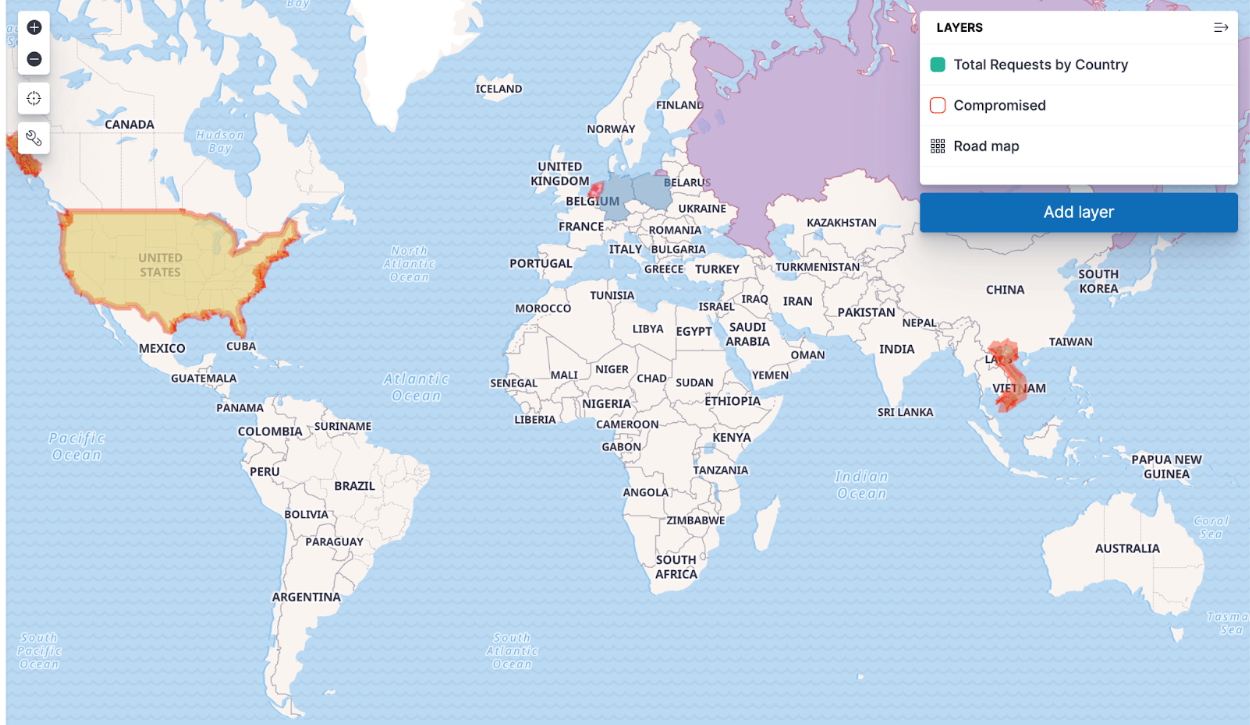
- Enrichment: Enrich your data with threat intelligence, DNS, user IDs, CMBD, and more in the stream, and before indexing. This saves your analysts time and delivers “better”, more actionable data. And because you’ve enriched your data with DNS along the way, you can drop those fields before indexing while still getting the context you need; or you can send the enriched data to low cost storage (like S3) for later review. You can maintain and recall the full asset information at the time the event happened using Cribl’s Replay feature. This is critical for zero day investigations and when you need to search back over months and years of data.
- Normalization: Clean, tag, and transform different fields from different data sources using different naming conventions by implementing a consistent naming rubric before indexing. This allows for easier searching and correlation once data reaches the SIEM, UEBA, or storage destination.
Before You Begin:
- Review the following Cribl Sandboxes:
- You’ll use Cribl Cloud https://docs.cribl.io/stream/deploy-cloud for your POC so you might want to note the following:
- Make sure you choose the correct region, either US West (Oregon) or US East (Virginia), to ensure the Cribl Stream workers are closest to the point of egress to lower costs. (It’s also wicked hard to change it later.)
- Cribl.Cloud Free/ Standard does not include SSO.
- Cribl.Cloud Free/ Standard does not support hybrid deployments. If you need to test on-premises workers, please request an Enterprise trial using the Chatbot below.
- Cribl Packs are out of the box solutions for given technologies. You can combine Cribl.Cloud with sample data from a Pack. This combination may be enough for you to prove Cribl Stream will work to help you optimize your SIEM. (See https://docs.cribl.io/stream/packs/#nav.) The following Packs might be helpful:
- Palo Alto Networks
- CrowdStrike Pack
- Syslog Preprocessing
- Exabeam
- Cisco ASA
- Splunk
- Microsoft Windows Events
- Microsoft Office Activity
- Cribl-AWS-Cloudtrail-logs
- AWS VPC Flow for Security Teams
- Cribl-Carbon-Black
- Cribl-Fortinet-Fortigate-Firewall
- Imperva Security Pack
- Auth0
What You’ll Achieve:
- You’ll create 2-3 technical use cases to support your business case.
- A business case is the business outcome you’re trying to achieve. The technical use cases you create will illustrate how Cribl features will work in your environment. Typically, you will need multiple technical use cases to achieve your business case.
- You’ll connect 2-3 sources to 2-3 destinations.
- Show that in your environment, with your data sources, you can:
- Optimize data going to SIEM to include more sources while keeping license and infrastructure spend flat
- Optimize SIEM performance and reduce management overhead SIEM
- Reduce time spent by analysts enriching, normalizing, and de-duping data and alerts before beginning investigations
- Reduce time spent onboarding new data sources
2. Select Your Data Sources
- For ease of setup, we recommend you choose from the list of sources supported by the Packs listed in Before You Begin. For the full list of supported sources, see: https://docs.cribl.io/stream/sources/.
- Choose from supported formats and source types: JSON, Key-Value, CSV, Extended Log File Format, Common Log Format, and many more out of the box options. See: our library for the full list.
Spec out each source:
- What’s the volume of that data source per day? (Find in Splunk | Find in Elastic)
- Is it a cloud source or an on-prem source?
- Do you need TLS, Certificates, or Keys to connect to the sources?
- What protocols are supported by both the sources and by Cribl Stream?
- During your QuickStart, do you have access to the source from production, from a test environment, or not at all?
For your QuickStart, we recommend no more than 3 Sources
Cribl Worker Node Host Name / IPs / Load Balancer
Configuration Notes, TLS, Certificates
3. Select Your Destinations
Where does your data need to go to:
- The list of supported destinations: https://docs.cribl.io/stream/destinations
- The category of vendors Cribl works with: SIEM, UEBA, EDR, XDR, Search Engine, Object Store, and many more options: https://cribl.io/integrations/
- What volume of data do you expect to send to that destination per day?
- Is it a cloud or on-prem destination?
- Do you need TLS, Certificates, or Keys to connect to the destination?
- What protocols are supported by both the destination and by Cribl Stream?
- During your QuickStart, will you be sending data to production environments, test environments, or not at all?
For your QuickStart, we recommend no more than 3 Destinations
Destination Sending method
Destination Host Name / IPs / Load Balancers
Configuration Notes, TLS, Certificates
4. Prepare Your QuickStart Environment
- Regardless of where your data resides, the fastest way to prove success with Cribl is with Cribl Cloud. With Cribl Cloud, there is no infrastructure to spin up and manage and no hardware to deal with. You can get straight to your observability pipeline planning, giving you greater control and choice over your data in our SOC 2-compliant Cribl Cloud.
- Cribl Cloud supports up to 1TB/day–the perfect capacity for a Cribl QuickStart. Once the evaluation is done and you are ready for production, you can increase the volume and allocate more capacity (or hardware, should you opt for a hybrid or on-prem deployment).
5. Launch the QuickStart by Registering for Your Free Cribl.Cloud Instance
- Once you’ve registered on the portal, sign into Cribl.Cloud.
- Select the Organization you want to work with.
- From the portal page, select Manage Stream.
- The Cribl Stream interface will open in a new tab or window – and you’re ready to go!
- Notice the Cribl.Cloud link in the upper left of the Cribl.Cloud home page, under the Welcome message. Click this link at any time to reopen the Cribl.Cloud portal page and all its resources.
- Follow the getting started Cribl cloud-hosted instance documentation
https://docs.cribl.io/stream/deploy-cloud#getting-started
- Examine the available out-of-the-box cloud ports
https://docs.cribl.io/stream/deploy-cloud/#ports-certs
6. Configure Cribl Sources and Destinations
As part of the exercise to prove your use case, we recommend you limit your evaluation to 3 sources and 3 destinations (or fewer).
Note: for an alternative to setting up Sources and Destinations you can use Cribl packs and sample data for your evaluation. Look at steps 8 and 9 to use Packs and the included Sample data.
- Configure Destinations first. Configure destinations one at a time. For each specified destination:
- Configure the destinations in Cribl https://docs.cribl.io/stream/destinations (For Distributed Deployment, remember to click the Commit first, then Deploy.) Test that Cribl Stream is sending data to your destination
- After configuring the Cribl destination, reopen its config modal, select the Test tab, and click Run Test. Look for Success in the Test Results.
- At the destination itself (Splunk UI, ElasticSearch, Exabeam, etc.), validate that the sample events sent through Cribl have arrived (for example, in Splunk search you can run ‘index=main cribl_test=”*”’)
- Configure Sources. Configure sources one at a time. For each specified source:
- Configure the sources in Cribl https://docs.cribl.io/stream/sources (For Distributed Deployment, remember to click Commit / Deploy button after you configure each Source to ensure it’s ready to use in your pipeline.)
- Note: If you need to test a hybrid environment–you will need to request an Enterprise trial entitlement. Use the chatbot below to make your request. Also note: there is not an automated way to transfer configurations across Free instances and Enterprise trials. Once you’re squared away with an Enterprise entitlement you can test hybrid deployments.
- Hybrid Workers (meaning, Workers that you deploy on-premises, or in cloud instances that you yourself manage) must be assigned to a different Worker Group than the Cribl-managed default Group – which can contain its own Workers:
- On all Workers’ hosts, port 4200 must be open for management by the Leader.
- On all Workers’ hosts, firewalls must allow outbound communication on port 443 to the Cribl.Cloud Leader, and on port 443 to https://cdn.cribl.io.
- If this traffic must go through a proxy, see System Proxy Configuration for configuration details.
- Note that you are responsible for data encryption and other security measures on Worker instances that you manage.
- See the available Source ports under Available Ports and TLS Configurations here.
- For some Sources, you’ll see example configurations to send data to Cribl Worker nodes (on-prem and Cloud) at the bottom. See here for an example using a Splunk Forwarder.
- Test that Cribl Stream is receiving data from your source.
- After configuring the Cribl Source and configuring the source itself (Syslog, Splunk Universal Forwarder, Elastic Beats, etc.), go to the Live Data tab and ensure that your results are coming into Cribl.
- In some cases, you may want to change the time period for collecting data. Go to the Live Data tab, click Stop, then change Capture Time to 600. Click Start. This will give you more time to test sending data into Cribl.
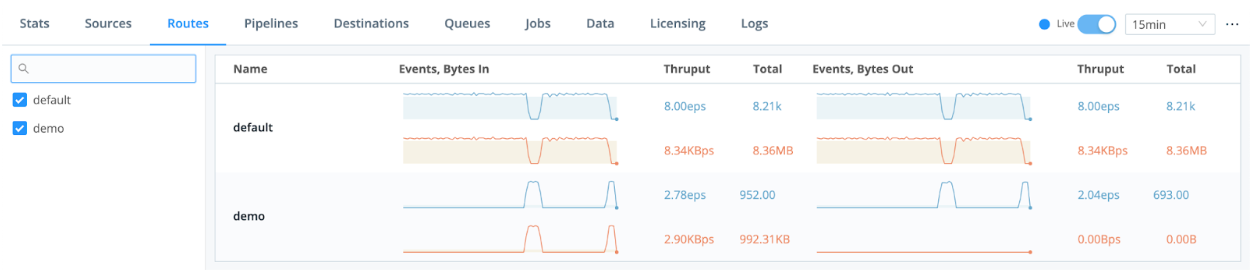
7. Configure Cribl QuickConnect or Routes
Another way you can get started quickly with Cribl is with QuickConnect or Routes.
Cribl QuickConnect lets you visually connect Cribl Stream Sources to Destinations using a simple drag-and-drop interface. If all you need are independent connections that link parallel Source/Destination pairs, Cribl Stream’s QuickConnect rapid visual configuration tool is a useful alternative to configuring Routes.
For maximum control, you can use Routes to filter, clone, and cascade incoming data across a related set of Pipelines and Destinations. If you simply need to get data flowing fast, use QuickConnect.
- Use QuickConnect to route your Source to your Destination or Devnull.
- Configure QuickConnect.
- Initially, you may want to use the passthrough pipeline. This pipeline does not manipulate any data.
- Test your end-to-end connectivity by selecting Source -> Cribl Source -> Cribl QuickConnect -> Cribl Destination -> Destination.
- Alternatively, use Routes to route your Source to a Destination or Devnull.
- Configure Routes.
- Initially, you may want to use the passthrough pipeline. This pipeline does not manipulate any data.
- Test your end-to-end connectivity by selecting Source -> Cribl Source -> Cribl Routes -> Cribl Destination -> Destination.
8. Capture Sample Files
Capture Sample Data set for each Sourcetype.
Capturing a sample data set allows Cribl Pipeline and Packs to validate the logic against your sample data, and show a before and after view to prove that your Reduction and Enrichment use cases are working.
- At the Source, go to Live Data -> Save a sample file (lower left corner).
- Rename the file and add the Sourcetype as part of the name.
- Select Remove the Expiration in 24 hours (that will make sure you have the sample file forever).
- Click Save.
As an alternative to capturing sample data at the Source, use QuickConnect to capture a sample dataset.
In the QuickConnect UI, the right Capture button captures a sample of data flowing through the Source.
- Click on Capture sample data.
- Rename the file and add the Sourcetype as part of the name.
- Select Remove the Expiration in 24 hours (that will make sure you have the sample file forever).
- Click Save. (For Distributed Deployment, remember to click Commit / Deploy.)
As an alternative to capturing sample data at the Source, use Routes to capture a sample dataset:
- At the Route, click a Route’s Options (…) menu.
- Click Capture sample data.
- Rename the file and add the Sourcetype as part of the name.
- Remove Expiration in 24 hours (that will make sure you have the sample file forever).
- Click Save.
9. Configure Cribl Pipelines and Packs
Pipelines are the main way Cribl Stream can enable users to achieve the use cases. A Pipeline contains a series of Functions that pre-process your data. Example Functions include Parser, Rename, Eval, Drop, Lookup, Aggregation, and many more.
Packs enable Cribl Stream administrators to pack up and share Pipelines and Functions across organizations, and include sample data for testing.
To optimize your SIEM, consdier the following Packs, depending on your environment:
- Palo Alto Networks
- CrowdStrike
- Syslog
- Exabeam
- Cisco ASA
- Splunk
- Windows Events
- AWS Cloudtrail
- AWS VPC Flow
- CarbonBlack
- Fortinet
- Imperva
- Auth0
- Select any relevant Packs.
- Choose up to 3 packs for your data sources and add each Pack. Click on the Pack listing in the Dispensary or consult the internal README.md for the benefits each pack provides.
- Use Pack sample data
- Take any necessary additional steps to configure the Pack.
Note that “Built by Cribl” Packs are supported via Cribl Community Slack.
Community-contributed Packs are best effort support. All Packs are validated prior to being publicly listed.
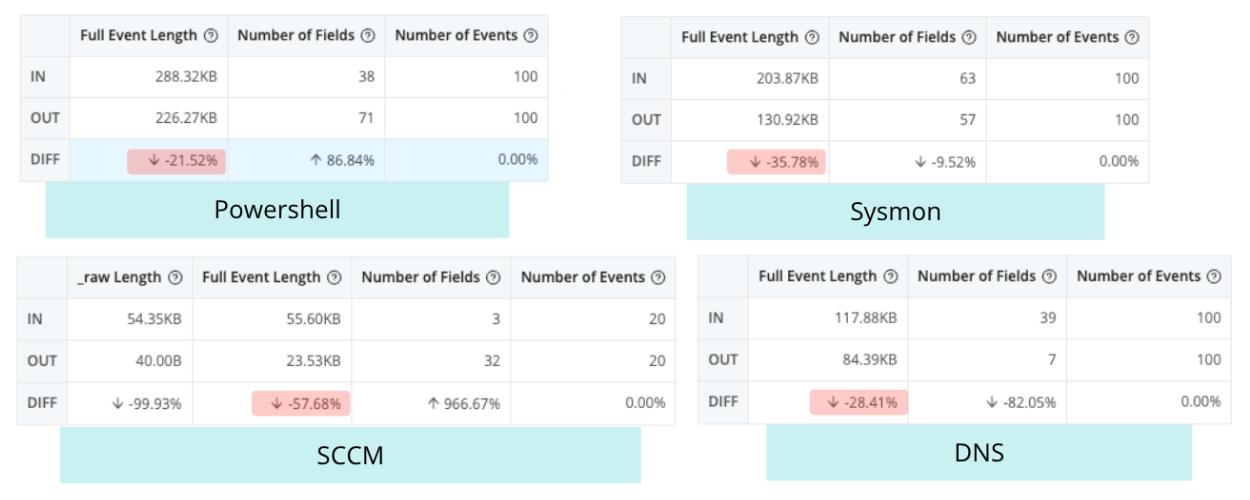
- Take a look at the Pack’s Pipelines, each of which has a corresponding sample file.
- With a Pipeline selected, open the sample file in Simple Preview mode.
- To see the before and after for that dataset, click Sample Data In / Sample Data Out.
- To view information about volume reduction, event reduction, and more, click Basic Statistics.
- Modify your QuickConnect or Route to include the Pack you want to add to Cribl.Cloud.
- As an alternative to Packs and the out-of-the-box Pipelines that are part of the Packs, you can create your own Pipeline. Pipelines are Cribl’s main way to manipulate events.xamine Cribl Tips and Tricks for additional examples and best practices. Look for all the sections that have Try This at Home for Pipeline examples https://docs.cribl.io/stream/usecase-lookups-regex/#try-this-at-home
- 1) Download the Cribl Knowledge Learning Pack from the Pack Dispensary for more cool Pipeline samples.
2) Examine best practice links (for example, the Syslog best practices.
- Add a new pipeline, named after the dataset it will be used to process.
- Use the sample dataset you captured as you built your Pipeline.
- Add or edit functions to reduce, enrich, redact, aggregate, or shape your data as needed.Confirm the desired results in the Out view and basic statistics UI.
10. Review Your Results
- Repeat any of the above steps until the Source, QuickConnect, Routes, Packs, Pipelines, and Destinations are supporting your business case.
- Determine if you achieved your testing goals for this dataset, and note your results.
- Finally, summarize your findings. Common value our customers see include:
- Cost savings (infrastructure, license, cloud egress).
- Time savings (data onboarding, normalization, enrichment, faster analytics tool performance).
- Future-proofing (enabling choice and mitigating vendor-lock).
Please note: If you are working with existing data source being sent to your downstream systems and you do nothing to the output from Cribl Stream, it has a may break any existing dependencies on the original format of the data. Be sure to consult this Best Practices blog or the users and owners of your downstream systems before committing any data source to a destination from within Cribl Stream.
Technical Use Cases Tested:
For additional examples, see:
When you’re convinced that Stream is right for you, reach out to your Cribl team and we can work with you on advanced topics like architecture, sizing, pricing, and anything else you need to get started!
 Use Cases
 Route
Route Enrich
 Search
 Reduce
 Transform
 Store
Store Replay
 Collect
 Universal Receiver
 Redact
 Supercharge Security Insights
 Agent Consolidation
 Tackle Application Infrastructure Sprawl
 Reduce Log Volume
 Slash Storage Costs
 Accelerate Cloud Migration
 Avoid Vendor Lock-In
 AIOps Optimization


 Seamless integrations to power all your tools See all Integrations
 Stream
 Cribl.Cloud
 Edge
Edge Copilot
 Search
 Appscope
 Lake
Lake